So I am going to work on actually capturing my progress on here for this build.
Currently I have done:
Pep:
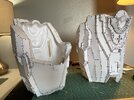
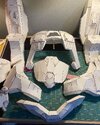
Chest piece - front
Chest piece - back (although I think I’m going to update some pieces)
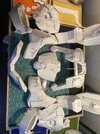
One boot
Currently working on other boot


I completed a test piece for fiberglass. Which is good because I saturated the **** out of one piece and it lost its structure and got all wonky. Less is more for the glass ya all

Electronics schematic (high level)
Helmet:

Body:

I’ll get more into the electronics once some of the components arrive. These are just hiiiiigh level overviews to help me identify pieces to purchase. And I’m probably missing things even at a high level lol.
Let’s talk about some things the I LOVE
WORKSPACE: I don’t like to pep in one single spot. This is a puzzle tabletop thing. Normies build puzzles on it, I use it for pep. It also has little drawers on the sides to hold my stuff, which is dope. Plus I can pick up the board and move my workspace from room to room. Definitely convenient

Tools:
By far my favorite part
Spring loaded snippers - super useful on the hand in small spaces
Circuit vinyl weeder - this thing looks like a dental tool. It pretty much is, and I use it to score the paper to fold it.
Thin nose glue gun - get into the tiny cracks wayyyyy easier.
If you have any suggestions for tools - let me know!

Currently I have done:
Pep:
Chest piece - front
Chest piece - back (although I think I’m going to update some pieces)
One boot
Currently working on other boot
I completed a test piece for fiberglass. Which is good because I saturated the **** out of one piece and it lost its structure and got all wonky. Less is more for the glass ya all
Electronics schematic (high level)
Helmet:
Body:
I’ll get more into the electronics once some of the components arrive. These are just hiiiiigh level overviews to help me identify pieces to purchase. And I’m probably missing things even at a high level lol.
Let’s talk about some things the I LOVE
WORKSPACE: I don’t like to pep in one single spot. This is a puzzle tabletop thing. Normies build puzzles on it, I use it for pep. It also has little drawers on the sides to hold my stuff, which is dope. Plus I can pick up the board and move my workspace from room to room. Definitely convenient
Tools:
By far my favorite part
Spring loaded snippers - super useful on the hand in small spaces
Circuit vinyl weeder - this thing looks like a dental tool. It pretty much is, and I use it to score the paper to fold it.
Thin nose glue gun - get into the tiny cracks wayyyyy easier.
If you have any suggestions for tools - let me know!
Attachments
Last edited: