Marty Falco
Member
This build technically started way back at the end of May 2020 when I first received my 3D printer. In my furious rush to finish this suit before Halloween, I've spent the better part of a day immersed in every corner of the 405th and was inspired to post a thread on this build. At the same time, I think it will make my deadline a little more concrete and help incentivize me to finish in time by announcing it to the world...
The basics:
My mission going into this project--create my multiplayer spartan from Halo 3 with as much game accuracy/realism as possible. This is why 3D printing was my only option. Having tried pepakura in the past, I felt there could be no substitute for those perfect angles, edges, small details, and SYMMETRY that could only be achieved by a 3d printer.
This led me to what I believe are the most comprehensive 3d models of Halo 3 armor out there. MoeSizzlac's files on thingiverse. The entire suit besides the helmet came from a combination of his full Mark VI master chief and the recon chest/shoulders variant.
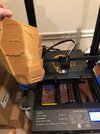
Entirely printed out of PLA. Using one of the cheapest printers on the market at $300 with the biggest build plate volume I could find. The Sunlu S8 with a 12x12 print bed and about 18 inches of vertical print space.
My recon helmet I started, no joke, 10 years ago, and was originally a pepakura project. File by Belakor. Applied way too much bondo back in 2010 so it has just been a big, heavy, bondo-y mess I didn't wanna tackle until now.
Every part I was able to print as one solid piece, save the Chest and COD front.
What's left to do over the next 5 days:
1) Finish the prints of resized left and right thigh sections
2) Rescale and print larger shoe pieces
3) Print TPU midsection pieces that are flexible
4) Finish print line and glue seam smoothing of chest piece (80% done)
5) Continue priming and sanding all other pieces (30% done)
6) Project foam inserts on all pieces for snug fitment
7) Undersuit work such as kneepads/eva foam combo to fill in space between shin/thigh gap, chest piece/shoulder piece gap, etc.
8) Give boots a quick black spray paint. Securely attach boot pieces (thinking shoe glue and Velcro)
9) Devise a way to attach the recon shoulder pieces to the biceps. They have very little contact surface so gotta get creative
10) Visor cut and install into helmet
11) PAAAAAAIIIIIIINNNNNTTTTTT which I know I'm going to be super tedious about and will take a lot longer than anticipated. Using a combination of spray paints and acrylic. Could use help deciding on a sealant. Unsure to go matte, semi-gloss, or gloss to achieve a metallic finish, in combination with weathering techniques.
12) Eat??? Sleep? Maybe? During my very busy upcoming week.
13) Find and win a costume contest here in my city?! The former probably being more difficult than the latter due to Covid... Classic Covid....
Alls I'm saying is, there are 24 hours in a day and I'm home everyday anyway due to the pandemic. Will be posting updates as I go further. Wish me luck.

Again huge shoutout to MoeSizzlac for designing this chest piece for me. I think I may be the only one who's printed and assembled it so far and it came out amazing. Printed to default size.

Shoulder pieces

Shoulder/bicep combo

Shins and boots. Just using a pair of old cheap hiking boots. Needs larger boot pieces printed.

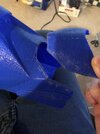
Original scale shin in gold. Except Z modified to 15 inches tall, about 8% increase. Found it to be too thick looking. Scaled blue to same height but 90% X and Y to make skinnier. Proportions to suit and body work better now.


Some parts but especially the chest have been fiberglassed, bondo'd, and Rondo'd (resin + bondo 1:1) in places to add strength where my prints were sometimes sub-par or too thin in areas. But particularly the chest so that I could guarantee my glue seams would not come apart.


And what's a spartan without a trusty H3 BR? Modified version of TheApropalypse's design of H2 anniversary BR. WIP
The basics:
My mission going into this project--create my multiplayer spartan from Halo 3 with as much game accuracy/realism as possible. This is why 3D printing was my only option. Having tried pepakura in the past, I felt there could be no substitute for those perfect angles, edges, small details, and SYMMETRY that could only be achieved by a 3d printer.
This led me to what I believe are the most comprehensive 3d models of Halo 3 armor out there. MoeSizzlac's files on thingiverse. The entire suit besides the helmet came from a combination of his full Mark VI master chief and the recon chest/shoulders variant.
Entirely printed out of PLA. Using one of the cheapest printers on the market at $300 with the biggest build plate volume I could find. The Sunlu S8 with a 12x12 print bed and about 18 inches of vertical print space.
My recon helmet I started, no joke, 10 years ago, and was originally a pepakura project. File by Belakor. Applied way too much bondo back in 2010 so it has just been a big, heavy, bondo-y mess I didn't wanna tackle until now.
Every part I was able to print as one solid piece, save the Chest and COD front.
What's left to do over the next 5 days:
1) Finish the prints of resized left and right thigh sections
2) Rescale and print larger shoe pieces
3) Print TPU midsection pieces that are flexible
4) Finish print line and glue seam smoothing of chest piece (80% done)
5) Continue priming and sanding all other pieces (30% done)
6) Project foam inserts on all pieces for snug fitment
7) Undersuit work such as kneepads/eva foam combo to fill in space between shin/thigh gap, chest piece/shoulder piece gap, etc.
8) Give boots a quick black spray paint. Securely attach boot pieces (thinking shoe glue and Velcro)
9) Devise a way to attach the recon shoulder pieces to the biceps. They have very little contact surface so gotta get creative
10) Visor cut and install into helmet
11) PAAAAAAIIIIIIINNNNNTTTTTT which I know I'm going to be super tedious about and will take a lot longer than anticipated. Using a combination of spray paints and acrylic. Could use help deciding on a sealant. Unsure to go matte, semi-gloss, or gloss to achieve a metallic finish, in combination with weathering techniques.
12) Eat??? Sleep? Maybe? During my very busy upcoming week.
13) Find and win a costume contest here in my city?! The former probably being more difficult than the latter due to Covid... Classic Covid....
Alls I'm saying is, there are 24 hours in a day and I'm home everyday anyway due to the pandemic. Will be posting updates as I go further. Wish me luck.
Again huge shoutout to MoeSizzlac for designing this chest piece for me. I think I may be the only one who's printed and assembled it so far and it came out amazing. Printed to default size.
Shoulder pieces
Shoulder/bicep combo
Shins and boots. Just using a pair of old cheap hiking boots. Needs larger boot pieces printed.
Original scale shin in gold. Except Z modified to 15 inches tall, about 8% increase. Found it to be too thick looking. Scaled blue to same height but 90% X and Y to make skinnier. Proportions to suit and body work better now.
Some parts but especially the chest have been fiberglassed, bondo'd, and Rondo'd (resin + bondo 1:1) in places to add strength where my prints were sometimes sub-par or too thin in areas. But particularly the chest so that I could guarantee my glue seams would not come apart.
And what's a spartan without a trusty H3 BR? Modified version of TheApropalypse's design of H2 anniversary BR. WIP