- Member DIN
- S5000
Introduction
Hello everyone, im incredibly excited to be a part of this community. My name is Doug and I go by StattingUP (Name change pending mod ). I am 25 and an avid cosplayer. Based out of Pennsylvania, I frequently attend NYCC and Philly Comicons. Dragoncon was the next destination but... well yeah thanks 2020.
I cant wait to grow my skills, meet/talk with members, and showcase the work that I am proud of. Hopefully I can help others with problems and learning experiences of my own while building my very first suit of Master Chief Armor.
I grew up with halo, its always been a part of my life. I met one of my now 14 year long best friends through halo. I knew that one day id make my own Master Chief costume. I knew I wanted to do it right though. I developed and researched as many skills as I could over the past 4 or 5 years that I've been cosplaying. After New York Comicon 2019 I knew it was time to make chief. Using this thread, Ill be updating my progress and communicating with you awesome people. Encouragement, constructive criticism, questions, and friendly conversation are all welcome!
Master Chief - Mark VI
Although I own a 3D printer, I chose to build Chief out of Foam. Specifically, Halo 4 - Mark VI armor. Halo 3 was actually my favorite halo, but the thicccccccness of the halo 4 chief armor made me choose it. The files that I used are actually from this very forum, The Armory. This is my very first foam armor build and first of this magnitude. It was daunting to say the least at first. Through on and off bursts of productivity, more so recently, I've managed to finish Boots, Shins, Knees, Butt guard, Forearms, Booster packs, Shoulders, and Biceps. I have the Thighs, Abs, Chest, Gloves, Helmet, and under suit to finish yet. I am 6'1 205lbs, athletic build for reference. After all the armor is complete I will be going back over to address any missing details or things I just want to adjust. This build is not 100% game accurate as ive added some of my own touches and judgement calls. Overall though, it leans heavily to match what was seen in the original. Below you'll find my current materials used and my current progress pieces.
Materials Used Thus far
SKS Props - HD Foam
Thin foam sheets from craft stores
Loctite 5 second super glue
Hot glue
Heat gun
Dremel and various other power tools
Box cutters and other pointy objects
Ender 3 Pro 3D Printer for Guns (Battle Rifle and Magnum)
Progress
All of these are shown in the order that I did them. I was proud to see my cuts and seams become increasingly better over the time I worked so far. If you have questions or critiques lets discuss! I didn't want to write a book for my first post so I left out a ton of detailing. (I know this is still a book.)
Biceps and Shoulders
The biceps and shoulders were the very first pieces I made. I believe i will go back and adjust the detail pieces on the shoulders. They will also need mounted to one another.

Forearms
The forearms were a pain, but once they were finished I was incredibly proud. The extra detail really makes these things pop. I mounted the elbows to the forearm for flexibility and fitting purposes.

Booster Pack and Upper Back
I am actually not thrilled about these. I had several mess-ups and just overall frustrations. The middle is 100% going to be remade as I botched a seam that you cant see, but I will always know its there. I also believe I should redo the boosters and get the shaping better, the bump outs on the inside gave me some hassle and could be redone.

Boots
Man these were fun to see turn out. I will be cutting the bottoms and adhering a shoe... Could really use some shoe suggestions. Ones that will make sense and be comfortable to wear all day at a con.

Shins and Knees
The Knees still need attached for ease of movement and fitting. The backs of these shins were a learning experience with some crazy hard angled cuts and shapes. They gave me the biggest delay and frustration as i threw away many attempts to finally get something I was okay with. My inner perfectionist.


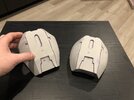
Butt Guard
Who doesn't love a good Chief butt? I loved making this piece as it was pretty simple and the curves came together really awesome. I made some creative choices for the top middle as I couldn't find high res reference pics and the circle was what was included in the pep files.

First Fitting!
This was my first test fitting, nothing is strapped. Everything held on by luck and gravity. Excuse the top part of the boot as I was using the wrong side combo. They each have a correct matching pair


3D Printing
This is in an early stage but i am currently printing a Halo 4 Battle rifle and Magnum as my accessories for the project. I will update later with progress on this!
Current!
That's it! You're all caught up with my build progress and I've been incredibly excited to share my progress and talk with all of you. I will continue to update this thread and reach out for tips and tricks. If you'd like to keep up with me follow me on Instagram @StattingUP
Hello everyone, im incredibly excited to be a part of this community. My name is Doug and I go by StattingUP (Name change pending mod
). I am 25 and an avid cosplayer. Based out of Pennsylvania, I frequently attend NYCC and Philly Comicons. Dragoncon was the next destination but... well yeah thanks 2020.I cant wait to grow my skills, meet/talk with members, and showcase the work that I am proud of. Hopefully I can help others with problems and learning experiences of my own while building my very first suit of Master Chief Armor.
I grew up with halo, its always been a part of my life. I met one of my now 14 year long best friends through halo. I knew that one day id make my own Master Chief costume. I knew I wanted to do it right though. I developed and researched as many skills as I could over the past 4 or 5 years that I've been cosplaying. After New York Comicon 2019 I knew it was time to make chief. Using this thread, Ill be updating my progress and communicating with you awesome people. Encouragement, constructive criticism, questions, and friendly conversation are all welcome!
Master Chief - Mark VI
Although I own a 3D printer, I chose to build Chief out of Foam. Specifically, Halo 4 - Mark VI armor. Halo 3 was actually my favorite halo, but the thicccccccness of the halo 4 chief armor made me choose it. The files that I used are actually from this very forum, The Armory. This is my very first foam armor build and first of this magnitude. It was daunting to say the least at first. Through on and off bursts of productivity, more so recently, I've managed to finish Boots, Shins, Knees, Butt guard, Forearms, Booster packs, Shoulders, and Biceps. I have the Thighs, Abs, Chest, Gloves, Helmet, and under suit to finish yet. I am 6'1 205lbs, athletic build for reference. After all the armor is complete I will be going back over to address any missing details or things I just want to adjust. This build is not 100% game accurate as ive added some of my own touches and judgement calls. Overall though, it leans heavily to match what was seen in the original. Below you'll find my current materials used and my current progress pieces.
Materials Used Thus far
SKS Props - HD Foam
Thin foam sheets from craft stores
Loctite 5 second super glue
Hot glue
Heat gun
Dremel and various other power tools
Box cutters and other pointy objects
Ender 3 Pro 3D Printer for Guns (Battle Rifle and Magnum)
Progress
All of these are shown in the order that I did them. I was proud to see my cuts and seams become increasingly better over the time I worked so far. If you have questions or critiques lets discuss! I didn't want to write a book for my first post so I left out a ton of detailing. (I know this is still a book.)
Biceps and Shoulders
The biceps and shoulders were the very first pieces I made. I believe i will go back and adjust the detail pieces on the shoulders. They will also need mounted to one another.
Forearms
The forearms were a pain, but once they were finished I was incredibly proud. The extra detail really makes these things pop. I mounted the elbows to the forearm for flexibility and fitting purposes.
Booster Pack and Upper Back
I am actually not thrilled about these. I had several mess-ups and just overall frustrations. The middle is 100% going to be remade as I botched a seam that you cant see, but I will always know its there. I also believe I should redo the boosters and get the shaping better, the bump outs on the inside gave me some hassle and could be redone.
Boots
Man these were fun to see turn out. I will be cutting the bottoms and adhering a shoe... Could really use some shoe suggestions. Ones that will make sense and be comfortable to wear all day at a con.
Shins and Knees
The Knees still need attached for ease of movement and fitting. The backs of these shins were a learning experience with some crazy hard angled cuts and shapes. They gave me the biggest delay and frustration as i threw away many attempts to finally get something I was okay with. My inner perfectionist.
Butt Guard
Who doesn't love a good Chief butt? I loved making this piece as it was pretty simple and the curves came together really awesome. I made some creative choices for the top middle as I couldn't find high res reference pics and the circle was what was included in the pep files.
First Fitting!
This was my first test fitting, nothing is strapped. Everything held on by luck and gravity. Excuse the top part of the boot as I was using the wrong side combo. They each have a correct matching pair
3D Printing
This is in an early stage but i am currently printing a Halo 4 Battle rifle and Magnum as my accessories for the project. I will update later with progress on this!
Current!
That's it! You're all caught up with my build progress and I've been incredibly excited to share my progress and talk with all of you. I will continue to update this thread and reach out for tips and tricks. If you'd like to keep up with me follow me on Instagram @StattingUP
Attachments
Last edited: