ODST (Sean Bradley kit)

Status
Not open for further replies.

Mysterious Stra

New Member
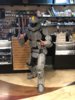
I'm a Star Wars costumer, member of the MMCC, 501st and Rebel Legion. That takes up the majority of my time, building, trooping, etc. But I've gotten to the point where I want to build a costume that is just for fun. No costume requirements to meet. No approval process. Just a fun to wear at conventions costume that isn't my Merc/Clone/Jedi. So I turned to the world of Halo. Confession time. I've never played any of the games. At all. I'm drawn to the universe and the characters and the armor and tech. The ODSTs in particular speak to me. So I decided to build a "themed" ODST costume because I want it to be something that's different and fun to wear. Its going to be a straight ODST build but with a custom character paintjob and accessories.

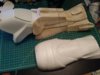
I know a lot of you build with EVA foam and that's very admirable. What you guys do with foam is beautiful. But I don't have those kinds of skills or the personality to sit and cut and shape stacks of foam. Its just not me. So I bought one of Sean Bradley's kits a few months ago. I now have the time to put it together and hope to get it ready for a convention in January. I haven't gotten into the armor yet but I have the helmet finished (so if this project dies a lonely, miserable death at least I have a cool prop for the shelf). Its Sean's ODST Dutch helmet that I picked because of the extra details. No idea if its specific to Dutch or not. It just looked cooler to me than the Rookie version. Anyway here are a few pictures of the work I've done on it.

Raw, untouched helmet.
KEMAwaD.jpg


Visor and opening trimmed and sanded and prepped for paint.
g54F2SG.jpg

tvw8XNs.jpg


Primer coat applied.
pwFb7JD.jpg


I applied a metallic silver base coat on top of the primer then added this metallic blue that I really dig the look of.
UoHdmEH.jpg


I've weathered it and painted some details on before hitting it with a matte clearcoat. I thought I had a photo of the finished helmet but I don't. I'll try to get that posted soon.

Next... the BBB of ODST! (that has been sitting in my garage since mid-October)
 
Got some good weather and a free weekend this past weekend so I got to cracking on the armor. As mentioned this is one of Sean Bradley's kits and its really nice. Not too much flash to remove and nice, clear trim lines.

Here's the MBB (Medium Brown Box) pic with everything inside.
UqkYly2.jpg


This is a shot of all the pieces I got trimmed and sanded.
5AVPoKK.jpg


And the pieces I got assembled - the gauntlets, calves and the knees attached to the shin covers.
jna9RFN.jpg


I still need to attach the ankle plates to the shin covers but I ran out of daylight. The gauntlets need the seams filled and cleaned up and then they'll be ready for paint and padding. But I'm going to hold off on the clean up and finish work until I get everything assembled and strapping figured out.

More updates as I get stuff worked on.
 
I’ve been slowly working on Sean’s kit as well. It’s friggin’ stellar and he is absolutely willing (at least in my case) to answer any questions. That kit is the very reason I’m looking to start building my own armor and props. Keep us updated dude. Here’s mine in it’s current state when I wore it back for a halloween party.
 

Attachments

  • 086884AA-A261-4EC0-942F-267D31904333.jpeg
    086884AA-A261-4EC0-942F-267D31904333.jpeg
    1.4 MB · Views: 474
If you’re referring to connecting the shin halves, I melted them together and sanded them down. (Don’t recommend) If you’re referring to attaching the calves and shins together there are a lot of ways you can go about it, for example I built a clip system similar to what Sean recommended on the calves and then wrap it around the shin and clip it in front when I’m ready to wear.

if that explanation sounds awkward I apologize and can send you some pictures to help out.
 
So, yeah... back to working on this.

First up, pics of the finished helmet.

ancf7OI.jpg


And the padding inside. Fits me like a glove.

imHivC5.jpg


I got a lot of the armor prepped for paint yesterday. Finished assembling all the pieces that needed put together, filled in seam lines, sanded, etc. I only got paint on one piece though, the ab armor, but I’m happy with how it turned out. This is with a base of Rustoleum 2X Gray Primer and a coat of Rustoleum 2X Aluminum Metallic. The metallic coat is a good base layer for weathering so the “metal” of the armor shows under any damaged paint. And for this particular piece will also serve as the white for the ab stripes of the Cap costume paint job.

cJMFMIu.jpg


I read through the instructions included by Sean with the kit and made a detailed materials list for strapping and attaching. I have ordered navy blue and red 1” nylon webbing and navy blue parachute clips for the exposed strapping. Rivets and washers also on order for the necessary connections as well.

For the under suit I’m going with navy blue BDUs or coveralls. I have a Condor H-harness and belt I’m going to try to use to attach the armor to, just need to dig it out of the closet. For boots I have some Vietnam era black combat boots that I plan to use if the boot armor fits.

I think I have just about everything I need now to get this done, including the time (thanks COVID-19) and motivation. So I hope to have it ready for whenever conventions start back up again.
 
Couldn’t wait to see how the metallic red I got looks on the armor. I taped off the molded straps and sprayed a couple coats of Dupli-Color Toreador Red Metallic. I still need to clean up the edges and weather it before sealing it. But I am stoked at how it looks.

APq5BLA.jpg


Here is a shot of the freshly painted ab armor with the finished helmet. I really love how these colors look together. Can’t wait to get the rest of the armor painted.

DWGKIqO.jpg
 
After replenishing my paint supplies I got all of the armor painted. Next is going to be weathering and then clear coat before I start strapping it up.

Wide view of everything getting color applied. I started with a base coat of Rustoleum Gray Primer and then a solid coat of Rustoleum Metallic Aluminum which I completed earlier in the week. After letting that set up and cure I put the color down.
6BAeLRY.jpg


Individual parts shots after all the color has been applied.
WY81e4w.jpg

hYzlhOC.jpg

M9Nr8bF.jpg

7gIeX0u.jpg

zjuWcH7.jpg

E0qVyUQ.jpg


Gave the chest the Captain America star and "ROGERS" in a basic stencil font. The shoulders got a custom ODST logo with the S.H.I.E.L.D. eagle in the center instead of the flaming skull and the Strategic Scientific Reserve eagle logo. I still need to clean up the paint on these which I'll do when I do the weathering.
ZFEsvtK.jpg


I am beyond happy with how these two colors look together. The Cobalt Blue and Toreador Red really pop. I can't wait to get everything together.
XET8hlg.jpg


After weathering, which should be easy, the really hard part comes... strapping it all together and putting it on. But that's a project for tomorrow (or more accurately next weekend)
 
Stupid life getting in the way of my fun.

Anyway, this is all painted up in a box waiting for me to finish. In the time between my last update and now Sean Bradley put up a few new items for sale so I picked up some upgrades. I’m still waiting for them to ship so everything is still on hold for the immediate future.

What I got is his backpack kit, new ammo boxes for the chest and a set of thigh and ankle pouches. He also made a cool sniper shoulder add-on that I can’t wait to paint up. I’m thinking I’ll mount the add-ons using magnets that way I can have a few options.

As soon as I get the new parts I’ll be posting some more progress, unless I get crazy and start strapping everything.
 
Status
Not open for further replies.
Back
Top