Okay, here we go. First timer Mk VI suit.

Status
Not open for further replies.

Strychnine

New Member
Alright. I've hassled with a few questions, done a painful amount of reading, pepped 5 forearms before getting it right, and off we go.

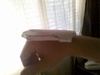
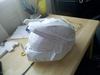
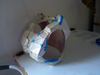
This is the chest, Low-Def from Robogenesis with a second coat of resin. I've never pepped or anything else before, so this is all new to me. I started with the chest, but I went low-def. My plan is as my experience grows I can slowly replace piece by piece with better ones as my experience grows and eventually have a second set of better-done armor.
IMG_20101117_120340.jpg


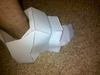
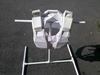
The same chest, rondo on the inside. If you look at the second picture I'm holding it up to the sun and looking in through the neck hole. It looks rather thin in places, doesn't it? I'm assuming I'm going to need a thicker coat.
IMG_20101124_094847.jpg

IMG_20101124_094833.jpg


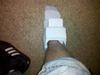
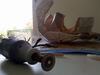
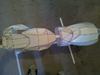
Forearms, pepped, rondo'd and... slightly warped around the cuff, as you can see. Meh. I'm hoping I can fix it with bondo, but having no experience with it... well. We'll see, right? These are FlyingSquirrel's medium def forearms.
IMG_20101124_094900.jpg


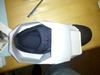
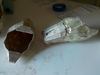
And lastly one bicep and one shin, with one coat of resin on it. Lowdef bicep from Robogenesis and Highdef shin from Crackhead09.
IMG_20101124_094921.jpg


Anyways, today I'll be putting together some easy MrOreo123 peps for sizing the remaining pieces. It's getting cold outside and harder to rondo and such, but I'm trying to keep everything heated up and... well. There you have it. Progress ahoy, I hope.
 

Attachments

  • IMG_20101117_120340.jpg
    IMG_20101117_120340.jpg
    97.1 KB · Views: 202
  • IMG_20101124_094847.jpg
    IMG_20101124_094847.jpg
    30.5 KB · Views: 202
  • IMG_20101124_094833.jpg
    IMG_20101124_094833.jpg
    34 KB · Views: 195
  • IMG_20101124_094900.jpg
    IMG_20101124_094900.jpg
    32.6 KB · Views: 187
  • IMG_20101124_094921.jpg
    IMG_20101124_094921.jpg
    34.1 KB · Views: 214
nice. Personally I wouldn't make a low def chest and keep it as my finished product. I would first make something low def, then make it again in high def after I got practice with the low def one. I would then keep a low def one as a pioneer piece. this means that it goes through all the stages a step ahead of everything else so that you know what will happen before you try it on the final product.
 
nice. Personally I wouldn't make a low def chest and keep it as my finished product. I would first make something low def, then make it again in high def after I got practice with the low def one. I would then keep a low def one as a pioneer piece. this means that it goes through all the stages a step ahead of everything else so that you know what will happen before you try it on the final product.

Y'know since I'm going to have to saw through the bloody thing as well, that's not a bad idea. I'd certaintly feel better about cutting through one before I cut through another. I just wish I could get my shoulders/head into it to see how it sat on me so that I could make any last-minute adjustments to it before I made a hi-def version.

Maybe I just ought to cut through it now just so I can put it on and see how it goes. I can still practice bondo on the front/back halves with it split, I suppose. Food for thought...

In any case, I pepped a version of the thigh. It fits just above my knee before it's too tight to go any further. I think it sits just about perfect where it is, but the problem is I doubt I'd get it that high with underarmor pants on (I did it wearing just boxer briefs, thus no images. I don't want to hurt anyone's retinas) so I suppose I'll add a couple CM and widen it out a bit to make a better fit and give the hi-def version a go.
 
Since you already have the chest resined and rondoed, go ahead and slice it down the sides. It should be fine if you decide to add another coat of rondo. Use the natural lines of the model to hide your cut lines, that way once you attach it back together, it will be barely noticeable, if at all. Good luck with your progress, you're off to a great start!
 
Thats a good idea replacing the parts when you make them higher defenition. I like how you have the stands set up, i didnt have that. Just one thing, the tape on the outside, if you resin over it, it bulges out. Id recomend either taking it off before you resin. I learned from going through that myself and i ended up taking it off after a coat or 2 of resin and it left an unsmooth area for me to try and sand out. It looks good so far though!!:)
 
Alright. Wow, a cople posts in and I'm getting awesome advice. I'm going to give the cutting a go. Cutting wheel with the ole dremel I guess?

Also, the tape was on after the resin, to hold the rondo in where there was slight gapping from my inexpert pepping. All that frame is is t-joints and connections of pvc from home depot.

Whew. Cutting upcoming then. Nervous/excited...
 
What method are you using for pepping? I use hot glue and pen marks for my folds. believe it or not, pepping goes faster when you take the time to mark all the mountain folds with black/blue pen and all the Vally folds with red pen.
 
... but I went low-def. My plan is as my experience grows I can slowly replace piece by piece with better ones as my experience grows and eventually have a second set of better-done armor...

This is what I have done. I've already completed the low-def suit and am enjoying going to cons, parades, gaming days, etc.

Meanwhile I can be as fussy as I want while I make replacement high-def pieces. And in the end, you have two complete costumes. I plan on having a friend or relative wear the low-def armour to a con and we'll go as 'red vs blue'!

Good luck, your work looks good so far.
 
What method are you using for pepping? I use hot glue and pen marks for my folds. believe it or not, pepping goes faster when you take the time to mark all the mountain folds with black/blue pen and all the Vally folds with red pen.

I've been doing the same myself. I spent a lot of time reading and popping around on here before starting, or even posting. It works out well so far, but at times I suppose I just didn't have everything lined up perfectly. Here's the experience.

Also, I'm kind of excited, actually, about ending up with two suits. My wife, I've been thinking about doing a foam Kat once I'm done, but having an extra MC she could be might be fun as well, as she's not too terribly smaller than me; I guess the bonus of being a shorter/smaller guy. :p
 
Well, moving on. I pepped a fitter gauntlet plate from MrOreo123, and... not sure if it's sized where i want it to be or not. Seems like it may just be a bit far over the knuckle/past the wrist, but I'm not entirely certain how the fitment there is supposed to be. I wonder about how it'll be as far as bumping into the forearm...
IMG_20101124_144826.jpg

IMG_20101124_144819.jpg
 

Attachments

  • IMG_20101124_144826.jpg
    IMG_20101124_144826.jpg
    28.4 KB · Views: 188
  • IMG_20101124_144819.jpg
    IMG_20101124_144819.jpg
    24.8 KB · Views: 190
nice work thus far however I can really see one purpose for low def parts and that would be to use to get scale correct. I myself went for the high def stuff from the beginning. I am fairly happy with the results on my first piece which was my helmet and will redo it eventually and by then it should be flawless as my torso section is better than my helemt as far as pep goes. I think there is simply too much time invested into finishing one piece to not be happy with it in the end, not to mention the expense of the materials used are the same weather it be high or low def. Unless like I say the low def part is only used to scale correct and test fit ect. Check out my progress and let me know what you guys think :) Keep up the good work. Later, Gforce598
http://www.405th.com/showthread.php/29219-This-is-my-first-Mark-VI-build-so-far-let-me-know-what-you-think-so-far.-)
 
Looking great so far! TO help stop the warping of cylindrical bits like the forearms, I glued a support on one end and stuffed the part to the brim with plastic bags, then glued another support on the opposite side to keep them in. This will help keep it's shape, and there was almost no warping for me when I did this with my forearm.

For the handplate, It's meant to stop just before your wrist and only just cover your knuckles, judging from my reference pics: http://reparent.blog.uvm.edu/images/masterchief.jpg

Good luck :D
 
Looks great so far, man. I wouldn't worry about that warping too much at all; it looks like you will be able to fix it with bondo. Awesome pepping so far and I can't wait to see more and a detailed/painted piece :)
 
Remember, these are video game physics here, they dont work in the real world. Just because its that size does not mean its practical to make it that size. If you look at the picture if he moves his forearm up it will hit the bicep and his other arm, the forearm and bicep are meshing together. It may be best to make it slightly smaller for the best movement unless you want a game accurate suit.
 
Well, time for another update. I got a lot done, but... simultaneously, kinda didn't. Dumb holiday, bad sizing, all that.

I've been busy since my last post. You can see two handplates that still seem just slightly too big for me. Damn these tiny hands!! I'm like that guy on the Burger King commercial. The space diaper was way too small. I barely got it to my knees. Big thighs for my size, but even just eyeballing the waist of it, it's never gonna fit, so that's going to need a redo.
IMG_20101128_163554.jpg


First dry run of the boot from MrOreo123. There's a lot of space around my ankle, which I suppose is understandable, and just needing some padding...
IMG_20101128_151232.jpg

IMG_20101128_151224.jpg


But even slipping my shoe in there leaves a TON of empty space that I can't imagine is right. Right?
IMG_20101128_151131.jpg


My shoe is almost swallowed even without the toe-section of the boot put into the game.
http://smg.photobucket.com/albums/v401/IPlayWithBlocks/?action=view&current=IMG_20101128_151123.jpg


BUT! I did get a completed thigh, and the helmet as seen below, which fits great even on the first try, which is nice, for once. This is MrOreo123's piece also, and it actually has more detail than I thought it would, so I think I'm going to stick with this pep for my final build, just to save some time and get things going forward.
IMG_20101128_140343.jpg


In any case, thanks for all your suggestions, taking the time to read my progress, and generally keeping me motivated.
 

Attachments

  • IMG_20101128_151232.jpg
    IMG_20101128_151232.jpg
    56.8 KB · Views: 203
  • IMG_20101128_151224.jpg
    IMG_20101128_151224.jpg
    53.3 KB · Views: 188
  • IMG_20101128_151131.jpg
    IMG_20101128_151131.jpg
    34.2 KB · Views: 194
  • IMG_20101128_140343.jpg
    IMG_20101128_140343.jpg
    36.5 KB · Views: 188
  • IMG_20101128_163554.jpg
    IMG_20101128_163554.jpg
    38.6 KB · Views: 199
Double post, but...whew. Got a good-fitting hand plate and diaper, so I'm feeling somewhat better. Jolly good! More to come. I think tomorrow I'll be cutting my tester chest and see how my sizing is going.
 
That looks fantastic! I have just started my Mark VI tonight. I am taking the advice here and starting low def as a sizing reference. i have only finished my hand plate and it very clearly needs to be downsized. will make a photo bucket and post pics when i make something that fits properly...
 
Hey, I got work done! First off I sawed through that chest piece. I'm glad it was a tester...
IMG_20101130_134953.jpg

Because it's small! The sides won't quite join around my body, so I either lose 15lbs in a month, or I make a larger size next time I go HD with it. Damn... I hope the next one fits though...

In any case, also, continued to resin my first shin and made a quickie hotbox since it's getting too damn cold.
IMG_20101130_134906.jpg


Also got the first bit of resin on the thigh and helmet. Not pictured is a second coat on the bicep too.
IMG_20101130_134913.jpg


Whew. Moving right along, huh?
 

Attachments

  • IMG_20101130_134953.jpg
    IMG_20101130_134953.jpg
    42.2 KB · Views: 192
  • IMG_20101130_134906.jpg
    IMG_20101130_134906.jpg
    51 KB · Views: 206
  • IMG_20101130_134913.jpg
    IMG_20101130_134913.jpg
    66.2 KB · Views: 191
the handplates should cover your knuckle, but not overlap it, and the wrist will have the sides going past your wrist, and the middle touching if you put your hand really far back
 
Status
Not open for further replies.
Back
Top