1) I noticed you said you saw the reference pics, but I wanted to make sure you saw these:
I used to offer to take reference pictures for people when Reach first came out, but college ended up taking a lot of my time up and I eventually had to stop. While I would still prefer finding better uses of my time than taking requests from others, your work is phenomenal and seeing as you are making certain parts of the armor that I am interested it, if you want a particular reference, just let me know. If all else fails though, you can at least follow the guide I just recently provided in the Reach Reference Pics Thread if you want to take your own pics. If you do this, I encourage you to post them to the thread and share them with the rest of us.
") 2)
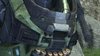
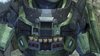
2) When you mention the collar, the middle spacer, and the shell basket, what are you referring to by the "middle spacer"?
Also, "shell basket" is a pretty great term for the section that holds the shells; I was trying to think up a good term for it but couldn't.
3) Is that your own personal model or did you export pepakura files over to .obj files or something?
Because we only have like 1 model of the Collar/breacher so far and it would be nice to have more options.
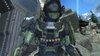
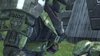
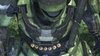
4) In reference to the 3d-model versus the in-game model, the strap/belt that goes down from the collar to the breacher shell basket looks to travel through the belt buckle looking thing in the middle. However, in your model, it appears as though it doesn't go through the buckle and it instead just connects to each side of it.
I just wanted to make sure that you noticed that it appears to be a strap that goes through.
On the Side View image above, on photobucket, if you hit the zoom button twice it will show you the original of the image which has a surprisingly nice resolution. Looking at the image, you'll see that the strap goes all the way through, and oddly, it sits outward and away from the chest.
Here's some examples of what I think we are essentially looking at:
http://173.255.201.19:8080/26-285-thickbox/milry-italian-men-designer-briefcase-and-laptop-bag-with-shoulder-strap-in-brown.jpg
http://www.strapsandbelts.com/images/replacement-shoulder-strap.jpg
5) Amazing idea with the UA Jorge Collar. I've always loved it and wished I could have had it on other armors, I guess great minds think alike
lol.
I wasn't sure how it would work or how it would look with the breacher collar, but I'm really glad you posted that image. It doesn't look bad at all tbh. If I went with it, I think I would tweak the shapes of the lines a little so it would flow more and match with the breacher collar. ....OR you could increase the size of the breacher collar to match the Jorge collar.
Just tossing some ideas out for you to think about!
(Random note: it probably would have been better if they named the breacher collar as a "front-side gorget", and list the grenadier's collar as-is but I guess what they did works)
6) In terms of real-life applications, why not have the Jorge collar on your rear side shoulder to protect your neck from behind? Doesn't the Commando shoulder piece protect your front side enough?
I use the CQC shoulder for my forward shoulder as it has the groove in it for me to look through, while I use a Commando shoulder piece on my rear shoulder to help protect the gap of the neck between the helmet and the torso armor which is a pretty open killshot location. If I were to introduce the Jorge collar though, it could make a difference on what shoulder pieces I use, since it opens up more options since it helps protect the neck and head without needing assistance from the shoulder guards.
Anyways, I totally love having bonus accessories and attachments for anything, and it is good to see you working outside of the box with the Jorge collar.
I'm planning on having HP/Parafoil pistol clip pockets on the belt, assault/sapper grenade canisters (2) on the back of the belt, and a tactical/recon soft case on the underside of the right breast covering the LED in that location.
I'll also agree with you in terms of you saying you are making an assault specialist-- I don't think you'll need the sniper rounds on your shoulder piece. Yeah they look cool, but if you want to work on a specialized build, as an assault specialist you should keep in mind what you'd want to keep with you if you were trying to clear a room from the entrance to the room... whether you knocked on the door or just blew a hole in the wall. Obviously you will need to be heavily armored, but you may not need to have protection on your rear side if you are breaching a room. In terms of weaponry, you'll need to think about whether or not there will be captives. If there are, grenades and shotguns may not be the best options, you might need to be a bit more precise with your kills. It's a shame that neither the BR nor the DMR have under-barrel shotgun attachments.
But this is your armor, do as you please; again, I'm just trying to give you some things to think about to hopefully make what you want to do more clear. If you want to specialize in a certain style of spartan (assault), do it! If you want something that is just a miss-match of parts that you think look really cool, you can do that too!
(EDIT: I just re-read your post, it seems like you have things covered. I missed the part about how you would have the Jorge Collar facing your enemies the first time I read through it, oops!)
7) You do a mix of foam and pepakura parts, right? I was looking through your photobucket and it looked like your Halo 4 Torso piece was made from foam.
If so, what are your plans on addressing the collar/breacher collar piece?
If you end up making foam templates, please share!
And again, if you decide you want to sell some castings of the pieces you've made, I think you may very well have a customer in me.
I'm cheering for you and can't wait to see more. It's nice having someone with similar interests that I'll be able to ask questions to when I start working on my set of armor.
EDIT: I've been looking through some of the foam builds here and it's been slightly discouraging to see how uneven and jagged some of them end up looking. How do you get things to look so smooth? What's your process/methodology after you print and hotglue your Pepakura models together?
EDIT 2: On page 3 or 4, you said you hadn't started on your Commando shoulder piece. I was wondering what the pictures of the Commando shoulder piece you have on your photobucket are. It seems like you have already finished it, but Idk... Sorry for snooping!