You are using an out of date browser. It may not display this or other websites correctly.
You should upgrade or use an alternative browser.
You should upgrade or use an alternative browser.
Project: Reach
- Thread starter NayrDeath
- Start date
- Status
- Not open for further replies.
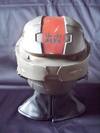
Also, and I'm sorry if I missed this in the thread somewhere, but how did you get that texture to the visor and black areas of the helmet? My Emile could use exactly that texture- I was planning on using hammered paint, but yours is much closer to what I'm actually looking for
Looks great! Lots of detail put into your work. Check out my Reach thread for some Reach pepakura files, I may have some that you might want.
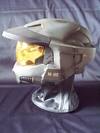
That gold visor...it's purtty, haha. Did you make it yourself? If you did, any tips on how you made it? I've done some research regarding vac-forming visors and tinting (Only in one color though, black. I can't seem to find the right kind of dye for the specific color of your visor.). Finding ways to chrome a visor is something I still have to research.
- Member DIN
- S007
Your work is top notch. Your in the 1% -ers in my book.
Can't wait to se this thing completed.
Can't wait to se this thing completed.
Thanks, Rosh!dude, your helmet came out perfect- I'm actually jealous. your bondo skills are so good they make me feel like taking my file set and throwing it into traffic too. ill be watching your build from here on out, keep it going man!
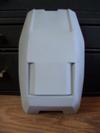
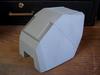
Though if you're referring to the helmet, it's a cast of JUSTINIAN117's Mk. VI helmet that I modified to look like the Reach version. I didn't do much bondo work to it... Unless the work done with spot putty counts.
Thank you very much.The build looks simple beautiful. You just gave me a lot of hope on my build looking as good as a foam build. I can't wait to see more.
I never been a fan of sporting glossy/non-weathered armor, makes you look like a greenhorn.OMG! Bella! Details are on point, no gloss matte definitely makes it look like the real deal Marine equipment.
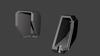
The bill, and the other black parts, were given two coats of Krylon Black primer and then two more coats of Krylon matte finish. If you have trouble getting the same texture try holding the can about 7 inches away from the piece and painting on a warm day.Also, and I'm sorry if I missed this in the thread somewhere, but how did you get that texture to the visor and black areas of the helmet? My Emile could use exactly that texture- I was planning on using hammered paint, but yours is much closer to what I'm actually looking for
Thank you. And another thanks for the recommendation, that torso looks way better than the one I was planning on making.Looks great! Lots of detail put into your work. Check out my Reach thread for some Reach pepakura files, I may have some that you might want.
No, I got it from JUSTINIAN117 and didn't bother asking much about how he does it. Though it appears to be really thick plastic (not motorcycle visor quality, but still pretty thick) that got an inner coat of translucent yellow-orange and then a coat of mirror-tint.That gold visor...it's purtty, haha. Did you make it yourself? If you did, any tips on how you made it? I've done some research regarding vac-forming visors and tinting (Only in one color though, black. I can't seem to find the right kind of dye for the specific color of your visor.). Finding ways to chrome a visor is something I still have to research.
A comment like that from such a respected member of the 405th, Thank you very much, Jim. I appreciate it.Your work is top notch. Your in the 1% -ers in my book.
Can't wait to see this thing completed.

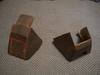
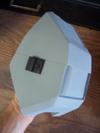
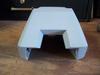
Sadly I haven't done much since I've last posted, due to work and life in general. I've mostly been focusing on my kneepad, smoothing it and studying reference images. I ended up cutting it in half, because I noticed there's actually a panel line the separates the knee... And because I seem to like dissecting armor. Haha.

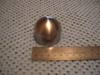
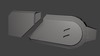
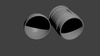
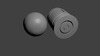
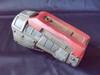
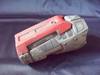
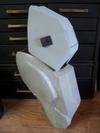
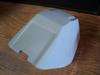
I found this at work a while back. It's a stainless steel beveled endcap for pipe.... Can anyone guess what it's getting turned into?

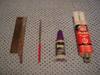
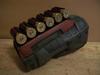
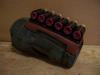
And in an effort to entertain you all, here's a picture of some things I feel everyone should own.

1: Hobby saw. Got mine in a woodwork kit ages ago. I use it more than my Dremel due to the control I have with it.
2: Needle file. Beyond helpful for details and panel lines.
3: Super Glue. Should get the award for best universal adhesive.
4: Epoxy. "Dude. What if we made fiberglass resin the consistency of hot glue?" "Brilliant, let's put it in a tube!"
Padding and electronics for my helmet should be here in a couple days, hope to have an update shortly after their arrival.
Take care, everyone!
-Ryan M-082
Attachments
Thank you!Helmet is so slick. Gunna be watching this thread!
You sir, are damn good. Lol.That appears to be the end of a 40mm grenade- at least the sale and size are right. I've been looking for something to make a 40mm out of for a while here- I need 10 of them in total. As usual, I'm watching.
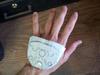
I received some padding in the mail a few days ago; it wasn't what I ordered, but it'll do.

I'm kinda irritated that the different shades of grey don't match, but 1: very few people will see the padding in the first place, and 2: I'm going to be making a neck liner that will cover the bottom of the padding near the opening.
Work was rough this week, I picked up two additional days and spent my first day off yesterday relaxing. I decided that I'd be happier laying around than outside covered in bondo dust, but I wanted to be productive so I started doing some modelling.


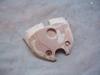
CMN attachment. I plan on getting this 3D prited and filling it with the guts of either a walkie-talkie or a personal hearing amplifier.
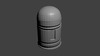
So, about that 40mm grenade...


My stepdad is a machinist; he's been making parts out of various materials for years, and when I showed him the metal end cap I found he was really excited to hear what I wanted to do with it. He told me that if I were to draw up what I wanted it to look like, he would try to make it for me. So I made a 3D model of the grenade and separated it into two pieces; the dome being the metal cap I currently posses, and the bottom cylindrical shape being the part I need him to make. I'm going to show him the render later tonight, and get feedback on whether or not it's do-able.
Sadly, that is all I have for updates today. The parts needed to finish my lights have yet to arrive, as well as a few more things I plan on putting in my brain-bucket.
Take care, everyone!
-Ryan M-082
Attachments
*update*
Hello again, 405th. It sure has been a while, hasn't it?
I'd blab about the countless things that kept me occupied during my 2-month hiatus, but that's not what you came here to see. So without further talk, The good stuff:
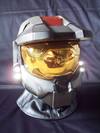
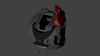
During my time away I was able to finish up the Mark VI, lights and everything, as well as a cast of the forearm I sculpted a while back.
The lighting system consists of two circuits running off of one tactile switch that I'm able to press with my chin; yes the gimmick is as neat as it sounds.
Each circuit has a pair of 5mm Ultra-bright (7000 Lumens) LEDs, that are powered by a 9v battery located in the back of the helmet (The section near the AI port).
Getting the lighting system to work was a nightma-*cough* ..Learning experience. I figured it'd be easy, considering it's only two little lights, but when it came down to creating such a thing I soon learned that I knew far too little about how lights work. Apparently hooking up two lights, that run at a full power of 3.5v, to a 9v battery is A BAD IDEA. I got to watch my beautiful soldering work go to waste as the lights burnt up the moment I hooked them up to the battery. I then hopped on Instructables and read an article about how to PROPERLY power an LED. I soon learned that the solution to my problem would be a resistor, which is a small part used to limit the current flow. After a small bit of calculations, a trip to my local RadioShack, and some time spend soldering everything together; I had a properly working circuit!
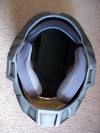
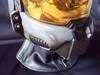
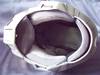
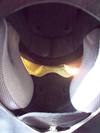
I installed motorcycle helmet padding in the helmet much like everyone else does, though I did do something new that I've yet to see any other Spartan cosplayers do; I installed a breathbox. For those of you unfamiliar with the term, a breathbox is a neoprene add-on for snowmobile helmets that traps your breath around your mouth to keep your visor from fogging.
I'm proud to say this helmet is incredibly comfortable and my visor never fogs; it's so comfortable that I took a nap in it one afternoon. I woke up with helmet hair, but that's beside the point. Haha.
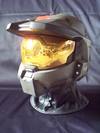
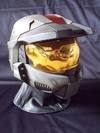
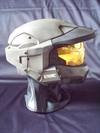
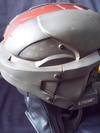
Without further a due, the finished helmet:


That beautiful neckseal I'm displaying my helmet with was tailored for me by Sara Turner or Sarlume, as many on here know her by. It's incredibly well made and fits my neck perfectly. It has corset boning sewn into it, much like the one she made for her personal Halo 4 suit, as well as velcro straps on the back seam. I'm beyond pleased with how it turned out and hope the other undersuit parts that I'll be making in the future do it justice.
As I mentioned, I did finish (Paint-wise. I still have a bunch of other things to do with it before I can truly deem it complete.) one of my forearms.
You'll notice that the colors are backwards, and that's been done on purpose. I never thought it made sense that your secondary color takes up more space than your primary color does on most pieces of Reach armor, so I switched things up a little.


Well that's about it for now. I hope everyone likes how things are turning out, and I hope to have more to show you all soon.
Until next time, take care and happy building!
-Ryan M-082
Hello again, 405th. It sure has been a while, hasn't it?
I'd blab about the countless things that kept me occupied during my 2-month hiatus, but that's not what you came here to see. So without further talk, The good stuff:
During my time away I was able to finish up the Mark VI, lights and everything, as well as a cast of the forearm I sculpted a while back.
The lighting system consists of two circuits running off of one tactile switch that I'm able to press with my chin; yes the gimmick is as neat as it sounds.
Each circuit has a pair of 5mm Ultra-bright (7000 Lumens) LEDs, that are powered by a 9v battery located in the back of the helmet (The section near the AI port).
Getting the lighting system to work was a nightma-*cough* ..Learning experience. I figured it'd be easy, considering it's only two little lights, but when it came down to creating such a thing I soon learned that I knew far too little about how lights work. Apparently hooking up two lights, that run at a full power of 3.5v, to a 9v battery is A BAD IDEA. I got to watch my beautiful soldering work go to waste as the lights burnt up the moment I hooked them up to the battery. I then hopped on Instructables and read an article about how to PROPERLY power an LED. I soon learned that the solution to my problem would be a resistor, which is a small part used to limit the current flow. After a small bit of calculations, a trip to my local RadioShack, and some time spend soldering everything together; I had a properly working circuit!
I installed motorcycle helmet padding in the helmet much like everyone else does, though I did do something new that I've yet to see any other Spartan cosplayers do; I installed a breathbox. For those of you unfamiliar with the term, a breathbox is a neoprene add-on for snowmobile helmets that traps your breath around your mouth to keep your visor from fogging.
I'm proud to say this helmet is incredibly comfortable and my visor never fogs; it's so comfortable that I took a nap in it one afternoon. I woke up with helmet hair, but that's beside the point. Haha.
Without further a due, the finished helmet:


That beautiful neckseal I'm displaying my helmet with was tailored for me by Sara Turner or Sarlume, as many on here know her by. It's incredibly well made and fits my neck perfectly. It has corset boning sewn into it, much like the one she made for her personal Halo 4 suit, as well as velcro straps on the back seam. I'm beyond pleased with how it turned out and hope the other undersuit parts that I'll be making in the future do it justice.
As I mentioned, I did finish (Paint-wise. I still have a bunch of other things to do with it before I can truly deem it complete.) one of my forearms.
You'll notice that the colors are backwards, and that's been done on purpose. I never thought it made sense that your secondary color takes up more space than your primary color does on most pieces of Reach armor, so I switched things up a little.


Well that's about it for now. I hope everyone likes how things are turning out, and I hope to have more to show you all soon.
Until next time, take care and happy building!
-Ryan M-082
Attachments
-
 100_2272_zps7ed848d2.jpg85.2 KB · Views: 95
 -
 100_2276_zps3499babf.jpg82.7 KB · Views: 89
 -
 100_2275_zps7d7630e1.jpg78.8 KB · Views: 92
 -
 100_2274_zpsaa248c2e.jpg73.8 KB · Views: 109
 -
 100_2273_zpsabc6fdd1.jpg73.6 KB · Views: 94
 -
 100_2279_zpsf92309fa.jpg68.9 KB · Views: 92
 -
 100_2278_zps8a009762.jpg78.3 KB · Views: 108
 -
 100_2281_zps83a50570.jpg98.5 KB · Views: 98
 -
 100_2282_zps2811cb05.jpg77.9 KB · Views: 100
 -
 100_2277_zps67ffbdb2.jpg81.3 KB · Views: 93
 -
 100_2286_zpsf83ecec2.jpg78 KB · Views: 93
 -
 100_2288_zpsd1f990a1.jpg84 KB · Views: 107
 -
 100_2284_zps0b518c3d.jpg85.7 KB · Views: 110
 -
 100_2285_zps0e0b4ede.jpg76.3 KB · Views: 107
That is a beautifully crafted helmet. The forearm looks very nice as well.
I might just copy your idea on the breathbox. Is your helmet more humid since the air can't escape?
I might just copy your idea on the breathbox. Is your helmet more humid since the air can't escape?
Your build is so perfect! the detail is amazing and so carefully made. This should be in the elite showcase in my opinion
Monkey Butt
New Member
Wow - looks super accurate, I have the helmet from the legendary edition of halo 3 (Mark VI) and it looks identical, its an awesome piece of work and good choice on halo: reach. from what Iv seen you probarblt know but reach uses rough paint (paint degrading, bits missing) just to give it that super wow wow effect, keep up the good work!
Thank you!armor is looking amazing
Thanks! So far it isn't, though I haven't really worn it for hours on end to test just what it's like in there. I'll get back to you once I wear it to a convention or something.That is a beautifully crafted helmet. The forearm looks very nice as well.
I might just copy your idea on the breathbox. Is your helmet more humid since the air can't escape?
Thank you very much; Reading that brought a huge smile to my face!Your build is so perfect! the detail is amazing and so carefully made. This should be in the elite showcase in my opinion
Dooooo it. Lol.Yeah that breathbox idea is interesting. might have to give that a try as well lol
It works WAY better than the computer fan I had hooked up in my last helmet.
The helmet liner was like $20, the cheek pads were about $25, and the breathbox was around $15.How much where the pads and where did you get them?
I got everything on ebay, though I must warn you: A lot of the big-time sellers for motorcycle parts and accessories don't always ship you what you see in the picture.
I wouldn't say 'identical', but yeah they're damn close haha. Yeah, Reach went for a more military-matte color palette, though it can be restored to the classic colorful look by going on Forge and adding the 'Juicy' light filter.Wow - looks super accurate, I have the helmet from the legendary edition of halo 3 (Mark VI) and it looks identical, its an awesome piece of work and good choice on halo: reach. from what Iv seen you probarblt know but reach uses rough paint (paint degrading, bits missing) just to give it that super wow wow effect, keep up the good work!
*UPDATE*
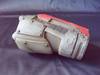
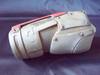
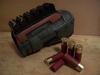
I got something rather neat in the mail the other day; A shotgun shell holster made to hold six shells, and it just so happens to be the closest thing on the market to the Assault/Breacher attachment seen in-game. I drilled holes in it (and my beloved forearm) and used some hex-head bolts to secure it. I then took 6 red shotgun cartridges and cut some aluminum pipe to fit inside of each and give them structural support. After that was done I used my thumbs and the butt-end of my super glue to re-crimp the shells.


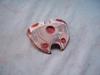
I also finished my Grenadier knee after countless hours of sanding and filling gaps. You'd think such a blocky piece would be easy, but with all the flat faces you're left with a ton of room for error and irregularities. The little black buckle piece was made out of balsa and styrene.


The shin is coming along rather nicely. I'm gonna do some more work to it before I show it off more, mostly because the other side looks horrible and is in some serious need of bondo.
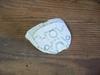
Before I forget, I pepped and resined a handplate yesterday. Surprised it turned out so well on a count of all those tabs haha.


-Ryan M-082
Attachments
-
 100_2343_zpsea3e9a9a.jpg62.6 KB · Views: 108
 -
 100_2322_zps3cf49848.jpg33.1 KB · Views: 89
 -
 100_2319_zps002a4583.jpg50 KB · Views: 95
 -
 100_2325_zpsba2461a1.jpg42.3 KB · Views: 86
 -
 100_2344_zpscd069b6e.jpg63.7 KB · Views: 100
 -
 100_2349_zpsbdc8babd.jpg61.8 KB · Views: 95
 -
 100_2330_zpsd2f234e4.jpg50.9 KB · Views: 85
 -
 100_2331_zps7abfbe73.jpg58.5 KB · Views: 87
 -
 100_2327_zpsc73e446c.jpg48 KB · Views: 84
 -
 100_2323_zps1f49eb19.jpg38.4 KB · Views: 103
 -
 100_2332_zps63cd6b5b.jpg64.5 KB · Views: 86
I couldn't help but notice that in your OP, your vanity image is displaying the Collar/Breacher chest piece as well as a Commando shoulder.
How far along are you on these? (Assuming you are still planning on going down that path)
I'm curious because I see that you are doing molds, and I'm interested in those pieces for my own armor (when I get around to starting it). So I was thinking if you were going to mold those pieces, I would love to get my hands on them.
Oh, and if you go the path of the collar/breacher, what are your plans on it? I think for mine, I want a legitimate nylon strap to go down the center of it with a proper buckle, and maybe even make what holds the shotgun shells out of some metal.
Your build looks absolutely great by the way.
I honestly love the look with the screws, painted or not.
That breacher-shotgun-shell forearm attachment and the forearm itself have to be the best looking forearm I've seen.
The lines are just simply gorgeous.
That knee piece of yours looks like it came straight out of a model kit. It looks like its made of a high quality plastic, but that's just because you did a great job with it.
Keep up the good work mate!
I hope all the Halo Reach reference pics I made back in the day are still helping people in some way!
I couldn't help but notice that in your OP, your vanity image is displaying the Collar/Breacher chest piece as well as a Commando shoulder.
How far along are you on these? (Assuming you are still planning on going down that path)
I'm curious because I see that you are doing molds, and I'm interested in those pieces for my own armor (when I get around to starting it). So I was thinking if you were going to mold those pieces, I would love to get my hands on them.
Oh, and if you go the path of the collar/breacher, what are your plans on it? I think for mine, I want a legitimate nylon strap to go down the center of it with a proper buckle, and maybe even make what holds the shotgun shells out of some metal.
Your build looks absolutely great by the way.
I honestly love the look with the screws, painted or not.
That breacher-shotgun-shell forearm attachment and the forearm itself have to be the best looking forearm I've seen.
The lines are just simply gorgeous.
That knee piece of yours looks like it came straight out of a model kit. It looks like its made of a high quality plastic, but that's just because you did a great job with it.
Keep up the good work mate!
I hope all the Halo Reach reference pics I made back in the day are still helping people in some way!
First off, thank you for the kind words. I actually just noticed the thread with your pics earlier today when you updated it; they'll come in handy in the future and I'm quite upset at myself for not noticing the thread sooner. Lol.
Neither of the pieces you mentioned have been started yet, though they will be getting some attention very soon. I originally planned to make the Collar/Breacher out of three pieces: The collar, the middle spacer, and the shell basket. Nylon would weave them all together and hex-bolts would secure them to the chest. I was actually going to try and make the basket out of aluminum, though I don't prefer to work with metal. However, unless I find an easier way I'll give it a shot since you recommended it. As far as chest attachments I'm also going to add something I've yet to see anyone else do:

I always loved the UA attachment Jorge sported on his chest and was pretty bummed when I realized it was only available for the Collar/Grenadier.
My Spartan-III persona is an assault specialist so the added armor on the side of my body that'll be more frequently faced toward the enemy would seem sensible.
As far as the Commando pauldron, I started work on a pepakura file for it yesterday but kept running into issues with random faces that don't show up in Blender; so I gave up (after my third time free-sculpting it) and decided that I'm just going to scratch build the damned thing. I'm going to be drawing up some templates to guide me tonight and might get some progress tomorrow, but no promises.
*UPDATE*
Not much to show you, but still an update nonetheless.
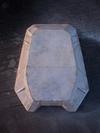
Been thinking a lot about my Spartan persona recently, thinking of what part's getting what color, where certain details will be placed, and more importantly what armor is more sensible. Upon that note I've made a change: instead of sporting a Sniper pad on my right shoulder I'll be wearing a Mark V, which will be grey instead of red ....like the game insists it be
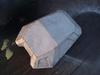
Anyways, I pepped out a MK V shoulder this morning and resined and rondo'ed it this evening.


It turned out rather well and I shouldn't have much bondo work to do to it. I'm hoping to make some progress on it tomorrow before work.
I also got a decent amount of work done on my handplate. The first pic is before I coated it in filler primer and went to work with glazing putty. The second is how it lays at the moment. Don't judge it too hard, it'll look better soon.


That's all for now. Take care, folks!
-Ryan M-082
Attachments
- Status
- Not open for further replies.
Similar threads
- Replies
- 52
- Views
- 1,659