rino's odst build (WIP)

Status
Not open for further replies.
Another update!
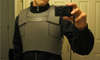
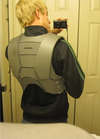
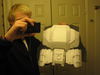
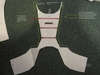
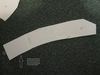
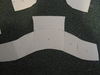
Had my first experience with foam last night. Built the chest core and it turned out pretty well! Its was pretty easy once i got the hange of it :D Anyways heres some pics:

IMG_1050.jpg

IMG_1053.jpg

IMG_1055.jpg


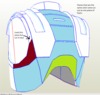
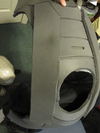
Just taped everything on to see how it would look when its completed :)
IMG_1061.jpg


Anybody know the best way to paint foam? Can you just use normal spray paint? Ive been looking around the forum but havent had much luck finding anything.

More updates to come!
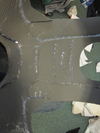
 

Attachments

  • IMG_1050.jpg
    IMG_1050.jpg
    42.5 KB · Views: 201
  • IMG_1053.jpg
    IMG_1053.jpg
    50.8 KB · Views: 192
  • IMG_1055.jpg
    IMG_1055.jpg
    41.3 KB · Views: 220
  • IMG_1061.jpg
    IMG_1061.jpg
    61.8 KB · Views: 219
That turned out very nice rino! So what do you use to cut the foam mats? Sorry I don't know very much about painting foam. I believe everyone has been sealing it before they paint it. Someone correct me if I am wrong. Did you check out Ben Streeper's video?

By the way, I'm rating this thread 5 stars. Your work is really making me consider other ways of building this stuff haha. Again, great job.
 
Thanks Hugh! I just used a utility and exacto knife to cut the mats. Worked pretty well, clean cuts unless i rushed it. Making slanted cuts where two pieces met at an angle was impossible. Instead i cut it straight and then melted the edge into the desired angle. I had watched his videos a while ago but just now went back and read through the thread. Got some ideas now :)

Thanks for the rating man, i appreciate it! :D
 
Ok cool. I had read that using a hot knife was a good way to go. But it's nice to know that using an exacto knife will work as well.
 
Yeah i read that too. Or a turkey carver! lol. Whatever works i guess! The utility knife worked fine, i just had to make sure i made smooth cuts. I also found that you could smooth the edges by melting the surface just slightly and smoothing it out.

Thanks road kill!
 
Nice work man! I like how the pep files turned out. Very clean indeed. I was trying to decide on either soft or hard armor for my chest core. After seeing how your foam build turned out, I think I'm sold on the foam idea. ;)
 
Thanks! Yeah i thought it would allow for a little bit more comfortable set up. It really wasnt that time consuming either, faster than pepping it! :)
 
Hey,

I really like your foam armor!
dit you made anny templates for this one or just uses Hugh his model?
because you made it from a few pieces :p

let me know I wanna make the same armor but I am not that handy with making a template

The peps look great as well keep up the good work
 
Bram, Thanks! I used hugh's pep file. I just combined certain sections, heated them and bent them to the proper curve. I just had to play around with the pieces of the pep once i cut them out so see how everything curved and fit together and then went from there. Goodluck! If if you have any further questions feel free to ask!
 
Hey,

Thanks for the explanation
Do you have your templates still?
Maybe you can post them on this page?
You would help a lot of us :)

Good luck with the rest of your armor
I cant wait to see it finished!
 
Ok i looked for all the pieces but couldnt find all of them. I found the most important ones so I'll still be able to explain.

I used the pieces that i have colored below. The pieces that are touching and are the same color i cut out as one piece of foam.

Foamfront.png

Untitled.png


Here are the pieces i could find, notice that i've taped multiple pieces together so that i could use it as a template to cut the foam. I also cut some pieces wider so that the shoulder piece would have something to sit on top of.

IMG_1064.jpg

IMG_1066.jpg

IMG_1065.jpg

IMG_1050-1.jpg


The chest core is two halves, the back and the front, and they are held together by the shoulder pieces

IMG_1069.jpg


Back inside so you can see that the details on the back were cut out and then pushed inward and glued.

IMG_1067.jpg


Well that covers it i think. Oh i did have to cut the sides that come together under my arm(where the two halves meet) a little so that it would fit me tighter but thats pretty simple to do.

Hope this helps! :D
 

Attachments

  • Foamfront.png
    Foamfront.png
    42.6 KB · Views: 215
  • IMG_1050-1.jpg
    IMG_1050-1.jpg
    26 KB · Views: 200
  • IMG_1065.jpg
    IMG_1065.jpg
    146.5 KB · Views: 196
  • IMG_1066.jpg
    IMG_1066.jpg
    106.5 KB · Views: 196
  • IMG_1064.jpg
    IMG_1064.jpg
    93.7 KB · Views: 198
  • Untitled.png
    Untitled.png
    52.5 KB · Views: 209
  • IMG_1069.jpg
    IMG_1069.jpg
    77.2 KB · Views: 202
  • IMG_1067.jpg
    IMG_1067.jpg
    150.7 KB · Views: 206
Awesome build and progress on your ODST Rino! The foam vest to hold the armor parts on is a great idea and I'm sure it'll be more comfortable to move around in.
 
Thank you so much! this is very nice

I got 1 more question
Did you scale the armor or just used the scale Hugh made it?

Thank you very much again!

Good luck with your armor
I can't wait to see it finished
 
wow. the skills with that gluegun are imense! its very very clean. its good to see someone who is good at foam armour, keep up the good work as that might be the way forward
 
Thanks roadkill, 0235 and td2253!

Bram
I used his scale. All his parts are scaled to fit a medium built 6ft person. I just had to trim the sides that meet together to fit me because im pretty skinny.
Again no problem!
Goodluck with yours as well
 
Status
Not open for further replies.
Back
Top