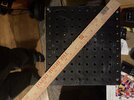
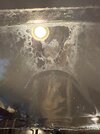
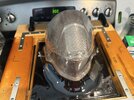
What is the detentions of your vacuum box? Should I consider changing my top plates to a board with smaller diameter/more holes?I was having touble with an ODST visor just a few days ago. I took a piece of scrap wood to raise one side up because I was getting creases. Here's what that looked like:
You could do the same but raise both sides. It also allows for better suction near the edges because the holes under the buck are being used now.
You are using an out of date browser. It may not display this or other websites correctly.
You should upgrade or use an alternative browser.
You should upgrade or use an alternative browser.
Starting my ODST build
- Thread starter chaos cre8ions
- Start date
- Member DIN
- S410
No that won't work. The idea is to raise it up from just underneath, nothing to the side. If you have 1 inch by 1 inch cubes, a few of those would do the trick.The indents in the buck have holes to help suction. If I cut these wood pieces to cover the corners, would that work?
My dimms are: 11 inches by 10.5 inches
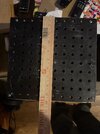

Looks like my box is 10.5 X 10 inchesNo that won't work. The idea is to raise it up from just underneath, nothing to the side. If you have 1 inch by 1 inch cubes, a few of those would do the trick.
My dimms are: 11 inches by 10.5 inches
Should I use 3 blocks? See photoHere's a side profile of my suggestion, if it helps. See how raising the buck up but only directly under it allows the plastic to fully form around to the edge of the buck
Attachments
- Member DIN
- S410
Yeah that would workShould I use 3 blocks? See photo
I’ll print off the 1x1” blocks when I get home from work in the morning, and try another run when I get up. Should I try the buck diagonally?Yeah that would work
- Member DIN
- S410
whatever orientation helps centre the buck as best as possible. You want don't want the plastic to have to stretch more than it needs to.I’ll print off the 1x1” blocks when I get home from work in the morning, and try another run when I get up. Should I try the buck diagonally?
You got it! I’ll post how good or bad it goes lolwhatever orientation helps centre the buck as best as possible. You want don't want the plastic to have to stretch more than it needs to.
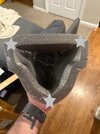
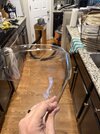
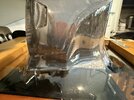
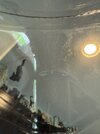
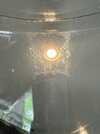
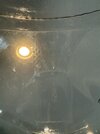
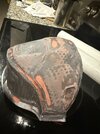
The pull went a lot smoother, but now I guess I’m seeing the imperfections in the front of the visor. How do I fix it? To the touch it feels smooth, but I’m seeing the distortions.whatever orientation helps centre the buck as best as possible. You want don't want the plastic to have to stretch more than it needs to.
Attachments
- Member DIN
- S410
I think that may be some paint or steam coming from the buck and being transferred to the visor. Clean the buck with soap and water and polish it with automotive headlight polisher. That should clear it up a bit.The pull went a lot smoother, but now I guess I’m seeing the imperfections in the front of the visor. How do I fix it? To the touch it feels smooth, but I’m seeing the distortions.
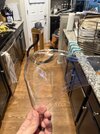
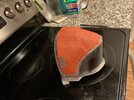
Looks like elevating the buck helped get it to form all the way to the edge! Excellent.
I’ll get to rest that tomorrow after I get off work ")
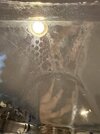
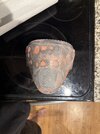
So the blemishes were still there. I used Bondo spot putty + Acetone to treat the buck and in the morning I will be sanding and resin treating tomorrow… If you haven’t used acetone w/ Bondo DON’T use a plastic bowl to mix them! The Acetone ate through the bowl in my hands and made a bit of a mess…Oops.I think that may be some paint or steam coming from the buck and being transferred to the visor. Clean the buck with soap and water and polish it with automotive headlight polisher. That should clear it up a bit.
Looks like elevating the buck helped get it to form all the way to the edge! Excellent.
Attachments

- Member DIN
- S410
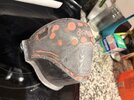
Do you have a picture of what it looked like after you tried to polish it? If it's almost good there's a chance that may be as good as you'll be able to get it. Home-made vacuum forming doesn't result in perfect visors.So the blemishes were still there. I used Bondo spot putty + Acetone to treat the buck and in the morning I will be sanding and resin treating tomorrow… If you haven’t used acetone w/ Bondo DON’T use a plastic bowl to mix them! The Acetone ate through the bowl in my hands and made a bit of a mess…Oops.
Do you have a picture of what it looked like after you tried to polish it? If it's almost good there's a chance that may be as good as you'll be able to get it. Home-made vacuum forming doesn't result in perfect visors.
Attachments
OrangeCrush
New Member
The good new: Once you get the coatings on it, no one will know you can't see straight.
Cue the Luke Skywalker "I can't see anything in this helmet" mem
Thanks to this thread, I have re-designed my vacuum table thing several times. I'm looking to do mine in June.
Best
Cue the Luke Skywalker "I can't see anything in this helmet" mem
Thanks to this thread, I have re-designed my vacuum table thing several times. I'm looking to do mine in June.
Best
- Member DIN
- S027
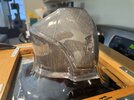
Well... adult to adult... it looks like you're getting out of it exactly what you're putting in to it.
The same patterns, pillows and distortions in the buck are seen in the visor.

If you're shooting for optical-grade coming out, you're going to need something closer to optical-grade smooth going in.
The same patterns, pillows and distortions in the buck are seen in the visor.
If you're shooting for optical-grade coming out, you're going to need something closer to optical-grade smooth going in.