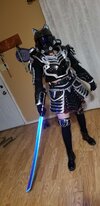
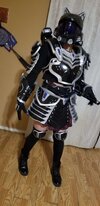
Yoroi Build x2 (matching sets)

Emp Frosty

Active Member
405th Regiment Officer
Member DIN
S144
Starting a new build thread after a long time to show off my Yoroi builds. I'm doing 2 sets, one for myself and another for my girlfriend. Time frame for these builds is to have hers done (or in a wearable state) by C2E2 this year (2024) and mine by HCS Worlds at the end of the year. I have a 3rd build planned to also have done by HCS Worlds but that will be a different thread.

First up we have my build in my now signature color scheme the Emperors Armory. For those who got to see it already its Metallic Sapphire Blue with Black secondary and White accents as well as my custom frost weathering on the boots and gloves.

Screenshot (224).png
Screenshot (225).png
Screenshot (226).png


With the helmet being carried over from my Mk. VII build.

Next up is my girlfriends build, she has chosen to go with a Black primary and Silver secondary with the theme of looking like a Black cat with silver bits.

Screenshot (221).png
Screenshot (222).png
Screenshot (223).png


Both builds will be near identical in construction (cat ears excluded) with regards to armor parts and materials. The bulk of the build will be 3D print for hard armor with foam being used for the shins, boots, and perhaps a few other parts to save weight and for comfort. I'm also playing around with the idea of fiberglass or resin reinforcing the hard parts as well but no guarantee yet due to time constraints.

As I reach milestones in these builds I'll be updating this thread as well as answering any questions anyone has.
 
Oh my gosh those suits are gonna look SICK!! I particularly like the cat ears XD

Best of luck getting it done in time for C2, because I really would love to see it in person!
 
With the first goal of C2E2 quickly approaching it's time to update progress on the first suit. I had to delay the update a bit since I had to print the entire belt since my cat tried to eat all the foam parts I cut.

Over the past weekend I managed to strap together all of the 3D printed parts for a test fit. And boy do I gotta say dont ever let someone tell you that strapping together a yoroi suit is easy. Strapping took about 6 hours spread across 2 days for me since I had near no reference for any of it.

After the test fit we decided that my girlfriend would change up her undersuit a bit and go with a skirt/kimono combo that matches her armor color.

Last things to do now is build the shins and boots and the whole suit will be ready for C2E2.
 

Attachments

  • 20240407_025938.jpg
    20240407_025938.jpg
    458.3 KB · Views: 64
  • 20240407_030116.jpg
    20240407_030116.jpg
    490 KB · Views: 63
Time to finally update things in here.

First up I managed to finish the first Yoroi suit just in time for C2E2. I didn't have the time to do the Katanas but I did have a pretty good stand in I think. Pictures have been added at the top. Some changes were made to the concept and Green goddess50 decided that she wanted to go with a Nier 2B crossover under suit and used one of the Kimono costumes for 2B as the under suit, was pretty fitting actually.

With the change to the concept we decided Id go with a Nier 9s Kimono outfit as my under suit to match. I have that on hand now but wont show anything till I have armor parts to go with it. Now that I'm starting with the next suit officially Ill try and show off some of the new things I'll be doing to improve and evolve the armor from the first set to the second.

Starting with the first major change is the color scheme:
Screenshot (251).png
Screenshot (252).png
Screenshot (253).png


I'll be changing to a black primary and gold/copper secondary in order to match my under suit colors and my girlfriends black and silver armor.

second change is still being worked on but Ill be going through and modifying the Bicep and Thigh plates to split the individual plates up and adding holes to make it possible to do my own lacing. This is for a couple reasons. First being that its way easier to print these parts in the small sections that have a lower chance of failure. Second being that sanding these parts will also become easier without the lace bumps modeled into them from the start. Third reason is havinf the plates flax as I move will look much better than the stiff plates they currently are. Lastly the ability to add my own lacing to each of these parts ultimately looks far better than the printed "bumps" of lace that are difficult to sand.

I'll try and document this suit a bit better for those of you following along to see how I rigged everything together. I did have to get pretty creative with it after all.
 
First small up date to follow along.

I took the bicep plate that used for the first set of Yoroi (acquired from Titlewave) and modified them a bit. I cut off the bottom plate and removed the lace sections on the original model, I then added a second row holes on the bottom to be used as the middle and top plates.
Screenshot (255).png
Screenshot (254).png


While not a perfect job it did give me the result I wanted when I printed them.

20240613_165335.jpg


Ill need to find a lace that matches the color I want still but for the prototype parts it was a good first attempt.
 
Small update to the build.

I went through and painted some parts to include, Helmet, hand plates, one forearm, and one set of bicep plates. Additionally I went and did a lace up of that one bicep.

received_1739920490166813.jpg
20240715_091655.jpg
20240715_091634.jpg


More will come soon as I've started printing the chest plate and am working the other forearm and bicep.
 
Time for one of those random updates.

First up Im about 75% of the way through the base level of this build to make it wearable. I've managed to get through most of the armor skirt and part of the back this time.

As with the bicep plates I've separated the Thigh plates into individual parts and laced them together. The holes for the lace were much bigger on the thighs so I had to make some braded cords in order to lace them up.
20240911_142950.jpg

20240911_161935.jpg

20240911_163806.jpg


Like with how I did the first set of armor I used some elastic nylon to link together all of the back and side plates for the skirt. This alows them to sort of flex and flow as I walk and give it a really nice look.

20240824_184429.jpg

20240824_191835.jpg


I also decided to make some additions to my helmet and will continue to work on making it better but for now Ive added the Oni horn armor effect but with blue lights on the inside.

Snapchat-2032628135.jpg


Second to last thing is I've made the last bit of progress I can before I move at the end of the month but am still on track for finishing for TORG.

20240914_153522.jpg


Very last thing to mention is I made some more modifications to the files I'm using to add a metric ton of lights and really make the armor pop, Ill have to show those next time.
 
What did you use to render and paint the model to display your color scheme? Blender? I've been wanting to do that as well as I get my armor printed so I can have the paint scheme planned out when I finally get there.
 
What did you use to render and paint the model to display your color scheme? Blender? I've been wanting to do that as well as I get my armor printed so I can have the paint scheme planned out when I finally get there.
I used the blender pack found in the Halo archives discord.
 

Your message may be considered spam for the following reasons:

If you wish to reply despite these issues, check the box below before replying.
Be aware that malicious compliance may result in more severe penalties.
Back
Top