You are using an out of date browser. It may not display this or other websites correctly.
You should upgrade or use an alternative browser.
You should upgrade or use an alternative browser.
My First Armor Build; Halo Infinite Master Chief
- Thread starter ForwardUntoDusk
- Start date
I don’t have any tips for you cuz I don’t have a 3D printer, sorry. What I do have is my praise, it looks so awesome! Keep up the great work, can’t wait to see it done!
- Member DIN
- S018
What you could do is print "scaling rings" - basically just cross sections of your armour, a few millimeters tall, that you use to test if a print is going to fit on you.Update: I ended up purchasing the Armorsmith software, so I could free-form scale the chest and back piece. I'm like 85% sure I got it right, but unfortunately won't know for certain until its all printed and I can try it on. Fingers crossed.
I've done that for most of the parts. Scaling rings are definitely the way to go when I do uniform sizing. The issue I was having with the chest piece is that I needed to deform the part and only scale up the bottom half to fit my oddly shaped torso. Lol.What you could do is print "scaling rings" - basically just cross sections of your armour, a few millimeters tall, that you use to test if a print is going to fit on you.
Yeah. I also purchased the files for a couple of his rifles and the pistol.Nice work so far!
Are those galactic armory’s files?
Last edited:
- Member DIN
- S054
Sweet! How do you like working with them?Yeah. I also purchase the files for a couple of his rifles and the pistol.
Overall, I really like his files. There’s a ton of detail worked into them, and everything seems very screen accurate.Sweet! How do you like working with them?
The way he broke the files apart is a little awkward for a few of the pieces, and there’s some funky artifacts on the Mjolnir armor set that MeshMixer had trouble repairing.
That being said, I’m very pleased with my purchase of them. I’ll post some pics of the rifles that I’m working on right now as well.
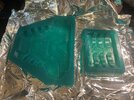
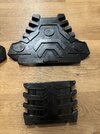
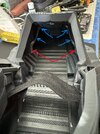
UPDATE: I think my experiment with molding the bottom of the boots worked out better than I had hoped.
I wanted to do a full boot piece, instead of just a boot cover, but was worried about the plastic wearing down quickly. In my slicing software, I cut off the bottom 1/2” and printed that separately. I used that piece to make a silicone mold, then cast it with an 85A urethane rubber.
I’ve glued those to the bottom of the print with some Super Weld epoxy (which I tested on a spare piece, and couldn’t even pull it apart with pliers), and I think it turned out pretty sweet…
Attachments
- Member DIN
- S054
Now that’s cool!UPDATE: I think my experiment with molding the bottom of the boots worked out better than I had hoped.
I wanted to do a full boot piece, instead of just a boot cover, but was worried about the plastic wearing down quickly. In my slicing software, I cut off the bottom 1/2” and printed that separately. I used that piece to make a silicone mold, then cast it with an 85A urethane rubber.
I’ve glued those to the bottom of the print with some Super Weld epoxy (which I tested on a spare piece, and couldn’t even pull it apart with pliers), and I think it turned out pretty sweet…
how did you get your shoes into the boots. The toes of the combat boots i am using wont fit into the front of the boot
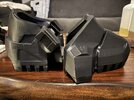
I went with Sketchers slip-on tennis shoes. I was originally planning to use boots as well, but wanted something that I could leave in the armor boots and get my foot into easily. After finding the shoes I liked, I scaled the armor boots off the inside measurements to get a tight fit.how did you get your shoes into the boots. The toes of the combat boots i am using wont fit into the front of the boot
on the inside of the 2 boot pieces, I glued a strip of thin rubber moulding to hold them in place, relative to each other. The toes of my Sketchers wedge tightly into the front, and then I have an elastic strap to hold them down in the heel section. It's pretty comfortable, and they don't move around at all. I can post some more detailed pictures if you want?
Also, here's an amazon link to the Sketchers that I have...
- Member DIN
- S118
would love to see the pictures, i did the same thing and you are right it is a nice tight fit no flopping around like i got with the bootsI went with Sketchers slip-on tennis shoes. I was originally planning to use boots as well, but wanted something that I could leave in the armor boots and get my foot into easily. After finding the shoes I liked, I scaled the armor boots off the inside measurements to get a tight fit.
on the inside of the 2 boot pieces, I glued a strip of thin rubber moulding to hold them in place, relative to each other. The toes of my Sketchers wedge tightly into the front, and then I have an elastic strap to hold them down in the heel section. It's pretty comfortable, and they don't move around at all. I can post some more detailed pictures if you want?
Also, here's an amazon link to the Sketchers that I have...
- Member DIN
- S054
Same! The boots look fantastic and I’m always looking to ways to make mine better.would love to see the pictures, i did the same thing and you are right it is a nice tight fit no flopping around like i got with the boots
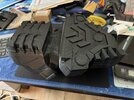
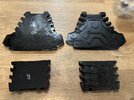
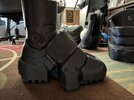
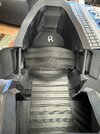
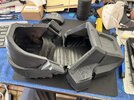
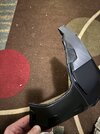
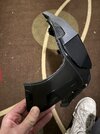
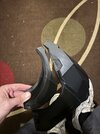
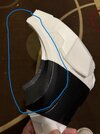
Here's some more pics of the boots... I cut and glued down (JB SuperWeld Extreme) a strip of thin rubber moulding (made for house baseboards) to connect the toe and heel sections of the boots. Its thin and flexible, but still really durable and tear resistant. This keeps the boot sections in place and makes sure the front of the shoes stay pressed into the toe section of the boots.
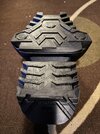
I used the ridges inside the toe section (see RED arrows on second picture) to scale it around the shoes, placing the ridge right behind the toe-box of the shoes to ensure a good grip. The back of my shoes fit smoothly into the heel section of the boots, and I have glued down a strip of elastic to help keep the heel snug against my shoes. I've put both boots on and walked around. The shoes are comfortable, and remain securely in both sections of MC boots.
I did use my Dremel to sand down the upper ridges inside the toe section (see BLUE arrows on second picture), because they were rubbing on my toes and causing some discomfort. Once sanded down though, the whole set up is pretty comfortable to wear and walk around in.
I just have to remember that the boots are much wider than normal tennis shoes. Lol.
Hopefully that explanation/description, along with the photos, makes sense...
Attachments


- Member DIN
- S054
That looks freaking fantastic.Here's some more pics of the boots... I cut and glued down (JB SuperWeld Extreme) a strip of thin rubber moulding (made for house baseboards) to connect the toe and heel sections of the boots. Its thin and flexible, but still really durable and tear resistant. This keeps the boot sections in place and makes sure the front of the shoes stay pressed into the toe section of the boots.
I used the ridges inside the toe section (see RED arrows on second picture) to scale it around the shoes, placing the ridge right behind the toe-box of the shoes to ensure a good grip. The back of my shoes fit smoothly into the heel section of the boots, and I have glued down a strip of elastic to help keep the heel snug against my shoes. I've put both boots on and walked around. The shoes are comfortable, and remain securely in both sections of MC boots.
I did use my Dremel to sand down the upper ridges inside the toe section (see BLUE arrows on second picture), because they were rubbing on my toes and causing some discomfort. Once sanded down though, the whole set up is pretty comfortable to wear and walk around in.
I just have to remember that the boots are much wider than normal tennis shoes. Lol.
Hopefully that explanation/description, along with the photos, makes sense...
Update: I may be getting carried away... Lol.
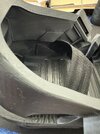
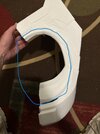
Not sure if I'm just crazy, or drunk off the good results I got from casting a mold of the boot treads...but I'm going to attempt more rubber molding. My new idea is to cut out the circular opening around the arm/shoulder joint. I'm going to try and cut these out of the chest and back pieces, glue them together, smooth and shape them, make a ledge for connections and magnets, and make a silicone mold.
After that, I'll cast the mold in a flexible rubber. I'm thinking of mounting the rubber ring permanently to the back piece, while attaching some magnets to the front of the ring. That way, when I attach the chest piece, the rubber ring will snap into place with magnets, forming a solid circle around my shoulder and helping a little to hold the chest in place...
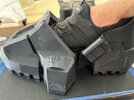
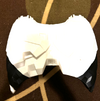
I have 3 extra prints for the chest piece (scaling that was a pain), so I should have plenty to practice on before attempting this on the properly scaled chest piece. I've included a pic of my first attempt on a spare chest piece. I'm using a hot-wire foam cutter, which seems to be working very well. Because the wire is so thin, you have to move slow and make several passes to get a clean enough separation of the pieces. After just one pass, the melted plastic on the cut pieces kinda half-weld back together.
The reason I had for trying this was to increase the comfort and flexibility around the arms and shoulders. When all is said and done, I want to be able to remove my own helmet, and reach the rifle I plan to attach magnetically to the back piece.
We'll see how the test piece goes... Fingers crossed.
Not sure if I'm just crazy, or drunk off the good results I got from casting a mold of the boot treads...but I'm going to attempt more rubber molding. My new idea is to cut out the circular opening around the arm/shoulder joint. I'm going to try and cut these out of the chest and back pieces, glue them together, smooth and shape them, make a ledge for connections and magnets, and make a silicone mold.
After that, I'll cast the mold in a flexible rubber. I'm thinking of mounting the rubber ring permanently to the back piece, while attaching some magnets to the front of the ring. That way, when I attach the chest piece, the rubber ring will snap into place with magnets, forming a solid circle around my shoulder and helping a little to hold the chest in place...
I have 3 extra prints for the chest piece (scaling that was a pain), so I should have plenty to practice on before attempting this on the properly scaled chest piece. I've included a pic of my first attempt on a spare chest piece. I'm using a hot-wire foam cutter, which seems to be working very well. Because the wire is so thin, you have to move slow and make several passes to get a clean enough separation of the pieces. After just one pass, the melted plastic on the cut pieces kinda half-weld back together.
The reason I had for trying this was to increase the comfort and flexibility around the arms and shoulders. When all is said and done, I want to be able to remove my own helmet, and reach the rifle I plan to attach magnetically to the back piece.
We'll see how the test piece goes... Fingers crossed.
Attachments
Thanks!What material are you using for the tread?
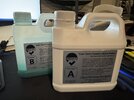
For the silicone mold, I used BBDino Super Elastic Platinum Silicone. I found that on Amazon.
For the actual rubber treads I used PT Flex 85 that I got from brickintheyard.com. I went with the highest shore hardness they had (85A). It’s still a little squishy and flexible, but sturdy enough I think it will hold up well.
Attachments

- Member DIN
- S118
i really think you are doing a awesome job on this with thinking things out like you are. i cant wait to see how everything comes out.
PS if you get a chance check out the smooth on flex foam it 15 i got some of that and it is really durable it is what i will be making all under suit part with it is hard to rip even if it has a tare in it.
this stuff is really good you can use a brush or slush cast with it.
PS if you get a chance check out the smooth on flex foam it 15 i got some of that and it is really durable it is what i will be making all under suit part with it is hard to rip even if it has a tare in it.
this stuff is really good you can use a brush or slush cast with it.
- Member DIN
- S054
I’ll most likely end up doing something similar on my MK7 build. The gaskets need to be flexible, but my foam work is really bad.Update: I may be getting carried away... Lol.
Not sure if I'm just crazy, or drunk off the good results I got from casting a mold of the boot treads...but I'm going to attempt more rubber molding. My new idea is to cut out the circular opening around the arm/shoulder joint. I'm going to try and cut these out of the chest and back pieces, glue them together, smooth and shape them, make a ledge for connections and magnets, and make a silicone mold.
After that, I'll cast the mold in a flexible rubber. I'm thinking of mounting the rubber ring permanently to the back piece, while attaching some magnets to the front of the ring. That way, when I attach the chest piece, the rubber ring will snap into place with magnets, forming a solid circle around my shoulder and helping a little to hold the chest in place...
I have 3 extra prints for the chest piece (scaling that was a pain), so I should have plenty to practice on before attempting this on the properly scaled chest piece. I've included a pic of my first attempt on a spare chest piece. I'm using a hot-wire foam cutter, which seems to be working very well. Because the wire is so thin, you have to move slow and make several passes to get a clean enough separation of the pieces. After just one pass, the melted plastic on the cut pieces kinda half-weld back together.
The reason I had for trying this was to increase the comfort and flexibility around the arms and shoulders. When all is said and done, I want to be able to remove my own helmet, and reach the rifle I plan to attach magnetically to the back piece.
We'll see how the test piece goes... Fingers crossed.
Similar threads
- Replies
- 4
- Views
- 291
- Replies
- 63
- Views
- 2,354
Similar threads
- Replies
- 4
- Views
- 291