My First Armor Build; Halo Infinite Master Chief

Update: I may be getting carried away... Lol.

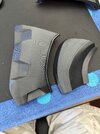
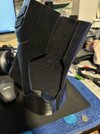
Not sure if I'm just crazy, or drunk off the good results I got from casting a mold of the boot treads...but I'm going to attempt more rubber molding. My new idea is to cut out the circular opening around the arm/shoulder joint. I'm going to try and cut these out of the chest and back pieces, glue them together, smooth and shape them, make a ledge for connections and magnets, and make a silicone mold.

After that, I'll cast the mold in a flexible rubber. I'm thinking of mounting the rubber ring permanently to the back piece, while attaching some magnets to the front of the ring. That way, when I attach the chest piece, the rubber ring will snap into place with magnets, forming a solid circle around my shoulder and helping a little to hold the chest in place...

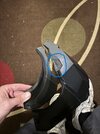
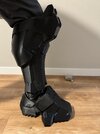
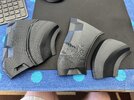
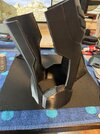
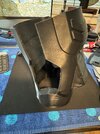
I have 3 extra prints for the chest piece (scaling that was a pain), so I should have plenty to practice on before attempting this on the properly scaled chest piece. I've included a pic of my first attempt on a spare chest piece. I'm using a hot-wire foam cutter, which seems to be working very well. Because the wire is so thin, you have to move slow and make several passes to get a clean enough separation of the pieces. After just one pass, the melted plastic on the cut pieces kinda half-weld back together.

The reason I had for trying this was to increase the comfort and flexibility around the arms and shoulders. When all is said and done, I want to be able to remove my own helmet, and reach the rifle I plan to attach magnetically to the back piece.

We'll see how the test piece goes... Fingers crossed.
hey i was thinking and yes it hurts lol, in the picture of the cut off gasket if you cut the little notch with it you could put a metal plate back there and then the magnet will hold better.
 

Attachments

  • IMG_9985.jpg
    IMG_9985.jpg
    1.8 MB · Views: 65
i really think you are doing a awesome job on this with thinking things out like you are. i cant wait to see how everything comes out.
PS if you get a chance check out the smooth on flex foam it 15 i got some of that and it is really durable it is what i will be making all under suit part with it is hard to rip even if it has a tare in it.


this stuff is really good you can use a brush or slush cast with it.
Thanks for the info. That sounds like exactly what I’m looking for.
 
First test-fit of the boot, ankle, and calf pieces. Everything fits together and seems to be sized perfectly.

Currently, the ankle is printed in TPU, but I’m not really getting the level of stretch or flexibility I want from it. Even with 83A TPU.

Contemplating multiple pieces, mounted together at the circle detail on the side, sized like a Russian nesting doll, so they actually slide over each other as I walk… That way, I may be able to get the flex action without the material bending or warping. Theoretically…

As I said, this may be getting out of hand. lol.
 

Attachments

  • IMG_9996.jpeg
    IMG_9996.jpeg
    2 MB · Views: 112
  • IMG_0003.jpeg
    IMG_0003.jpeg
    2.1 MB · Views: 117
  • IMG_0013.jpeg
    IMG_0013.jpeg
    1.8 MB · Views: 110
First test-fit of the boot, ankle, and calf pieces. Everything fits together and seems to be sized perfectly.

Currently, the ankle is printed in TPU, but I’m not really getting the level of stretch or flexibility I want from it. Even with 83A TPU.

Contemplating multiple pieces, mounted together at the circle detail on the side, sized like a Russian nesting doll, so they actually slide over each other as I walk… That way, I may be able to get the flex action without the material bending or warping. Theoretically…

As I said, this may be getting out of hand. lol.
wow that looks good!
 
First test-fit of the boot, ankle, and calf pieces. Everything fits together and seems to be sized perfectly.

Currently, the ankle is printed in TPU, but I’m not really getting the level of stretch or flexibility I want from it. Even with 83A TPU.

Contemplating multiple pieces, mounted together at the circle detail on the side, sized like a Russian nesting doll, so they actually slide over each other as I walk… That way, I may be able to get the flex action without the material bending or warping. Theoretically…

As I said, this may be getting out of hand. lol.
that looks really good, but how easy is it for range of motion can you walk pretty good?
 
Found this great video from Frankly Built, on how to slice up files in MeshMixer using face groups. Gave it a shot for the chest/back pieces, to be able to cast that inner shoulder seal in rubber or foam.

Took some finagling, but I was able to get a clean separation of those pieces to print individually. Should only need to shape a little for a seamless fit.


Attachments

  • IMG_0027.jpeg
    IMG_0027.jpeg
    5.9 MB · Views: 65
  • IMG_0026.jpeg
    IMG_0026.jpeg
    3.3 MB · Views: 75
Found this great video from Frankly Built, on how to slice up files in MeshMixer using face groups. Gave it a shot for the chest/back pieces, to be able to cast that inner shoulder seal in rubber or foam.

Took some finagling, but I was able to get a clean separation of those pieces to print individually. Should only need to shape a little for a seamless fit.


I’m totally using that video, thanks for sharing it!
 
Found this great video from Frankly Built, on how to slice up files in MeshMixer using face groups. Gave it a shot for the chest/back pieces, to be able to cast that inner shoulder seal in rubber or foam.

Took some finagling, but I was able to get a clean separation of those pieces to print individually. Should only need to shape a little for a seamless fit.


that helped me a whole lot on my ghost build im going to start thank you
 
Trying something different for the knee joint. Originally, this piece was fully printed in TPE, but it was pretty restrictive on movement.

I removed the side panels using my hot-wire cutter, and glued some stretch fabric in its place. Flexibility has definitely increased, but not sure I'm entirely sold on this solution.

I used MeshMixer to remove the panel from the 3D files. If I do decide to go with this method, then I can print a new piece with clean edges around the fabric.
 

Attachments

  • Screenshot 2023-10-14 210525.jpg
    Screenshot 2023-10-14 210525.jpg
    302.5 KB · Views: 77
  • IMG_0084.jpg
    IMG_0084.jpg
    3.5 MB · Views: 80
  • IMG_0082.jpg
    IMG_0082.jpg
    4.2 MB · Views: 74
  • IMG_0080.jpg
    IMG_0080.jpg
    4.2 MB · Views: 68
  • IMG_0079.jpg
    IMG_0079.jpg
    2.1 MB · Views: 76
I'm not a fan of how thick the thigh pieces are on these files. When I size them to fit my leg, it doesn't leave much of a gap between the pieces. So, they were rubbing against each other as I walked. Went into Blender and tried to sculpt down the inside. Hoping I can scale them down a little more, and give me some more space when walking...
 

Attachments

  • Screenshot 2023-10-15 1057162.jpg
    Screenshot 2023-10-15 1057162.jpg
    165.7 KB · Views: 66
I'm not a fan of how thick the thigh pieces are on these files. When I size them to fit my leg, it doesn't leave much of a gap between the pieces. So, they were rubbing against each other as I walked. Went into Blender and tried to sculpt down the inside. Hoping I can scale them down a little more, and give me some more space when walking...
Are those the galactic ones?
 
Trying something different for the knee joint. Originally, this piece was fully printed in TPE, but it was pretty restrictive on movement.

I removed the side panels using my hot-wire cutter, and glued some stretch fabric in its place. Flexibility has definitely increased, but not sure I'm entirely sold on this solution.

I used MeshMixer to remove the panel from the 3D files. If I do decide to go with this method, then I can print a new piece with clean edges around the fabric.
hey i like that idea and you really dont notice the parts that are missing
 
Are those the galactic ones?
Yeah. I looked at the moesizzlelac files on Thingiverse, to potentially use the thigh files. But, the design just didn't match. Also checked out the Nikko Industries files, but figured I'd give this a shot before dropping another $125. Lol.

With the sculpting I was able to do in Blender, it should give me another 20-30mm of space between the thigh pieces.
 

Your message may be considered spam for the following reasons:

If you wish to reply despite these issues, check the box below before replying.
Be aware that malicious compliance may result in more severe penalties.
Back
Top