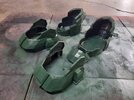
1st Build 3D printed Halo 5 Master Chief build

Status
Not open for further replies.

MrChuck

New Member
Hey yall!
I've been lurking the forums for the past few years now, but now I'm finally making my official first build/update post.
I have actually started building the armor like a year and a half ago, so this will just be for sharing updates with you guys.
I post story updates often on my Instagram account, so if you want to see how it's going, feel free to check me out: @spencharmander

I have been building the armor using parts from across the multiverse of the Internet.
Most of the parts came from Jace1969's Halo Master Chief Full Body Armour on Thingiverse (Halo Master Chief Full Boddy Armour by Jace1969),

Some parts from CarterBuilder12's Halo 4/5 parts which he posted on the forums a few years ago (Halo 4/5 master chief armor high poly 3d printeble for you!) (very nice parts btw)

The Helmet was big_red_frog's Halo 4 Helmet Full Size A on Thingiverse (Halo 4 Helmet Full Size A by big_red_frog), printed with the high detail perforated visor which is also on Thingiverse.
(which I might actually reprint because I didn't do a great job with bondo-ing, sanding, painting etc. Future Project? maybe.)

I use a Creality CR-10S and a Lulzbot Taz 6.
Resolution: depends on the part, but mostly 0.3-0.38mm for producing parts faster.

SO here's the current WIP:
I finished the top half of the Armor. I'm not going to discuss it very much, but I will be redoing some of it, like the overall finishing and painting part.

These are old photos, from an old phone, sorry for the bad photo quality.

image1.jpeg
image1 (1).jpeg


Moving Forward:
I am currently printing the left thigh armor. The shins and right thigh parts are ready to be glued together. I'll post more pictures when more progress has been made.

A question I just thought of!:
How do you guys attach your knee armor? I printed the knee parts recently and that was a question that I had. Do you somehow attach it to the shin armor?


Sorry for the long awkward post, I'm just excited to finally post an update here on the 405th forums. Thank you, and Happy building!
 
Welcome aboard! Your work so far looks excellent and I am excited to see it done.

As for attaching things people normally use straps, buttons, velcro, some people also just permanently mount it to an undersuit.
Best of luck!
 
UPDATE:
The thighs have been fully printed and assembled. Gluing and sanding is underway and going well.
20220131_163145.jpg
20220131_155838.jpg

Here are some pics for the completed leg parts, and an awkward photo of the right-side leg armor.
It fits well, it will definitely need some insulation and padding for my leg to be more snug.

I got started on printing the Foot armor. Scaling the pieces to an old hiking shoe was a minor challenge. I was viewing some other armors and I decided to try to make the foot armor as streamlined, minimal, and as less awkward and clunky as possible. All while trying to maintain the whole Epic Master Chief Look.
I'm using the parts from Galanionn's Halo 4 foot files on Thingiverse: FOOT HALO 4 by Galanionn

Here's one of the completed heels on the set of shoes I plan to use: (it needs to be cleaned up a little)
20220131_164142.jpg


At this current pace, I should be able to have all the foot parts printed out within the week.
Alongside this MAster Chief build, I built an Assault Rifle. I will speak of it no more, as it looks atrocious (I know, I built it.) the best picture I have of it is now my account picture.
BUT, to make a weapon the Master Chief himself would want to use, I built the BR85 Battle Rifle from Halo 5. I am working on detailing right now, and it looks Infinitely better than the AR I built a while ago.

20220131_151328.jpg


Progress is going well, to say the least. Thanks for the feedback about the knee pads, it was greatly appreciated.
Anywho, Happy Building!
 
Hello again!
I've been sanding a lot. The legs are fully sanded and mostly assembled. I modified the calf/shin armor pieces so that the back opens up like an iron man suit, and is held shut by an elastic band. I got this idea from Moesizzlac's Halo 3 Master Chief armor that he posted on Thingiverse.
MC shin.jpg

I started sanding the chest pieces again to get rid of the cruddy paint/Bondo job I left on it two years ago. It needs some work.
I will be holding the front and back together with some strong magnets. But after testing the weight and durability, I decided that I will also be using velcro to keep the pieces on my body.
Has anybody that has 3d printed the chest armor done something similar to this? What has worked best with y'all?
MC chest front.jpg
MC chest side.jpg

I've also thought about painting/repainting parts in a different shade of green. What do you guys think is a good color?

Heres a picture of the legs: sanded, primed, and mostly assembled
MC legs .jpg


Thank you for the support. I hope to complete this Armor build in the next couple months.
Happy building!!
 
Update:
I put a silver undercoat on the legs, to help with battle damage later on. I will be putting on the green layers within the next few days. It's looking pretty nice.
I'm excited to put on the green, it'll finally feel like it's getting closer to being done.
MC legs.jpg


When I printed the chest front/back, I was printing the parts at a resolution of about 0.30mm to 0.35mm just to speed things up. However, this kind of plays into really bad structural integrity. So, I've been lining the inside with resin and making sure that things will hold together and last more than 15 minutes while I'm wearing it. It's coming along well. Here's a picture of me wearing the back
MC pack.jpg

I still need to spot putty up some cracks to make it look good, but I'm getting to that probably today or later.
This project is progressing well, to say the least.
Happy building!
 
Also! I forgot to mention, that I finished the BR85 that I mentioned earlier. It came out really nice!
I put some weathering on it, and it works magic on the end result! It helps mask up any hiccups from earlier.
Picture:
MC BR.jpg

I'll send some more pictures with me holding it when I have more armor to show off.
 
Update:
I put a couple of coats of green on the legs. It's looking pretty good. Today, I'm putting on tape for the darker green parts.
MC legs green.jpg
MC leg tape.jpg


Progress is going well. Since the armor portion of this build is nearing completion, I need to start thinking about the undersuit portion. I have a black bodysuit ready that will have velcro patterns on it for the corresponding armor segments that will need to be attached to my body. I am looking for ideas for using 3-4mm foam to create designs for the shoulders, neck, inner thighs, abdominal region, and spinal region.

If anyone knows of any pepakura patterns or guides or references that could help with this project, help or direction would be greatly appreciated.

Happy building!
 
Update:
Things are going well!

The legs and boot armor are completely sanded and painted.

mc legs 2.jpg
mc boots.jpg


A few days ago, I mounted the mounts for the magnets to hold the torso armor together. And today I tested to see how well the magnets perform. They are very strong. Earlier, I was a little nervous about only using magnets, but now I think that they will do very well on their own.
It was incredibly odd having the torso parts basically stuck together near instantly, where as two years ago they were being held together by a buckle system, which took 10 excruciating long minutes to try to get them attached together (by myself)

Anywho, pictures!:
MC BR chest.jpg
MC br chest 2.jpg
MC chest fron chest.jpg


The parts where the torso connects under my arms don't match up together, so I'll be using foam and velcro to get them to connect. The front and back will be repainted and detailed soon.

MC chest bottom side.jpg


Things are going pretty well. I'm very excited about all the progress I'm making on this project.
Questions, input, or feedback are welcome

Happy Building!!
 
Hello! its been a little bit.
Update:
I did another magnet test last week, and those magnets are very strong. They definitely passed a shake test. However, as I was trying to pull them apart, the parts that were holding the magnet mount almost pulled off a chunk of the armor itself. (I didn't get any pictures, sorry)
A valuable lesson was learned though. I printed this armor at a layer height of 0.30 to 0.32, just so I could print off more parts per day. BUT, when you increase layer height, you sacrifice durability/strength, because the layers themselves don't get very good adhesion to each other.
I have been working on it, reinforcing it, making it tougher. Its going well.

All the parts have been painted. Now they await their blackwash/weathering stage.
1652985614489.jpeg

(please excuse the clean laundry in the background)

Today I have started on the under suit foam parts. I had to dig around on the forums a little bit, but I found the shoulders and groin pep files.
I found them buried deep in this thread (Soft Parts - high res Halo 5 undersuit files Pepakura/3d printing), made available by Demogorgon in May of 2017.

2022-05-19 (1).png
2022-05-19.png
1652986049191.jpeg


Foam is actually kind of fun to work with. After I've cut out the pieces, I'll adhere them to my lycra bodysuit with E6000. That's the plan anyways. Ill keep all y'all updated on that.

Happy building!
 
In need of advice.
I am going to be starting on the Velcro for the legs soon, and I need to figure out where the Velcro needs to go. I already have the attachment for the chest and arms figured out. I know that my legs will be moving around the most and the armor will need to be mounted on pretty tough, however I don't want to overdo it to the point where movement is more limited than it should be.
The thigh armor will be held up with straps and buckles, but I don't want them to be loose around my legs.
What would you guys recommend?
 
I am in progress and haven't tested this live yet but I think I have a good solution.

I am using a molly belt with hip pads for gun holsters that I will attach to the thighs.

I linked to my post to illustrate the layout.

Post in thread 'Halo Infinate 3D printed build' Halo Infinate 3D printed build
I like the method youre using, I could probably replicate something that for the thigh armor. Also, I like how your armor is turning out so far. It looks great! and thank you for the help!
 
I don't suppose you have a good solution for the shins. My first suit the shins fit awfully. I want them to be nice and snug so they don't rattle around.

Was thinking downhill mtb shin pads with decent straps and pad out the inside with foam so I can just bmget my foot through but it's still snug.

You found any good solution
 
I actually haven't gotten down to the shins yet. I was planning on putting in a velcro strap to hold it up to the right spot, then filling the inside with low density craft foam. The craft foam would allow some squish, but hopefully should hold it snug on my leg. Hopefully.

Your mtb shin pad idea might work as long as your armor can fit over it.
 
Update on the armor:
Its coming along pretty well.
After basically resanding the whole chest and backpack, I put on a couple coats of green spraypaint and they're looking really good. I'm currently taping them up to paint the details on maybe tomorrow.

1654794952823.jpeg


I loaded the thigh and shin armor with padding and they are pretty snug. I figured that I probably will only use a few square inches of velcro to keep the thigh armor from rotating too much, as they will be held up with padding and with buckles that will be sewn into the bodysuit. I was in my shop the other day wearing my bodysuit all day figuring out and marking down where the velcro will go. And my amazing sister will sew them in for me.

Here are some pics of the legs:
1654795406277.jpeg
1654795433335.jpeg


Its coming along pretty well. I will probably finish up in the next couple weeks, which I'm excited to say but also sounds weird to hear because I started this project like two years ago.

Anywho, thanks for all the help!

Happy building!
 
Also! I forgot to mention, that I finished the BR85 that I mentioned earlier. It came out really nice!
I put some weathering on it, and it works magic on the end result! It helps mask up any hiccups from earlier.
Picture:
View attachment 316435
I'll send some more pictures with me holding it when I have more armor t
Update on the armor:
Its coming along pretty well.
After basically resanding the whole chest and backpack, I put on a couple coats of green spraypaint and they're looking really good. I'm currently taping them up to paint the details on maybe tomorrow.

View attachment 319022

I loaded the thigh and shin armor with padding and they are pretty snug. I figured that I probably will only use a few square inches of velcro to keep the thigh armor from rotating too much, as they will be held up with padding and with buckles that will be sewn into the bodysuit. I was in my shop the other day wearing my bodysuit all day figuring out and marking down where the velcro will go. And my amazing sister will sew them in for me.

Here are some pics of the legs:
View attachment 319023View attachment 319024

Its coming along pretty well. I will probably finish up in the next couple weeks, which I'm excited to say but also sounds weird to hear because I started this project like two years ago.

Anywho, thanks for all the help!

Happy building!
Looks amazing I love the look of 4/5s armor.
 
Status
Not open for further replies.
Back
Top