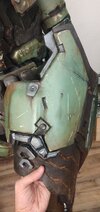
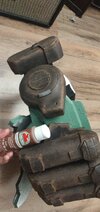
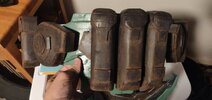
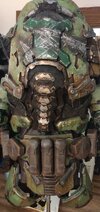
Doom 2016 Praetor suit

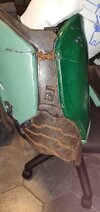
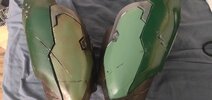
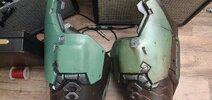
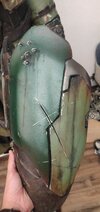
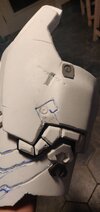
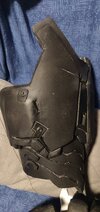
I have not updated in a while because the leg stuff isn't particularly glamorous, but I do finally have them roughed out. The overboot + sneaker + foam system I threw together actually seems to be working quite well, which is frankly bizarre. I had a much more difficult time with the upper body, but I think since I've been doing a lot of test fits and cross-referencing with the game model I managed to avoid any serious goofs.
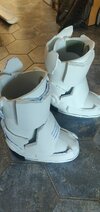
IMG_20220630_184043.jpgIMG_20220630_184120.jpg

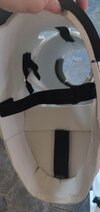
The boots are basically a bunch of loose shapes held together with elastic straps for flexibility, with one along the bottom to keep it down against the sneaker. I ran mechanic's wire around the outside to provide structure. I wouldn't call it elegant, but it does work very well. I wear a 13 so I was concerned about making it too long, since the model has pretty stubby boots. But the dimensions do look appropriate to the rest of my suit, and I'm free handing everything so I'm not worried about 1:1 accuracy.
IMG_20220630_184320.jpg
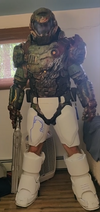
The test fit videos are below along with a still I liked. I tried using the front facing camera this time, so the quality is better. Since I couldn't see the screen I ended up with some weird dutch angle framing.


Still.PNG
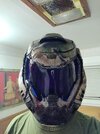
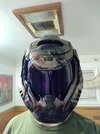
That's every major element of the suit, except for the knee pads. I'm very happy with how it all came together, it all looks good and stays in place. The heat isn't great. I thought I could get away with skipping a helmet fan, but the jury is still out. I'm going to poke some more holes in the thing and see if that helps with fogging. I took a closer look at my tint job and saw that there are tiny little orange peels under the surface, so if I want good visibility I'll have to sand down to the acrylic and reapply. I'd like to get it darker anyway, so after legs are done I'll get to it.

Mobility is very decent, I can jump and move around without issue and I don't think I look too doofy doing it. The only fitment issue is some velcro that keeps the torso sections together on the right side. I think the weight of the belt and thighs is pulling it down out of place, so I should be able to lengthen the straps and be in good shape. And I'm keeping a close eye on the calf pieces, they might be a little low but I need to finish more before I can tell.

The cheapo fake leather jacket I got just isn't going to work, but if I can find a breathable jumpsuit I can probably paint and sew onto it and make it look better in the long run anyway. I know absolutely nothing about what fabric to look for, so that will be another thing to work out. For this video I just threw on a dark flannel. I apologize for making you look at my knees, but it was 84 F and I didn't want to be found dead of heatstroke inside a video game costume. For the record, I was at least wearing shorts.

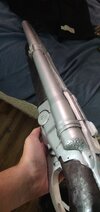
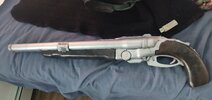
And here is the super shotgun after a pass with black oil paint. I'm always amazed at what oil can do compared to acrylics. I might leave it like this, or do a little bit with some burnt umber. It looks good enough that I don't want to overcook the paint job and detract from the model. It comes out to 31-32ish inches.
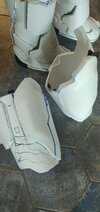
IMG_20220630_184159.jpgIMG_20220630_184219.jpg

That's where I'm at, the knees shouldn't be too much more work and then it's all details from then on. I'd just like to get the armor "done" by the end of the summer and then worry about undersuit details or whatever. It is certainly encouraging to be able to try it all on and have it look good without breaking catastrophically.

Thanks for reading, peace
 
Last edited:
if you're looking for a breathable undersuit material I'd look into stuff with lycra! I use a lycra dive suit for my spartan and it makes wearing the suit somewhat bearable.
 
if you're looking for a breathable undersuit material I'd look into stuff with lycra! I use a lycra dive suit for my spartan and it makes wearing the suit somewhat bearable.
Thanks, I will try and get my hands on some. My reservation is that a looser cut would hopefully bunch up at the joints and blend in what I like to think of as my "slim" frame with the bulk of the suit. I'm looking at cotton coveralls right now with the hope that I can cram an ice pack vest under the suit if need be..
 
The thighs are done, and the belt is about 85%. I still need to make the two frontmost pouches and detail the codpiece. Once I get that all that finished, I'll fix a couple rigging issues and try the suit on one more time before I start finishing out the boots, but it's coming quickly now that everything is roughed out.


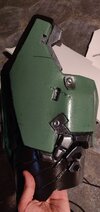
Here are pictures of how I paint, going from bare foam to spray can plasti-dip, then spray paint with brushed acrylic accents, then a heavy acrylic wash for the "leather," ending with burnt umber oil paint lightly applied on with a brush and paper towel. The weathering is mostly oil with some black acrylic to get into the cracks. Then scratches with a silver paint sharpie. As I type this, I realize I haven't added (fake) blood yet.. hopefully the pot hasn't dried up because Citadel ain't cheap.
IMG_20220806_231147.jpgIMG_20220807_015427.jpgIMG_20220808_224858.jpgIMG_20220808_224907.jpgIMG_20220809_020216.jpgIMG_20220813_222019.jpgIMG_20220813_222111.jpgIMG_20220815_231114.jpgIMG_20220815_231120.jpg

Same thing with the belt, except that I applied the plasti-dip less vigorously onto the pouches so that they would stay a little more porous. It helped to differentiate them from the "metal" bits and allowed them to absorb more of the nutmeg acrylic paint I used for weathering.
IMG_20220813_222220.jpgIMG_20220812_232842.jpg IMG_20220815_230954.jpg

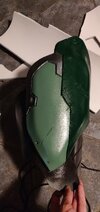
And I did end up sanding the visor down and re-applying the faux stained glass spray. I managed to avoid the weird subsurface micro-cracking thing that happened last time, and it is now simultaneously darker and less blurry than my first attempt. I think this may be dark enough, but I'll get some pictures under sunlight to see what comes through. I always liked the opacity of Doom 2016's helmet, so I'd like to make it pretty hard to see my face.
IMG_20220727_010701.jpgIMG_20220727_010728.jpgIMG_20220727_010752.jpgIMG_20220727_010810.jpg

I have some kind of surplus army coverall thing coming in the mail soon (a CWU-27/P if that means anything to anyone), so that will be my basic undersuit. I may need to dye or paint it a bit darker, but it is intentionally well-ventilated so it will be an upgrade over my current jacket regardless. As long as it doesn't smell gross I'll be happy.

I will update soon after I try all this crap on. We had a couple weeks of extreme heat and humidity, but it looks like that broke so I have no excuses. Peace
 

Attachments

  • IMG_20220815_231302.jpg
    IMG_20220815_231302.jpg
    1.3 MB · Views: 133
  • IMG_20220815_231315.jpg
    IMG_20220815_231315.jpg
    1.4 MB · Views: 140
Wow awesome dude! It keeps baffling me how you manage to reproduce almost every detail with EVA foam. What is your secret? Do you use multiple layers of EVA foam with different thickness or just a lot of heat shaping? Well probably both, but I am very impressed, I would not be able to do that with EVA.

And man your paint job is on point! You're really making me think about giving my suit a weathered look too. It looks fantastic. Keep up!

Also thanks for the tip with the military style undersuit, I might could need one for my cosplay as well. Just hard to find one in my size. I also see prices ranging from $40 to $300 ^^'.
Thanks! For the thighs I cheated a bit and cut in some of the seams and details, especially in the leather area. I just got a dremel, which helps a ton with making smooth indentations and edges, so I've been a little sloppy with the craft knife. The shaping is partially done with a heat gun. Usually, for complex surfaces like the chestpiece, forearms, or back of the thighs I'll get the rough shape on a flat piece of thicker foam, then build up the rough topography I need with sections of thinner foam, then put a thin piece of foam over top and heat form it so it smooths out to the shape of everything else. It's much easier than trying to heat and shape a single piece of foam.

The other thing is that I just get a lot of it "close enough," since I figure if the silhouette is right people will be a little more forgiving of little goofs. That's why I like the foam, since I have a lot of wiggle room to shift stuff around and adapt the shapes onto myself. But I'm sure you can tell that a lot of the little details are less than 100% accurate to the actual files, which is a natrural consequence of using EVA unless you have military-grade OCD.

I think the coveralls I bought were around $40 shipped, they looked lightly used but I saw sets with sweat stains that just looked grotesque. So I would be wary.
 
Just now saw your thread, and I'm completely blown away at how detailed this build is. Def looks like you've fought some demons with that battle damage. Can't wait to see the finished build!
 
I may not be a big Doom fan but damn your build is looking outstanding!
Love all the details in the suit and it all accompanied by amazing painjob with weathering that makes it look like it's been used in the battlefield a lot in such realistic way.
Following and looking forward to your progress. It's amazing.
 
Just now saw your thread, and I'm completely blown away at how detailed this build is. Def looks like you've fought some demons with that battle damage. Can't wait to see the finished build!
I may not be a big Doom fan but damn your build is looking outstanding!
Love all the details in the suit and it all accompanied by amazing painjob with weathering that makes it look like it's been used in the battlefield a lot in such realistic way.
Following and looking forward to your progress. It's amazing.
Thank you, it's very exciting to be closing in on the end after nearly 3 years. It will be fun to put it all on and get some good pictures with a real camera.
 
I got the belt and thighs done and did a brief test fit. I definitely need to replace the nylon strapping that is currently holding the cuirass together. The weight of the new pieces is too much for the velcro to handle, which makes sense because it's all scraps from random projects that I hot glued together. You can actually hear it letting go in the video, along with that big gap on my left side.

I'll try replacing it with elastic and adjusting some things slightly, which I think will do the trick. It will be a project for when the weather cools down and I can stand to be in the thing for more than 8 minutes at a time.

This was the premiere of the new coveralls, which I would definitely recommend. The fabric is very breathable and seems quite tough, and the cut itself is comfortable. I obviously have to dye it brown, but I'm tempted to get another one for when I'm working on cars or other nasty stuff. Certainly a good value purchase.

I should probably find a way to keep that butt plate from just flapping around too. Might be a good idea to just velcro it to the seat of the coveralls, but I don't know if I want to stitch them up quite yet. The codpiece has mysteriously vanished, probably under some couch somewhere. It has not been painted yet anyway, so it's probably for the best that it was left out.

The only other thing I noticed was that the visor seems to have lightened up slightly, which I assume is from it curing further. I guess I'll throw a few more coats on and try to go overkill this time. Due to the camera angle here, my face looks like it sits lower in the visor than it actually does. It still isn't ideally where I'd like it to be, so hopefully if I darken it down a lot more the placement will be a little harder to notice.


Again, it's certainly getting there. I have to squint real hard, but it looks like it's coming along. I think the darker color of the pleather jacket hid a lot, so I'll get me a basin and some dye and see if I can get that undersuit looking right.
 
Last edited:
I have to say that I am really impressed with your armor suit, Argent. :)

I found this forum while researching how to build an Praetor suit. My 14-year old son wants me to build one for Halloween (6 weeks away no less), and while this and some other Praetor build threads have been pretty informative, they also lead me to conclude that it would be a long time before my noob skills are adequate to the task, let alone in the short time he's left me to actually do it. :( And that assumes that he doesn't lose interest in helping me as I've requested, bailing out on me...

But I do have some questions.

1) What thicknesses of foam did you use? Any recommended type/seller?

2) I see that you decided near the end of the project that an flight suit to use as an base would be an good idea. Have you a source of decent ones that aren't $200? I'd actually prefer good quality knockoffs that are cotton, as the real flight suits tend to run kind of hot. No need for nomex fabric in this kind of costume.

3) Ventilation, and heat build up seem to be common issues with this kind of costume. Any thoughts as to ways to mititgate it? I thought thinning out the back of foam pieces to reduce the amount of heat buildup might be helpful, feasible/useful? Perhaps a ribbed undershirt like people who wear body armor all the time tend to wear?

4) Fairly significant weight seems to be an issue. Any advantage of using low density EVA for the inner parts, and the higher density EVA for external surfaces? Or lighter weight materials (not sure how practical that is).

Any thoughts as to how much you spent on this project? I may start to fiddle around with making some minor costume pieces just to get some experience with EVA and the construction techniques, and I don't want to spend a lot of money at the get-go.

Thank you
 
4) Fairly significant weight seems to be an issue. Any advantage of using low density EVA for the inner parts, and the higher density EVA for external surfaces? Or lighter weight materials (not sure how practical that is).

From personal experience EVA foam is very light-weight to the point where you barely feel it. But my first cosplay was done with fiberglass and resin so my comparison is based on that. A water bottle is heavier than a big sheet of eva foam which you could make quite lot of the costume while bottle of water is often lighter than a single piece of fiberglass resin armor.
With foam I'd rather say bigger priority is ventilation and airflow to not overheat than weight since it's an insulating material.
 
I have to say that I am really impressed with your armor suit, Argent. :)

I found this forum while researching how to build an Praetor suit. My 14-year old son wants me to build one for Halloween (6 weeks away no less), and while this and some other Praetor build threads have been pretty informative, they also lead me to conclude that it would be a long time before my noob skills are adequate to the task, let alone in the short time he's left me to actually do it. :( And that assumes that he doesn't lose interest in helping me as I've requested, bailing out on me...

But I do have some questions.

1) What thicknesses of foam did you use? Any recommended type/seller?

2) I see that you decided near the end of the project that an flight suit to use as an base would be an good idea. Have you a source of decent ones that aren't $200? I'd actually prefer good quality knockoffs that are cotton, as the real flight suits tend to run kind of hot. No need for nomex fabric in this kind of costume.

3) Ventilation, and heat build up seem to be common issues with this kind of costume. Any thoughts as to ways to mititgate it? I thought thinning out the back of foam pieces to reduce the amount of heat buildup might be helpful, feasible/useful? Perhaps a ribbed undershirt like people who wear body armor all the time tend to wear?

4) Fairly significant weight seems to be an issue. Any advantage of using low density EVA for the inner parts, and the higher density EVA for external surfaces? Or lighter weight materials (not sure how practical that is).

Any thoughts as to how much you spent on this project? I may start to fiddle around with making some minor costume pieces just to get some experience with EVA and the construction techniques, and I don't want to spend a lot of money at the get-go.

Thank you
Thanks!

The flight suit was a "CWU-27/P", but I found it on Ebay by looking up "flyers coveralls" or something like that. There's a guy that sells them for ~$40 shipped, I'd say it's very worth it even for the garment itself. I'm somewhere between 5'11" and 6' with a 32" waist and the "42r" size fits me very well. I believe the number denotes chest diameter, no clue what the "r" is though. It's military surplus, so there are all sorts of adjusting straps to fit different body types. And it is full cotton.

I used different thicknesses for the foam, but most of the structural stuff was just the floor mats you can buy at Home Depot, which are 10-12mm in thickness. However, I've found that the low density stuff Michael's sells isn't as insulating, which definitely matters for staying cool, and it does actually seem significantly lighter. The brand is Artminds, again 10-12mm is probably good for the structural stuff but you might want to pick up a thinner roll to do the details. It is very fairly priced, and I'd probably use it if I was doing the whole thing again.

The heat kind of sucks on mine, but it isn't too bad for a full costume suit. The film industry stuff is all foam rubber and I can't imagine what kind of hell that is, especially under studio lights. Definitely having a breathable undersuit material like cotton helps, and the low density foam makes a difference. I've contemplated wearing one of those ice pack vests under the suit but I don't know if it's feasible. If he can take his helmet off easily he'll be fine.

If you really want to get in-depth, one of the worst parts of wearing a suit are the points where the foam presses against the skin/undersuit, since you have the most insulation combined with a complete lack of breath-ability. So what I did was make the foam structure slightly larger than it needed to be, and pad it to fit with soft foam along the points that carried most of the weight (shoulders, upper back, chest.) That way there was at least a little room for air to move around. But honestly, mine is extremely overbuilt, so this stuff may not matter so much in a 6 week project. I'd say it's just good to be mindful of whether or not there's gaps for air to circulate at least a little bit. Cutting away the non-structural parts of a hidden layer of foam can really help comfort.

The weight honestly isn't an issue, but it can be awkward to move around with all sorts of junk affixed tightly to you. The real sin is that you have to learn how to not move like a dork.

I'm probably in this thing for maybe $2-300, but that's spread out over years of me fiddling and adding lights and crap. Really you could spend $90 on a few foam rolls and paint and come out with something that will blow your son's friends' costumes out of the water. I'd just jump in with something small like an arm, so if you do goof up it's not a big deal. The time is going to be more of an issue than anything, not that 6 weeks isn't more than enough, but I was aiming for 2 weeks and now I'm 2.5 years in. I think that speaks more to my own lack of momentum than anything, though.

Good luck! Let me know how it works out, or if you want any tips.
 
Last edited:
I'm not dead!

I did a bit more work on the suit, mostly stuff that makes it less of a horrible PITA to wear. I (badly) sewed up some big velcro sheets to replace the old suspension system that I had cobbled together, and it is working quite well. It's both lower profile and stronger than before, and I can still reach my arm buckles when putting the suit on. The pictures disappeared so I'll have to take more tomorrow.

Aside from that, I took another pass at tinting the visor, got the codpiece partially painted, and tweaked some strapping. I know I did more too, but it's been so long I can't remember. Hah. That stained glass paint definitely lightens as it cures, but if I can't get it any darker than it is now I won't be too upset. Everything feels a lot sturdier and tighter this time, for better and for worse. I was pretty skinny when I made the arms so I may have to dremel them out a touch. Not a terrible thing. Overall a very successful test fit.

I forgot - I found some ArtMinds tie dye spray in a clearance bin and it turns out that it makes for really gnarly fake blood. Hence the paint job on the arms.

I've been looking for an excuse to try out DaVinci, so this time I compiled everything into a little YouTube video.


I have to make a grievous retraction: those coveralls I mentioned ain't cotton. I figured that out after trying to dye them for 45 minutes and getting nowhere. I have no idea why I thought they were, but I really hope no-one bought them on my recommendation. I got a dark brown Red Kap pair off of Amazon. They fit well and the color blends in OK.

I really need to bite the bullet and do the boots. Everything else is mostly goodish, with the exception of the old belt velcro which failed a couple times during the test fit. I may replace it with some new material, or just try a different system entirely. Either way, when I get that done the suit will look pretty much finished north of the knees. Exciting! Although I'm not in love with how the left pauldron stays so rigid. Maybe I can rig up some elastic or something.

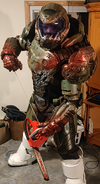
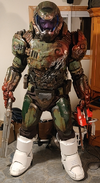
Anyway, here are a couple goofy stills from me attempting to pose. Hopefully I can make more significant progress on the suit soon. Come to think of it, the shotgun isn't even done yet..
Pullstart.PNGSSG_Chainsaw.PNG
 
This thread is more than 4 months old.

Your message may be considered spam for the following reasons:

  1. This thread hasn't been active in some time. A new post in this thread might not contribute constructively to this discussion after so long.
If you wish to reply despite these issues, check the box below before replying.
Be aware that malicious compliance may result in more severe penalties.
Back
Top