You are using an out of date browser. It may not display this or other websites correctly.
You should upgrade or use an alternative browser.
You should upgrade or use an alternative browser.
Euclid’s ODST Build Thread
- Thread starter Euclid
- Start date
- Status
- Not open for further replies.
Euclid
New Member
Thank you, I look forward to yours as well. His instructions for the armor are pretty useful so I do y think you’ll have any problems. There are a few things I’ll do different then him, but it’ll be roughly the same.I dig that helmet a lot. Looking forward to following your build. I’ll be doing a Sean Bradley kit too, so it will help a lot to see how you get through it.
Euclid
New Member
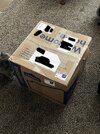
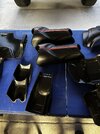
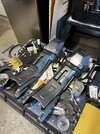
Trim trim trim. Right now that’s the name of the game then after that it’ll be assembly then reenforcing the armor. I know I’m doing it a little out of order then mr Bradley’s instructions but I have a method to my maddness… hopefully.
Attachments
Euclid
New Member
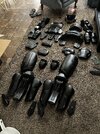
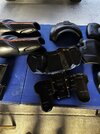
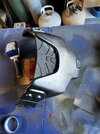
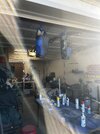
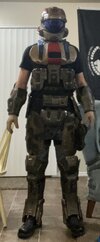
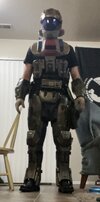
Done with all the trimming work. Did some light assembly. Now it’s time to reenforce the Armor!! Did a test fit by taping some of it on and I’m honestly so dang excited. If you’d like more detailed views on certain armor parts let me know and I can post better pictures. But til then love and piece y’all!
Attachments
-
 4EAC0D4B-025A-44DE-B016-DD2EACFD3096.jpeg1.5 MB · Views: 204
 -
 82B5AE7A-C455-4332-9212-854BD5082FF6.jpeg1.5 MB · Views: 218
 -
 F995787F-8F78-4013-BB61-A1C4C9BCC835.jpeg1.7 MB · Views: 210
 -
 D0324FC8-9875-433D-8A28-BB34C30E9BDC.jpeg1.3 MB · Views: 197
 -
 34CE7142-0E8F-44AF-93F8-36B077398DCF.jpeg1.7 MB · Views: 218
Euclid
New Member
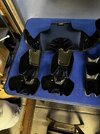
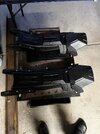
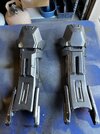
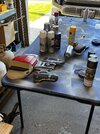
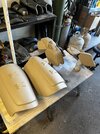
Alright I haven’t documented a lot of the steps but here we go. I have finer-glassed most of the pieces (the ones I deemed necessary). Did some cut outs for strapping (still have some to do). Then I need to detail and weather after I clear coat tomorrow. Then final assembly when the rest of the soft parts get in.
Attachments
-
 ADBCD480-ADE4-4BA6-BF04-C0810C68774B.jpeg2.3 MB · Views: 195
 -
 8BDECCE1-12B7-427C-BDE4-570EA3251598.jpeg1.9 MB · Views: 195
 -
 9F00C854-D501-4507-904E-FB2F3FBE70D6.jpeg1.9 MB · Views: 199
 -
 BFDC861E-F565-422E-890E-000D1E7E4CB5.jpeg1.9 MB · Views: 195
 -
 55F6049F-FF15-4676-86BB-96CBD344A2A4.jpeg2.2 MB · Views: 200
 -
 A62BB552-CA02-4E64-B3A9-52D4F591B5CD.jpeg1.4 MB · Views: 201
 -
 8C96265F-DBAF-437D-B9B9-2F279ADB2F5C.jpeg1.9 MB · Views: 193
 -
 E37885B6-5AA4-4958-9C0A-76282ECFB980.jpeg2.1 MB · Views: 203
 -
 81B180FA-5CA8-4AA0-A70B-46AE740BB0AF.jpeg2.8 MB · Views: 197
 -
 101E57D0-6015-4992-9336-54B50880E96E.jpeg2 MB · Views: 189
 -
 C1D85BE0-ACBB-4745-BF6D-E17D7E61D2E9.jpeg2.5 MB · Views: 212
Euclid
New Member
Rock Lobbster
Sr Member
- Member DIN
- S098
Loving the desert ODST look! Sean's kit is absolutely fantastic and holds up really well. If you haven't thought of it already putting magnets into the shins and doing a 2 piece design makes suiting up and down a lot easier
Euclid
New Member
Thank you. Ya his kit is stellar, the over all quality is great and the only problems I’ve had with it are self induced. Also thanks for the tip, always love QoL improvements for kits.Loving the desert ODST look! Sean's kit is absolutely fantastic and holds up really well. If you haven't thought of it already putting magnets into the shins and doing a 2 piece design makes suiting up and down a lot easier
Euclid
New Member
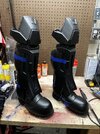
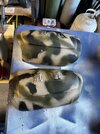
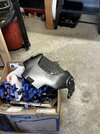
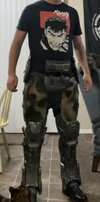
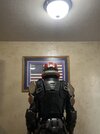
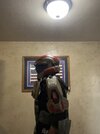
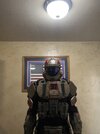
Almost there. I’m 85 precent of the way to the finish line. Just need the soft parts, detail vinyl, and should strap parts to com in. Also need to pad out some areas but it’s looking good. Today’s activities where doing general weathering and details. Using oil paints for a black brown wash layer. It also doesn’t show well in the photo but I added a Molle panel to my left leg with some pouches. Can’t wait to be done!!!
Attachments
Euclid
New Member
Well you’re in luck my friendLove how it looks so far. And I'm looking forward to see it finished.
Euclid
New Member
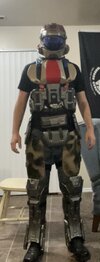
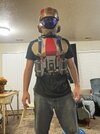
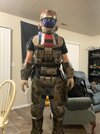
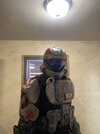
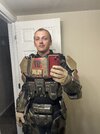
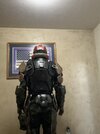
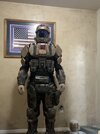
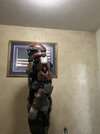
Well it’s finally down (besides the reshape to the shoulder straps, and some small non armor additions I might do) criticism is welcome but all in all I’m happy with it!
Attachments
-
 82FAE120-DC68-4A31-AC34-1D89DAB641CA.jpeg949.4 KB · Views: 219
 -
 89F5C4F2-D59A-4AD7-9D79-F04CD5063A45.jpeg1.7 MB · Views: 236
 -
 8160EEAE-BB7B-4AEC-A4BB-0F71F913E4F1.jpeg1,012.1 KB · Views: 221
 -
 63EE00EA-E5ED-4B65-B7F0-0A5304983A89.jpeg916.6 KB · Views: 203
 -
 2EF7B0D0-81A0-4A3E-B0A7-FDF7BD3C8D13.jpeg908.2 KB · Views: 194
 -
 0BEDD734-F754-4CEC-BFD6-9EE04D154B1B.jpeg914.8 KB · Views: 217
 -
 35146667-A601-4820-9E4F-59DDF26EC702.jpeg914.3 KB · Views: 212
 -
 49BDE423-475E-4935-AC5F-CF0C27AC7708.jpeg1,002.6 KB · Views: 208
 -
 02AC51BE-5150-4775-B82C-2299DE0F1F9C.jpeg1,005.3 KB · Views: 211
 -
 D0AEF799-D62C-478D-B373-244DC460262E.jpeg1,012.9 KB · Views: 217
 -
 9F7732AA-C31F-4526-A22D-01FD734157DA.jpeg1,010.5 KB · Views: 202
Euclid
New Member
Might try weathering them down then or look into a new pair. Thank you for your input appreciate it.Personally I would choose a darker color gloves to make the helmet, chest plate and shoulder pads pop out more. But overall everything looks amazing
Euclid
New Member
Also I added foam to my thigh plates, I did a trial run at SLC FanX last year and rubbed the skin off on my thighs. No photo added because there’s no cosmetic change to the armor it self. Might add some random pouches and such to the armor here in the near future but I’m not sure yet.
- Status
- Not open for further replies.
Similar threads
- Replies
- 7
- Views
- 1,073