Halo Landfall ODST (Complete)

Status
Not open for further replies.
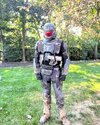
Been a little bit since my last update. I caught some nasty stomach bug and wasn’t getting much work done. But I’m back and have the torso section almost complete!

I recently finished the shoulder straps, attached everything to make sort of a clam shell you slide into. Which is my preferred method of climbing in my armor. Last piece of the puzzle is getting sides attached to the lower back section and creating a buckle system so they connect to the abdominal “wings”.
FA87540A-1079-4986-A083-321584AC92E3.jpeg

I am over the moon with how the soft parts and printed parts look together. Super hype to have this all wrapped up, get some amazing photos taken and tour some cons in it!
 
It's looking really good. Hope you're feeling better now. Always sucks to not be able to make much progress because you're sick.
 
Today, I picked up a Cricut Joy. Which is the infant Cricut. I wanted to try my hand at making vinyl decals and stencils.. well I’m happy to report it works amazingly! The UNSC letters & Bird are stickers. The tiny barcode is a paint stencil. I’m beyond hyped about these little victories!

7A0A291E-641C-4831-B4D2-EFD201EC9B31.jpeg


Going on vacation tomorrow, so when I get back it’ll be time to finish the Shoulders, Hips Guards, Thighs and Shins. Then I can do a proper suit up before weathering and calling the suit done! I hope you all enjoyed the Halo series premiere, I for one loved episode one.
 
So that's what the Cricut was for! Those decals look super nice, I love how they turned out! Super nice touch with the barcode too!!
 
Finally finished with the rigging on the torso section! Also I cast my butt plate in urethane rubber back with urethane foam for a nice comfy sit!

C91A3467-0DD3-4782-B7FA-2ABEDA39FC39.jpeg


Lastly, I got the shoulder armor attached to the vest in the form of some super strong Velcro. Last will be the Med Patch & some serious weathering! I can see the light at the end of the build!!!

02F8B29E-40E2-4498-B0A0-C232B06FDA88.jpeg
 

Attachments

  • 66718583-CD40-426B-9610-A47977F8CFF5.jpeg
    66718583-CD40-426B-9610-A47977F8CFF5.jpeg
    2.2 MB · Views: 88
I need to see a video of that butt plate in action :-D

(Also - any plans to potentially sell them?)
 
I need to see a video of that butt plate in action :-D

(Also - any plans to potentially sell them?)
Here’s a video of it in “action” on my Instagram ButtPlate. As far as making them for others I’d have to clear that with Sean Bradley since it’s from his vacformed kit that I purchased.
 
Since my last update I’ve dirtied up the armor quite a bit. I also finished building the shins and getting that all rigged.

The faux mud I made with ground up chalk pastels (various dirt colors). I’m currently editing the video explaining the process that will be on my YouTube channel.

With that said, enjoy the pics!

35F63F03-8097-4CFD-9A87-AA50F98EDAA9.jpeg
ACD5BB78-5792-49B0-A11E-81AEB722682B.jpeg
F6AC39A3-94CA-4A52-8E51-937C7685BBE2.jpeg
50BFCF0A-EAB9-4E65-951E-FF6730E9E9C3.jpeg
6428145C-87BA-4B49-8BF7-7C04F8832357.jpeg
 
Im so glad i found the build thread for this suit, its coming together so well! And your weathering and pastel work is to die for :love: looks like it stepped right out ofthe screen!
 
Im so glad i found the build thread for this suit, its coming together so well! And your weathering and pastel work is to die for :love: looks like it stepped right out ofthe screen!
Thank you. I’ve been looking at the references since 2018 so I hope some of that translates to my build.
 
So I test fit everything with my old 3D printed thighs, sadly they throw off the entire weight balance of the suit, so I ordered a set from SeanBradley.. hoping to have the entire thing wrapped up in June.

In the meantime it’s chillin on the mannequin! I’m super happy with the results so far!

8748E5A7-B07C-4171-9B1F-40157F5BDE9B.jpeg

9AE7400E-2EE6-468A-A18C-402DE7FF73CC.jpeg
 
This looks amazing! I have been watching your tutorials on youtube. Hopefully I can use some of what I have learned watching your progress so far in my current build.
 
This build has finally come to an end! Yesterday I was able to finish the thighs and do a full suit up!
1719A32B-D6DE-4667-B1E7-33C2A75CD76F.jpeg

The thighs have some heavy paint chipping, which help sell the story that my ODST has been in the field for wayyyy too long! Buddy needs a vacation!
15F6970B-69C5-4399-8576-E326A3DF9AFC.jpeg

I was also messing with some new weathering techniques and came up with a repeatable way to create a salt water stain which I think looks nice against the mud and grime.

After all the paint was dried I sealed it and installed some straps with buckles to keep my thighs up with my belt. Finally elastic straps were added inside to hug them to my thighs.
 

Attachments

  • 5269C2E7-1E61-4414-9CA0-1F0C6F2C5EC0.jpeg
    5269C2E7-1E61-4414-9CA0-1F0C6F2C5EC0.jpeg
    1 MB · Views: 86
  • 96C694D3-D3C4-4448-A889-F5CC6B3E74FB.jpeg
    96C694D3-D3C4-4448-A889-F5CC6B3E74FB.jpeg
    1.1 MB · Views: 86
692FEB14-3A72-4335-8A84-0C1703BC1F56.jpeg


718A638D-6B92-4261-B368-7BC0F032E82D.jpeg


And there we have it! I’m still planning on making a BR to go with the kit and I may raffle off the helmet and get a new more symmetrical cast. Overall I’m super stoked with the rebuild and can’t wait to get some professional photos and start trooping in this kit!!!
 
Status
Not open for further replies.
Back
Top