Hey, well new...and worried to be honest.

Status
Not open for further replies.
Sadly if this is in any way terrible I see this as the only way to work one out, I can't seem to understand how to fit together the files from the foam no matter how hard I try to understand it. From what I have seen scratch building is much more of a time consumer so I see this being about 1.5 instead of 1 month to build or so, but I think it could be possible. Unless it's that bad then...well I am sorry, I will prob just drop this now, and pack up.

NOOOOOOO! Please don't go. PLEEEEAAAASSSSSEEEE don't drop it and run!!! :cry::cry::cry::cry::cry::cry::cry::cry:

We want you to stay cause we like you and we think you're cool like the rest of us!!(y)(y)(y):D:D:D:D

It's going to be a hard long journey and well I'm still making changes to mine even after all this time. I started on my build in late 2009 if that tells ya anything. We want to help you go forward with this, and I guarantee you that this effort you put forth will be SOOOOO worth it in the end.

I understand that figuring out this stuff isn't exactly easy but you can do it!!


Well...I suppose I could see to it. The thing is I have to set my own time constraints, otherwise I can't get things done. My mind sadly works like that due to my stupid afflictions. Never the less, it may be some time (prob a few days) till I get foam and other things (hopefully the craft shop and hardware store has what I need), and well, I see where it goes.

I like your response here, don't ever stop--don't ever quit--:D:D:D:D

You might look online for a better supplier also and find some different stuff to make it work better for you too!! You never know!

I'm so happy your gonna stay the course!!!! YEA!!!!:D:D:D:D:D:D:D
 
Sadly if this is in any way terrible I see this as the only way to work one out, I can't seem to understand how to fit together the files from the foam no matter how hard I try to understand it.
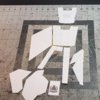
Hoping some reference images may help you out here. These are a few pics from my build. I cut the template pieces out that I needed and pieced them together using a little bit of masking tape. From there, I traced it out on foam. For the most part, I only needed half of the template as it could be flipped over to make the other side. Once traced out on foam, look at the piece (in game, reference image, etc.) and see where the bends / folds/ angles are. From there, just determine where you need to make your bevel cuts. Hope that helps. 90% of my build was printing the templates and piecing them together then figuring out the cuts. Once you get the hang of it, it will almost become second nature to "just know" where the cuts are going to need to be made on the back side.

Both shoulder pieces were made using only half of one template then flipped over to get the other side X 2. On the knee cap pieces, I must have tried 4 or 5 different times to get the bevels right and had to put it down a few times and walk away from it for a bit.

Like everyone else has already said, there are going to be mistakes. It is what you learn from the mistake and the next attempt that makes your build absolutely awesome!

IMG_20180722_132214_555.jpg 20190115_093617.jpgKnee Cap.jpg 20190115_094219.jpg
 
Last edited:
Oh well thanks this helps a good bit. Thankfully I have help from my art teacher, and with that, I can more or less have a ways to help learn how to scratch build something from a professional standpoint, but these photos help immensely. Now one thing, the visor. I like to have my checklist on how to get everything. The thing is, the payment for this may be a bit, and I have not the money or knowledge, and or time to vacu-form it (Third world country life.). Is there way other than that? I would consider getting plastic sheets, cutting, shaping, and tinting, and colouring if need be. Then gluing, and sealing if need be. Would that work?

For my visor I just took a flat, pre-dyed visor from a place I can't remember because it was 6 or 7 years ago, finally cut it to rough shape, and stuck it in with hot glue, tears, and lots of prayers and frustration. I hate it, but ut looks presentable. Ish.
 
Oh well perhpas I can do something geometrically based, I have seen many place it in two parts and then stick them together to form the bump. Though I do wish I had a vacuformer, I am sure I can handmake most visors, but large volume based ones like SPI and such sadly not, curse my lack of funds/intellect to make one.
 
Heh thanks, but after watching the video in it's entirety, I know for sure I could never make that. To big, too much materials, and well far, far to complex even with a video, I know I will mess up. Though, anyone experienced with visors over here? Do you think it's logically possible if someone was to hand craft a visor for say and ODST helmet? Will it look good? Also say if someone was to task with bigger stuff like EVA, SPI etc, would someone be able to. Asking for well information purposes on the last two.
 
I also watched the whole vid and agree. Way to complex and a bit woonko for me. Like to watch though. Thank you
 
Heh thanks, but after watching the video in it's entirety, I know for sure I could never make that. To big, too much materials, and well far, far to complex even with a video, I know I will mess up. Though, anyone experienced with visors over here? Do you think it's logically possible if someone was to hand craft a visor for say and ODST helmet? Will it look good? Also say if someone was to task with bigger stuff like EVA, SPI etc, would someone be able to. Asking for well information purposes on the last two.

The Andrew DFT method of visors is to use a coloured document cover cut out with scissors and glued together carefully. It's a pretty handy DIY shortcut if you don't have the space for a vacuum former or you don't have a heat gun. Just a word of warning though, this method is fairly flimsy and you'll have to be more careful with the helmet.

For my ODST visor way back I used a heat gun to shape a lexan sheet over different geometric objects (table edge for sharp corners, wine bottle for rounded) and glued together with polycarbonate glue. It was... less than exact but it fit the bill for me back then, it was just a huge safety hazard since I didn't have heat resistant gloves at that point.
49898905_2037664966318961_1358129565926424576_n.jpg
 
For the ones I made for my kids, I used .020 PETG sheets with colored vinyl and standard mirrored window tint. Covered the exterior side with the colored vinyl and the interior with the window film. Let set and pepped the visor just like PaiganBoi. The silver visor is just straight mirrored window film.
FB_IMG_1548189544974.jpg FB_IMG_1548189554957.jpg
 
Ok great! Great, I should be off tom to buy, final checks, checklist to be made and all that. Plastidip to seal, and contact cement to stick things together, hot knife/sharp blades, rotary tool, heat gun, foam 1/2 inch x 20 or so pieces, and a respirator. Do I need anything else, also, something to cover up seam work, what should I use?
 
Ok great! Great, I should be off tom to buy, final checks, checklist to be made and all that. Plastidip to seal, and contact cement to stick things together, hot knife/sharp blades, rotary tool, heat gun, foam 1/2 inch x 20 or so pieces, and a respirator. Do I need anything else, also, something to cover up seam work, what should I use?
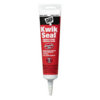
Some people will recommend kwick seal, but I like woodland scenics foam putty because it is sandable. Kwick seal isnt. Also, make sure the resporatir is a good quality one. We dont want a tone getting paralyzed or something from inhaling the good stuff
 
I use this:
index.jpeg

Fill the seam, add a drop of water to your fingertip, and smooth it out. I find it does shrink a small bit once dry, so another application may be needed. Once fully cured, I find that it can be lightly sanded.

I also don't care for plastidip that much and go with the multiple layered Mod Podge route which I find hides my seams extremely well. Kwik Seal, multiple layers of Mod Podge, Wet Sand, and bye bye seams.
FB_IMG_1548686674422.jpg 20181014_173552.jpg
 
Last edited:
I haven't tried the foam putty but it sounds like something right up my alley .
 
I haven't tried the foam putty but it sounds like something right up my alley .
I highly recommend it good sir. mblackwell1002 turned me onto the stuff about a year ago and I've found quite a few uses for it. Another fun toy I've recently picked up is Lumin's Workshop Foam Clay which is effectively moldable EVA foam which is great for more organic shapes than rifles and armour.
 
Could this also be used as a replacement for bondo on the outside of a helmet? I'm looking to reduce the overall weight on my next helmet build.
 
I highly recommend it good sir. mblackwell1002 turned me onto the stuff about a year ago and I've found quite a few uses for it. Another fun toy I've recently picked up is Lumin's Workshop Foam Clay which is effectively moldable EVA foam which is great for more organic shapes than rifles and armour.

I just bought some of this to fix the foam issues I had on the forearm piece I just repaired using a EVA foam-over method and this stuff is the money!! Give it a shot and see what you think for yourself but I thought the rip in the foam sheet was going to be a problem until I tried this---life saver!!!
 
Status
Not open for further replies.
Back
Top