- Member DIN
- S530
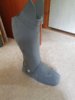
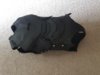
im skeptical of the ability to use eva foam as a shoe..
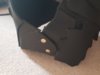
ExCeLLuR8 showed me a way to do things for his boots by using horse- stall rubber mat as the sole and shoe gooing it to the shell, which is made of EVA foam. This method actually works really, really well. I highly recommend it.
BUT!!! On the surface of the rubber and the foam where the shoe goo will go, (I attached them directly with super glue, first) scuff up with sandpaper or similar device before applying the goo. Otherwise the goo will not adhere appropriately, and you'll have problems.