1st Build Master Chief (MK VI)WIP (reallemonboi)

Status
Not open for further replies.
If you want to make it super accurate; don't forget to drybrush "mud" around the feet and shins. The Halo 3 chief also had heaps of pale yellow / eucalyptus seed yellow weathering which Im assuming was suppose to represent the layers of green coming off (Because some green paints are sanded to reveal a yellow tone)

as per demonstrated in Cereal killers old video

I see! I've just been trying to use things I find around the house as I'm not worrying too much about complete accuracy as long as it 'feels' like Master Chief. Thank you for the tip though! I will definitely hold that in mind for later projects when I'm on a looser budget
 
I gotta figure this out too as I'll be doing it soon. I imagine epoxy would work well? Just make sure to rough up the print where you're gonna stick it down
Strapping is always tricky. esp with 3d prints. I haven't done 3d print armor but check out some of the other 3d print build threads and see what people do. I have had luck with rondo but I'm using pep. In my experience, if nothing else sticks, rondo will.
I was thinking about epoxy, hot glue was too weak for the heavier pieces like the thighs and super glue makes some parts brittle and spikey. I will most definitely research rondo, I'm not sure what that is or how to use it.
 
I was thinking about epoxy, hot glue was too weak for the heavier pieces like the thighs and super glue makes some parts brittle and spikey. I will most definitely research rondo, I'm not sure what that is or how to use it.
So if I recall correctly you are using a sandable filler primer for smoothing so rondo may be too much of a pain in the butt for you. Rondo is a slang term referring to a 1:1 mixture of Bondo auto body filler and fiberglass resin. It is usually used to harden and strengthen stuff or just make a coating inside of a fiberglass reinforced piece so that the fiberglass won't poke you. I have also found that it makes a really good adhesive when used liberally. It seems ot bond to almost anything so it can be useful where other adhesives fail. There are some more nuances to it but that's the general idea. I also am a firm believer in jb weld, but have not tried it on 3d printing bc I'm not 3d printing my suit. Rondo can be expensive to get the components so someone who does more 3d printing may have a better suggestion for you.

Rondo is my choice bc I already have Bondo and resin for the other steps of my pep build.

I have heard of people using Bondo to smooth prints as well as using resin to smooth prints so that may be worth looking into but again someone who has made armor with 3d printing may have better suggestions.
I see! I think I've heard of a process like that before, but I didn't know it was called Rondo. I think I'm going to stick with just resin or just a ton of super glue, as I'm not on a super big budget and want to mainly use things I already have. Thank you though!
 
I stopped working on the main torso piece until my printer gets fixed, I've begun work on the helmet because each part can fit on my Ender-3. The largest piece messed up a bit, but not enough to require a full reprint (It's always the biggest print that fails). It's pretty bad though so I've been spending a lot of time sanding and filling repeatedly. I think I'm going to use a few coats of primer instead of just one because of layer lines are pretty nasty. Last but not least I coated the inside with a fair amount of resin, as this is the helmet and I expect it'll be taken on and off and set down and moved a lot.

Tip (I guess?): DON'T USE RESIN INSIDE YOUR BEDROOM YOU'LL HAVE TO SLEEP ON THE COUCH FOR LIKE 2 DAYS
 

Attachments

  • PXL_20220204_204651351.jpg
    PXL_20220204_204651351.jpg
    31.3 KB · Views: 118
  • PXL_20220204_204700041.jpg
    PXL_20220204_204700041.jpg
    28.7 KB · Views: 119
  • PXL_20220204_204721788.jpg
    PXL_20220204_204721788.jpg
    46.8 KB · Views: 123
Feb 7, 2022
Whilst working on the helmet (I got it all painted, now time for clear coat... weathering comes later don't worry...) I have come to the realization that: I have literally no idea how to make a one-way visor. I've seen someone who sells them but it's 80 USD for one visor, and I don't want to shell out all that for one visor, even if they're really good. I've also seen that people have used motorcycle helmets as well.
I want a one-way mirrored, gold visor, that has the depth and detail of Master Chief's. Does anybody know any good threads or tutorials to help? Thank you all and it's all greatly appreciated.

Tip: If you're finding the black spray-paint isn't rich or vibrant enough for you, try using black acrylic paint. I use my fingers to spread most of it (so it doesn't leave brush strokes), but I still use a small brush for smaller details. Keep a wet and a dry paper towel on hand, so if you mess up you can wipe it off with the wet towel, then dry it with the dry (acrylic washes off prints super easily when it's still wet).

PXL_20220208_104555944.jpg
PXL_20220208_104528350.jpg
PXL_20220208_104458552.jpg
 
It wouldn't look perfect, but some people have used two motorcycle visors layered with the outer one having the shapes that you see on chiefs visor cut out, so you get some of that 3D effect. Otherwise, the only way I can think of is vacuum forming the visor and mirroring it with something like alclad II. Depending on where you live, you might be able to the the rattle can version so you don't necessairly need an airbrush. There is a decent chancd though that it'll end up more expensive than buying the visor, although you could then make it fit your helmet perfectly.
 
It wouldn't look perfect, but some people have used two motorcycle visors layered with the outer one having the shapes that you see on chiefs visor cut out, so you get some of that 3D effect. Otherwise, the only way I can think of is vacuum forming the visor and mirroring it with something like alclad II. Depending on where you live, you might be able to the the rattle can version so you don't necessairly need an airbrush. There is a decent chancd though that it'll end up more expensive than buying the visor, although you could then make it fit your helmet perfectly.
I would have never thought of using two to add layer, that's actually a really cool idea. Might have to try it, and if it just doesn't work I'll probably just buy the visor from Etsy even though it's more expensive.
 
Feb 9, 2022
I added some lights to my helmet! I used an old battery-pack with a switch from an old light-up christmas sweater that doesn't work anymore. I used some spare wire and blue lights from an old arduino starter kit I had. I wish I could've made the lights white to match better, but the only colors I had were blue, orange, and red. I chose blue. For the coverings I just took some plastic from an box, roughed it up with some sandpaper, and glued them rough-side-in. Now all I need to do is make/or get the visor and the helmet is completely done

Tip: Don't use super glue for gluing in the sanded plastic, It countercts the scratches and makes it fully clear again. I used hot glue.
Tip 2: Make sure the spraypaint is 10000% dry before adding the next layer. In the winter it can sometimes freeze and appear dry. If you don't wait long enough it'll thaw under the outer layer and become a bubbly mess that falls off reaally easily.
Tip 3: Get a soldering iron, the twist-n-tape method for wiring is super finickey and doesn't like to stay consistent.
Tip 4: Store some extra batteries in the bck of your helmet, I just have 2 taped to the back where my head isn't touching the helmet.
PXL_20220210_021649568.jpg
PXL_20220210_021742488.jpg
PXL_20220210_021751535.jpg
PXL_20220210_021804928.jpg
 
Last edited:
Feb 13, 2022
I finished the helmet! I decided to not care much about the visor details, so I just bought a cheap motorcycle visor. I accidentally cut it a tad too small but I got it to just barely work. Also I jerry-rigged some air conditioning inside as well to allow cooler air to breathe and keep the visor from fogging up too badly. For that I used a fan from a broken printer hot-end, and a 9volt battery holder from an Arduino kit and yes, a lightswitch. I propped it up on some hot-glued foam to allow airflow from under the helmet and better direct it at my face. I'm overall very pleased with how it turned out even despite numerous errors.

Tip1: You don't have to always buy knew things if you have an old one that works.
Tip2: Double, Triple, and Quadruple check the visor before cutting it, and cut it a bit too big so there's leniency. Here's an awesome video tutorial for cutting down visors. Here's the first one but I suggest watching both (You don't need to use a Dremel, I used a little thin handsaw).
PXL_20220213_163139537.jpg
IMG_20220213_113908_906.jpg
IMG_20220213_113908_927.jpg
 
Hi! This is just going to be a thread on my Master Chief armor build! This is my first Halo build and it's going along pretty nicely. I'll also make written updates and rundowns on any tips/tricks/challenges I've faced, and any questions I may have. The first few posts will just be me catching up on what I've done so excuse how close the uploads are.
Hi, I'm new to all this. Where do you get your templates from? Going to give it a go making my first chief outfit
 
Written update: I sorta just put a ton of contact cement on top of the duct tape to keep it down better and ensure the straps don't fall off while I'm wearing the armour.
 
Sorry for the MASSIVE pause in between uploads, I took a bit of a break in order to catch up on some school and mental stuff

Anyways! Seeing how it's been quite some time I have some exciting updates considering my armor cosplay, this one's a doozey.
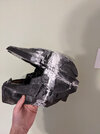
I finally completed the main torso pieces, the seams aren't quite ideal but when I'm movin and shmovin and groovin... nobody can really notice that much... I hope...

Firstly I filled the inside with resin to keep it from breaking so easily, yadda yadda y'all have already seen me talk about this here.
How I decided to wear it was a brainstorm and a half let me tell you that.
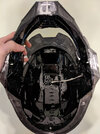
The tops of the two halves are connected by adjustable straps that can technically "unbuckle", but aren't meant to all too much. The lower of the pieces snap in place with straps on magnets. This setup makes it super easy to pull over my head and lock it in place (see pictures below). It also allows me to put it on by myself and takes less than a minute.
I spaced the inside out with strategically placed foam, most notably: I put a 'bar' of foam across where my ribs meet the squishy part of my stomach, as to have the lowest possible contact whilst still maintaining proper flexibility (not that I'm flexible to begin with). Two lengths of foam in a triangle-ish pattern down the back so it doesn't press uncomfortably on my spine but still allows for hold while moving.
Then there's just some foam bars to keep the plastic from digging into my shoulders.
I placed denser EVA foam in places the plastic rubbed on each other to help decrease chipping and scraping of the paint. Mainly around the top hinges and where the bottom arms come in contact.
Finally I designed a little thingy out of EVA foam and stuck in in the neck to help fill some of the space between the torso and helmet. (Not in pictures I'm wearing it).

Tip 1: Round the foam a bit by cutting it a certain way, this makes it wayyy more comfortable to wear.
Tip 2: Coat the inside in resin if you're tired of stuff breaking easily.
Tip 3: Strap-hinges and magnets are SO much nicer than buckles.

Yes I know I have a smudge on my mirror deal with it.
Also here's a video of my struggling for a solid minute, enjoy.

PXL_20220312_194055058.jpg
IMG_20220310_225124_074.jpg
IMG_20220310_225124_108.jpg
PXL_20220316_012403130.jpg
PXL_20220316_012443350.jpg
PXL_20220316_012435870.jpg
PXL_20220316_012337251.jpg
PXL_20220316_012312900.jpg
 

Attachments

  • PXL_20220316_013004691_2.mp4
    30.5 MB
March 18, 2022

Quick update, a friend donated a "pair" of broken headphones that I fixed up and put inside of my helmet, unfortunately I was only able to save one half but it's still really cool that I can listen to music/take calls inside a Master Chief Helmet.

Tip: If you get hot glue on your fingers, instead of rubbing them together in attempt to cool it off, which only spreads the hot glue and burns more of your hand: submerge them in water, this cools it off much faster and keeps it from spreading molten glue everywhere.
IMG_20220317_205552_518.jpg
 
March 20, 2022

I finished the bicep pieces!!! I tried using magnets on straps to hold them up, but that failed miserably so I just went with classic foam, I kept the magnets in for storage reasons though. Wanted to be careful to not let it cut off my circulation (I've done an Edward Elric cos before I know how that feels). I also cut off the top half and glued it on further down because the way it origianlly was didn't allow me to move my arms above shoulder height. I also put EVA foam in some places to keep collision chips to a minimum.

I know it looks 'finished' but there's still some work I want to do on it.

Tip1: Use old brushes for muddy weathering, combined with circular motions instead of classic painting. Looks much more natural.
Tip2: I know it sounds stupid, but weather after and over the clearcoat. Glossy mud looks fake.
Tip3: Clean your brushes right away unless you want a ruined brush.

PXL_20220321_013314387_2.jpg
PXL_20220321_202610153.jpg
 
Status
Not open for further replies.
Back
Top