1st Build Master Chief (MK VI)WIP (reallemonboi)

Status
Not open for further replies.

reallemonboi

New Member
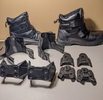
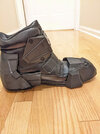
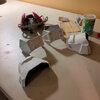
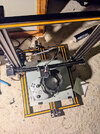
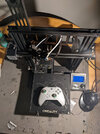
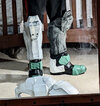
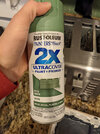
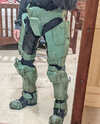
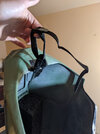
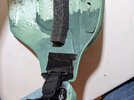
Hi! This is just going to be a thread on my Master Chief armor build! This is my first Halo build and it's going along pretty nicely. I'll also make written updates and rundowns on any tips/tricks/challenges I've faced, and any questions I may have. The first few posts will just be me catching up on what I've done so excuse how close the uploads are.
 
Jan 5, 2022
The first thing I started on was the shoes, my plan is to work my way upwards from least noticeable to most noticeable and learn along the way. One of the tops of the shoes failed halfway through so in order to conserve filament I just printed the second half and soldered them together. The boots I'm using are just some old snowboots (the padding looked space-esk) and I have 3 inserts in them to raise my height up a good 3 inches (I'm 5'10 normally).
 

Attachments

  • Screenshot_20220203-153146.png
    Screenshot_20220203-153146.png
    299.7 KB · Views: 152
  • PXL_20220101_235443162.jpg
    PXL_20220101_235443162.jpg
    47.5 KB · Views: 147
Jan 5, 2022
The shoes are finished priming and sanding and priming and sanding and... you get the idea. I've learned that you can reinforce plastic welds by filling them with superglue and sprinkling baking soda over it, it uses a lot of superglue (not cost efficient) so I'm on the lookout for better alternatives. I still haven't picked out what spray paint color to use.
 

Attachments

  • IMG_20220106_181329_268.jpg
    IMG_20220106_181329_268.jpg
    41.4 KB · Views: 97
Jan 9, 2022
Got me a new printer! (Cr10s) it's a 300x 300y 400z with filament runout sensor and a few other things. Much bigger than my old 180x180 Ender-3. I'm still keeping my Ender 3 for smaller things so I can still work efficiently. (I ordered it so long ago lol). Also quick test to see if this way of attaching files is better or worse:
PXL_20220110_032825757.jpg
 
Jan 13, 2022
Printed both shins, and both sides of the codpiece. I started painting the shoes and have been working on sanding the shins and codpiece.
Tips: I've been using drywall putty as a filler, it dries quickly and sands super easily, just have to be careful to not let it flake before painting it.
 

Attachments

  • PXL_20220113_225035310.jpg
    PXL_20220113_225035310.jpg
    54.8 KB · Views: 113
Not sure if this will work on 3D prints but I reinforce my foam seams on the inside with shoe goo, haven't had a piece come apart yet
 
Jan 15, 2022
The extruder thingy on my Ender 3 broke (I've had it for a little over half a year at the time it broke), but not to worry I bought a new, red, aluminum extruder for like $9. I bought two just so I could replace the one on my CR10s before it even has the chance to break.
Here's the US link if anyone needs it: Amazon Creality Extruder Upgrade
 
I've learned that you can reinforce plastic welds by filling them with superglue and sprinkling baking soda over it, it uses a lot of superglue (not cost efficient) so I'm on the lookout for better alternatives.
I've also got a suggestion, but this time on the outside: check out this guide on 3D print welding. 3D print welding allows you to fill in gaps/seams in prints with the same material it's made of, so it blends well and is just as durable.
 
Somewhere around Jan 19, 2022
I found a color of spray paint that's almost perfect for my Halo 3 MKVI, not sure if it'll work for Halo 4+5 Master Chief as his armor is a much darker tone in those games. I've also learned that you can use a palm/circular hand sander to really get those layer lines gone, before this I was layering primer and sanding repeatedly which was very wasteful. Now I use the palm sander, then sand the details, spray one layer of primer. Then I lightly sand it by hand, and rub it down with a wet washcloth, then try it. This leaves it superr smooothhh and I know it sounds like a lot but it's really not all too bad, and conserves so much material.
 

Attachments

  • PXL_20220122_221722767.jpg
    PXL_20220122_221722767.jpg
    55.1 KB · Views: 89
  • PXL_20220122_221717953.jpg
    PXL_20220122_221717953.jpg
    53.9 KB · Views: 94
  • PXL_20220122_221714324.jpg
    PXL_20220122_221714324.jpg
    51.7 KB · Views: 86
Another option of the seam lines aren't too bad is some sort of body filler, like Bondo. Nasty for your lungs so make sure to mask up and have good ventillation, but it sands well so is great for that.
I've also learned that you can use a palm/circular hand sander to really get those layer lines gone, before this I was layering primer and sanding repeatedly which was very wasteful. Now I use the palm sander, then sand the details, spray one layer of primer. Then I lightly sand it by hand, and rub it down with a wet washcloth, then try it. This leaves it superr smooothhh and I know it sounds like a lot but it's really not all too bad, and conserves so much material.
Not excessive at all! In fact people will do this many times (sand + filler primer) to get a really smooth finish. Good thing you got the palm sander, those things are super handy.
 
Another option of the seam lines aren't too bad is some sort of body filler, like Bondo. Nasty for your lungs so make sure to mask up and have good ventillation, but it sands well so is great for that.

Not excessive at all! In fact people will do this many times (sand + filler primer) to get a really smooth finish. Good thing you got the palm sander, those things are super handy.
Yeah it turns out I had one all along! I saw it in the garage and thought, "Huh, I maybe I could use that." Super handy though, if I didn't already have one I would've definitely got one. As for the bondo technique, I've been using a drywall fixer filler which has been working super well.
 
Last edited:
Jan 24thish, 2022
I finished painting the lower half of the body, I've weathered it and put one layer of clear-coat on. It's all held on by a series of straps and foams, with the shins mainly held up by sitting on the boots.
 

Attachments

  • PXL_20220121_030121651.jpg
    PXL_20220121_030121651.jpg
    59.7 KB · Views: 135
Last edited:
Jan 31, 2022
I finished the forearms! The black parts are done by hand-painted acrylic. My CR10s broke (Thermistor stuff), so the right one had to be done in 2 parts on my Ender 3, I didn't splice it super well so there was a pretty gnarly seam-line, but I think I smoothed it out pretty well, and since it's on my arms which I move around a lot (I tend to talk by waving my hands around like a madman) I'm hoping nobody would notice it much.
Tips for welding parts together: Tape the outside of the parts together with LOTS of strong duct-tape. Buy a cheap plug-in soldering iron [DONT USE YOUR MAIN ONE] to easily 'weld' the two pieces together on the inside.
 

Attachments

  • PXL_20220124_160235378_2.jpg
    PXL_20220124_160235378_2.jpg
    51.1 KB · Views: 100
The current way I wear the armor is super unreliable, I've been holding the straps to the armor with duct-tape, lots of it, but they fall off constantly and means I can't wear it for more than like 20 minutes (and each time its less) without everything starting to fall off. If anyone has any better, more secure ways of attaching the straps to the armor I would love to know
Current way they're held on:
 

Attachments

  • PXL_20220204_204514030.jpg
    PXL_20220204_204514030.jpg
    83.4 KB · Views: 100
  • PXL_20220204_204600606.jpg
    PXL_20220204_204600606.jpg
    74.6 KB · Views: 96
If you want to make it super accurate; don't forget to drybrush "mud" around the feet and shins. The Halo 3 chief also had heaps of pale yellow / eucalyptus seed yellow weathering which Im assuming was suppose to represent the layers of green coming off (Because some green paints are sanded to reveal a yellow tone)

as per demonstrated in Cereal killers old video

 
The current way I wear the armor is super unreliable, I've been holding the straps to the armor with duct-tape, lots of it, but they fall off constantly and means I can't wear it for more than like 20 minutes (and each time its less) without everything starting to fall off. If anyone has any better, more secure ways of attaching the straps to the armor I would love to know
Current way they're held on:
Strapping is always tricky. esp with 3d prints. I haven't done 3d print armor but check out some of the other 3d print build threads and see what people do. I have had luck with rondo but I'm using pep. In my experience, if nothing else sticks, rondo will.
 
I gotta figure this out too as I'll be doing it soon. I imagine epoxy would work well? Just make sure to rough up the print where you're gonna stick it down
 
Status
Not open for further replies.
Back
Top