My First Armor Build; Halo Infinite Master Chief

ForwardUntoDusk

Member
Hi, everyone. I just recently started my first full, 3D printed armor build! Naturally, my first and only choice was to do Master Chief.

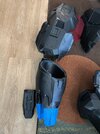
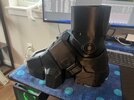
I'm using the Halo Infinite design from Galactic Armory for the armor, and I found some files on Etsy for the under-suit. It might be more trouble than its worth, but I'm attempting to print all the joint details in soft TPU. The ankle pieces that I've printed seem to be working great so far...

Current problem I'm dealing with, is sizing the chest and back pieces. Apparently, my rib cage is wider than "normal". Lol. I don't wanna just scale up the chest piece, as this will restrict my shoulder and arm movements... I was thinking of using a heat gun to widen the connections around my rib cage. Does anyone have any better ideas that have worked for them in the past for "stretching" parts without just scaling up the whole part??

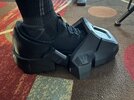
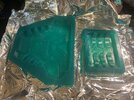
For the boots, I sliced off the bottom half inch, printed that separately, and will be attempting to cast a mold with a hard urethane rubber.

Also, any tips/tricks you have to help me avoid those rookie mistakes would be greatly appreciated!

I'll try to keep updated with new pics as I progress with my build. Thanks! (My cat's name is Moby, and he still doesn't know what to make of the armor...
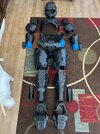
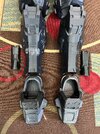
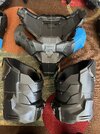
IMG_9893.jpgIMG_9883.jpgIMG_9884.jpgIMG_9888.jpgIMG_9885.jpgIMG_9820.jpgIMG_9908.jpgIMG_9910.jpg)
 
Aww man looks amazing. I used the same files. It is a bummer you didn't read my post first because I talk about all the issues with those galactic armory files... especially the chest plate. I even notified the galactic armory people of the issue many months ago. Bummer they didn't fix it.

You could try boiling water to around 190 degrees and dipping parts of the chest piece in until it is soft enough to mold it. It takes about 20 seconds about to soften.
I'll keep that technique in mind. Thanks for the tip!

I just recently found out about this place, and signed up. Definitely wish I'd known earlier!
 
I'll keep that technique in mind. Thanks for the tip!

I just recently found out about this place, and signed up. Definitely wish I'd known earlier!
Well you're here now so welcome! I reccomend looking at the "New Threads area" there's also a Tutorial thread that links to a whole bunch of applicable topics
 
The chest fans are fine and I can barely hear them. I did install a small noctua fan in the helmet which I thought would work but it was both loud and it didn't do the job. For simplicity I have just stuck a cheap neck fan that fits, for me, at the top of the helmet: KIDEE Neck Fan, Portable... Amazon.com
 
The chest fans are fine and I can barely hear them. I did install a small noctua fan in the helmet which I thought would work but it was both loud and it didn't do the job. For simplicity I have just stuck a cheap neck fan that fits, for me, at the top of the helmet: KIDEE Neck Fan, Portable... Amazon.com
Even at a noisy convention with the fans on medium I was able to hear people
 
Hi, everyone. I just recently started my first full, 3D printed armor build! Naturally, my first and only choice was to do Master Chief.

I'm using the Halo Infinite design from Galactic Armory for the armor, and I found some files on Etsy for the under-suit. It might be more trouble than its worth, but I'm attempting to print all the joint details in soft TPU. The ankle pieces that I've printed seem to be working great so far...

Current problem I'm dealing with, is sizing the chest and back pieces. Apparently, my rib cage is wider than "normal". Lol. I don't wanna just scale up the chest piece, as this will restrict my shoulder and arm movements... I was thinking of using a heat gun to widen the connections around my rib cage. Does anyone have any better ideas that have worked for them in the past for "stretching" parts without just scaling up the whole part??

For the boots, I sliced off the bottom half inch, printed that separately, and will be attempting to cast a mold with a hard urethane rubber.

Also, any tips/tricks you have to help me avoid those rookie mistakes would be greatly appreciated!

I'll try to keep updated with new pics as I progress with my build. Thanks! (My cat's name is Moby, and he still doesn't know what to make of the armor...
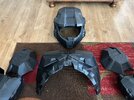

View attachment 336345View attachment 336346View attachment 336347View attachment 336348View attachment 336349View attachment 336350View attachment 336351View attachment 336352)
Looks great so far! A tip for finishing 3d printed armor that I learned a little late is to sand the raw print before using filler primer and bondo. It knocks down the layers more so the filler has to do less work. I've started sanding the raw prints up to at least 300 before using filler and have been getting smoother results.
 
Agreed! Bondo spot putty is a life saver. I've done some other 3D printed cosplay stuff; have done a few Master Chief helmets, Mando, Iron Man, etc... The helmet in my profile pic was my first cosplay project. This is by far the largest project I've taken on, and the first full suit. I'm daunted, but super excited.

I usually start with 120-grit to sand the raw print, then progress to 240-grit, Duplicolor filler primer and Bondo spot putty for the finishing smooth. I've found that wood filler is great for filling larger defects, as I can build it up without cracking.
 
Looks great so far! A tip for finishing 3d printed armor that I learned a little late is to sand the raw print before using filler primer and bondo. It knocks down the layers more so the filler has to do less work. I've started sanding the raw prints up to at least 300 before using filler and have been getting smoother results.
I've found that out the hard way as well. Lol.
 
Update: I ended up purchasing the Armorsmith software, so I could free-form scale the chest and back piece. I'm like 85% sure I got it right, but unfortunately won't know for certain until its all printed and I can try it on. Fingers crossed.
 
Update: I ended up purchasing the Armorsmith software, so I could free-form scale the chest and back piece. I'm like 85% sure I got it right, but unfortunately won't know for certain until its all printed and I can try it on. Fingers crossed.
Love Armorsmith. It made a huge difference when scaling the armor to my size. I'm in the same boat as you where I am pretty sure it is the right scale but not positive. The forearm pieces that I printed out were perfect, so I'm hopeful the rest of the scaling goes that way. Best of luck to you!
 
Just a note that worked for me with those Galactic Armory files. The back chest parts I scaled to 95% and the front to fit I scaled to 92.99%. So you can see that it isn't a one-to-one scale. I hope that helps.
 
Love Armorsmith. It made a huge difference when scaling the armor to my size. I'm in the same boat as you where I am pretty sure it is the right scale but not positive. The forearm pieces that I printed out were perfect, so I'm hopeful the rest of the scaling goes that way. Best of luck to you!
To you too!
 

Your message may be considered spam for the following reasons:

If you wish to reply despite these issues, check the box below before replying.
Be aware that malicious compliance may result in more severe penalties.
Back
Top