My HD Modular ODST Build. (3D printing/Sewing/CAD)

Status
Not open for further replies.

WhenInMaine

Member
Hey 405th team!
Its been a shockingly long time since I have uploaded anything onto the forum, but here I am, trying to change that!

Long story short, I have finished the first iteration of this suit, (Thanks to everyone following it on facebook and Instagram), but its a really long build, and I kinda want to go into a fair bit of depth with this build thread. So ill probably spread it over a number of posts, and just write some more whenever I get the chance.

So, without further introduction, here we go!
-----------------------------------------------------------------------------------------------------------------------------------------------------------------------

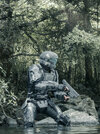
When I started this build, I had built 5 Foam ODSTs. I was pretty happy with my previous ODST, and I had a lot of fun with it!
MVIMG_20200801_094246.jpg


But whenever I wore it, I always had this feeling that I could do it better... Maybe increase the realism by Making actual hard armour!
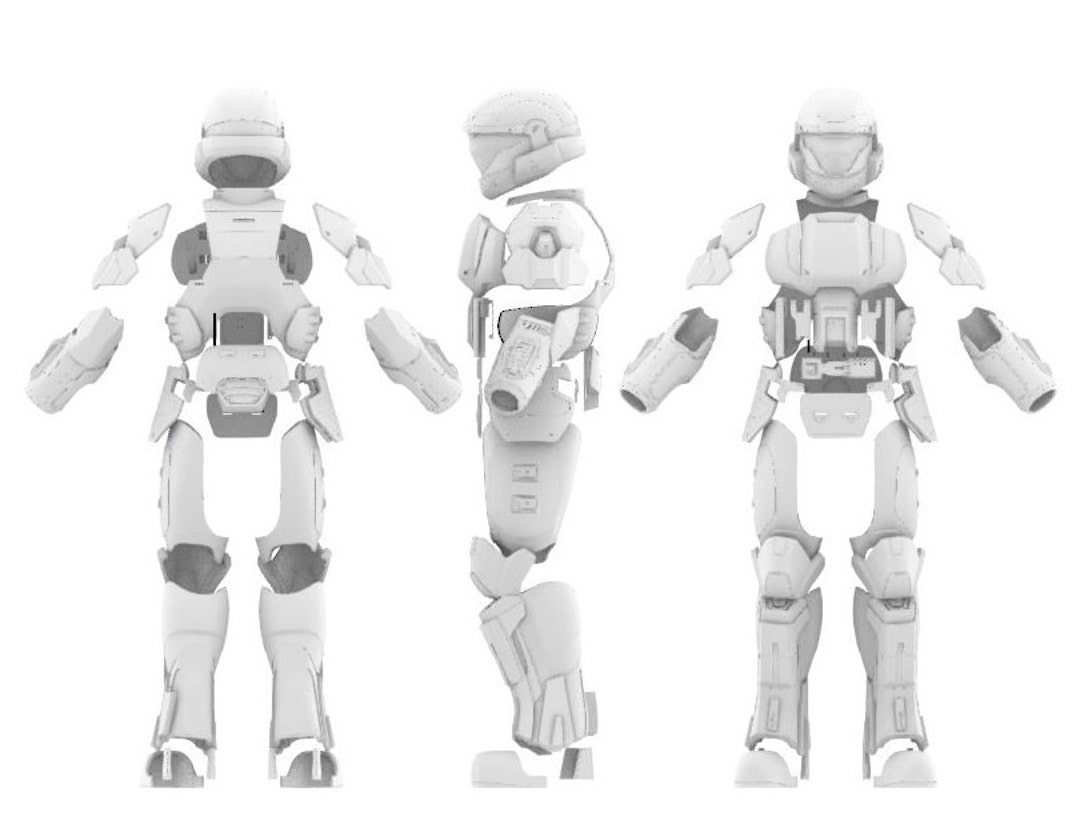
I already had a 3D printer, and the degree that I had just finished in Industrial Design had involved a LOT of 3D modeling and CAD, so I decided that I would design and 3Dprint my own set of ODST Armour.

Right from the get go, I had a range of criteria that I wanted this suit to meet.

It needed to:
- Be Highly accurate. (If I was going to go to the trouble of printing a suit of armour, I wanted it to be as accurate as I could manage!)
- Retain an excellent range of motion. (I wanted to be able to use this suit and not feel too restricted, I knew this could be an issue with hard amour)
- Be Modular and Realistic. (I wanted to be able to swap parts out if I wanted, and design the suit with a mix of hard and soft parts. )
- Be easy to clean up. (Idk about you, but personally I find sanding prints to be very tedious. I wanted to minimize the effort required to get it smooth)
- Be printable with my Artillery Sidewinder 3D printer.

With these goals in mind, I got to planning.

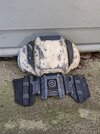
I began with the Chest armour. I wanted to treat the straps, back armour, and chest armour as different components, all fitted together with clips and velcro in a believable fashion.
This was more or less my original drawing, and it kinda did turn out pretty much in this way:
PXL_20211123_041726087 (1).jpg

PXL_20210216_072058936.MP (1).jpg


With the general idea of how it was going to all clip together, I whipped out my laptop, (he had no idea how much he was gonna be working over the next year xD) and got to designing.
Using some images from the official ODST Cosplay guide, I threw it into Rhinocerous 7, and whipped up the chest plate. From there, I carved some gaps for screws and buckles and made the little side wing parts come off, both as attachment points for bags and stuff for later, and so I didn't have to sand any tight corners later on.
chest veiw one.PNG


chest view 2.PNG

After being happy with the model, I printed it out, and it worked great!

PXL_20210217_052359472.MP.jpg

PXL_20210218_091317009.MP.jpg

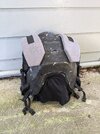
After doing a dumb, and printing the same half of the chest twice, I started thinking about the fabric parts I was going to attach it to.

I started off by making a tape cast of my torso, and then drawing my design onto it. from there I could cut it up, and get the patterns I needed for sewing.
PXL_20210218_051245287.MP.jpg

PXL_20210221_074142694.MP (1).jpg


This ended up being the Slightly photoshopped Imaged I used for referencing the torso, if anyone wants it. (I removed the pink and purple checks, so not 100% accurate I guess xD)
under armour (1).PNG

Once I had my patterns, It was time to get to sewing!
PXL_20210223_102625493.MP (1).jpg

These were my pattern parts, that I then cut out of fabric.
PXL_20210223_111216627.MP.jpg

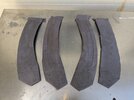
Here is me using contact cement to give a nice edge to my pleather parts, (I'm probably making someone who actually knows how to sew bang their head against a table, and for that I apologize xD)
PXL_20210223_112222990.MP.jpg

Slooooowwwwwlwly coming together.
PXL_20210224_001120408.MP (1).jpg

And then with all the black pannels sewn in
PXL_20210224_001152007.MP (1).jpg

Lets be real most of this is gonna be hidden, but imma know its there, and that's what matters!

The "ab" section was made by covering foam abs with fabric. Again, someone out there is having an aneurism watching me use contact cement to "upholster" foam. That person should probably stop reading this thread, bc it happens more.... Or they should teach me how to do it properly, I'm open to learning!
PXL_20210224_022320359.MP.jpg


I then made the ab section, that would hold the clips seen on the reference, that would hold my back plates on.
PXL_20210224_030258220.MP.jpg

PXL_20210224_030303243.MP.jpg

more progress!
PXL_20210224_034519494.MP.jpg


Finally, I added a collar of EVA foam and pleather over around the neck. This collar also housed the front ring of the back armour.
PXL_20210309_032023420.MP.jpg

PXL_20210309_044012129.MP (1).jpg


And that's basically where the vest has ended up to this date. If I were to go back and change things, I would be making everything a lot neater for a start. (the joys of prototyping, and then going "eh good enough for now" and then never going back and fixing stuff I guess haha) secondly, I would probably not use velcro for the sides of the vest, maybe a zip would be better. the velcro keeps coming undone as a bend to put on other armour, and it's just a little messy. Wither way, It was a great start!

Alrighty, Im gonna leave off the first post there, partially because its past 1am here.

Its got to be back on the forum!

-WhenInMaine/ From the Brink Studios
 

Attachments

  • PXL_20210224_001120408.MP.jpg
    PXL_20210224_001120408.MP.jpg
    3.3 MB · Views: 201
I wish I had the patience to make such a beautiful undersuit, great job. been watching you on insta, WETA better hire you on soon haha.
 
I wish I had the patience to make such a beautiful undersuit, great job. been watching you on insta, WETA better hire you on soon haha.
Cheers man! Its been a long haul project, and its good to finally document it! Weta is proving difficult to contact, but Im living in the same city as them now, so hopefully they notice me soon xD

I'm so happy you have documentation on this suit, its going to be so useful
I really do hope some people find it useful!


Alrighty, onwards!
-----------------------------------------------------------------------------------------------------------------------------------------------------------------------
Pushing forward with this build, I decided I wanted to get the torso done first, to make sure all my sewing hadn't gone to waste.

So I started modeling all the back plates. I wanted the back plates to be individual, so they had some level of movement, and I knew that the bottom plate would have to be joined together because it was too big for my printer.
This is basically what I ended up with:
back plates.png


The theory was that the shoulder straps would link at the bottom, overlap the plates all the way over, and then hold the chest in place at the front. All the individual plates were separate as well, so they could move/wouldn't split it knocked.

With the back all designed, I then printed it all out.
PXL_20210226_022542230.MP.jpg

PXL_20210227_010406726.MP.jpg


Unfortunately, I got carried away, and punched forward a little without taking many photos, but I basically butchered two T shirts and a section of upholstery foam to create a padded "backpack" to hold the plates. You can see the results here:
PXL_20210301_093801412.jpg


It lifted the plates a few cm off my back, (the odsts are a little "back heavy" in the reference images") and gave them some structure. Somehow, (almost miraculously lol) most of the seams and connection points actually mimic those seen on the actual model.
PXL_20210301_232740804.jpg


I had also modeled the back plates with some holes to feed straps through. These straps then clipped into the clips at the front of my tunic, which I made in the last post. This entire rig kept everything really tight, meant nothing flopped around, and made the whole thing feel like a hug. Its also really adjustable too, so if I ever put on any weight, (or lose it) I can just adjust all the straps!
PXL_20210301_232752500.jpg

PXL_20210301_093648745.MP (1).jpg


Moving on from the back plates, I made a start on the shoulder straps. I wanted to make them flexible and at least lined in fabric. the basic process ended up being:

- Make a paper pattern to fit the plates
- Make 4 5mm (low density) foam versions
- Carve tracks for the straps to go into
- Cover those foam versions with fabric (I used contact cement and I probably should remake the whole sections xD)
- Add a little pleat of fabric between each pair
-Glue each pair together

Im not sure this is the best methods, and its on the list of things I want to redo, but it works for now :)

See below for examples:
PXL_20210301_224442427.jpg

PXL_20210301_224946510.jpg

PXL_20210301_233306814.jpg

PXL_20210301_235828466.jpg

Adding the pleat/seam down the middle^
PXL_20210302_001003986 (1).jpg

And then all done. Next I added a slit for the strap to go through at the end of the groove, and added the webbing strap. I went a little too wide here I think, ill probably use thinner webbing next time.
PXL_20210302_010527950.MP.jpg


With the shoulder straps on, it all started coming together really nicely. I was super stoked with the torso, and ready to push on further.

PXL_20210303_065056418_2.jpg


The final part of the torso armour was the Belly plates. Previously with my foam amour, I hadn't payed this section much heed, but I decided I wanted to actually do something interesting with it. I was going to turn it into a wallet (because I love making my life difficult).

So I got to designing. Along with the functional aspects, I wanted it to be easy to clean up as well, so I made it in a bunch of parts, to maximise the smooth surfaces to sand. This was the result:

belly pouch (2).PNG

belly pouch open (1).PNG

It would open far enough to withdraw a bank card, or cash or something, and then I would add some elastic to make it snap back into place.

PXL_20210304_074811681.MP.jpg


It actually worked a treat!
Here Are the exploded views:

exploded veiw (2).PNG

exploded veiw 2 (1).PNG


The other parts of the Belly armour were not really very exciting, but they were designed to go over a pleather plate carrier that I designed to match the reference. Here it is in all its glory:

PXL_20210308_021257717.MP.jpg

PXL_20210308_021417997.MP (1).jpg


And that's basically that for the torso armour!

If anyone is looking at buying the 3D files I have up on etsy, the patterns for the Belly plate carriers, and the shoulder straps are included with the files, so that makes assembling everything a little more straightforward :)

Looking at all these photos close up makes me see all the problems, and suddenly I want to rebuild the entire thing already xD


Until next time, Jono @ From the Brink Studios :D
 

Attachments

  • PXL_20210301_232106053.jpg
    PXL_20210301_232106053.jpg
    3.5 MB · Views: 147
Hey team, I'm back with another update!
-----------------------------------------------------------------------------------------------------------------------------------------------------------------------
After completing the torso, I dove into the shoulders!

shoulder progress (1).PNG

shoulder exploded (2).PNG

And that's how it turned out!

I wanted it to come apart so that I could swap out the different plates for sniper or CQB plates without completely changing the shoulder base armour. I haven't made the other plates yet, but I will at some point!

After the design phase, (which I just skimmed over in two sentences even though it took me like a whole day lmao) I printed them out, and it ended up working out awesome!

PXL_20210313_043030637.MP (1).jpg

PXL_20210313_043022589.MP (1).jpg


with the shoulder working just fine, (one of the most straightforward parts to make actually), I moved onto the belt section.


The belt was pretty straightforward, made up of some pretty simple parts. the biggest design thing I did was design the hip plates to be printed flat, to minimize support material, and improve strength.
progress full amrour (1).PNG

progress belt (1).PNG

flat hip plate (1).PNG


PXL_20210325_090759010.MP.jpg


The plates were attached to fabric padding and a belt and then integrated into the armour.

PXL_20210326_024748263.MP.jpg


After sorting the front of the belt section, I moved onto the thighs.

I decided to model the thigh in one piece, mostly because that's how the plate looks in game. It also conveniently happened that my printer was just big enough to print it in one part too.
I did want to add hardpoints for potential bags and pouches to be added later, so I wanted to make the clips removable and space for straps behind them.
Finally, I wanted the inserts inside the shin armour to be a flexible/foam material rather than plastic.

so, just like the shoulders, I got to designing.
Thighs final (2).PNG

thighs conections (1).PNG

The clips just slot into gaps, and the gaps double as hard points for straps and stuff.

After designing, I printed it all out.

PXL_20210524_233058784.MP.jpg

They fit!

After successful printing, I got working on the inserts.
PXL_20210525_030935707.MP.jpg

PXL_20210525_033728533.MP.jpg

PXL_20210525_041951604.MP.jpg


So, making slow progress on this thread, Its good to be getting the documentation finally!

Cheers for reading,

Jono @ FromTheBrink
 
This is wonderful man, I just started working on my own ODST setup with the files I found on here for the armor to print. Yours look so clean! is there any way I can get my hands on some of the files?
 
Oh hey I found your build thread. We talked a little on Facebook. I bought your files right when you made them available! I’ll definitely keep you updated and send you pics when I’m done so you can have some more completed costume reference pics with your files
 
Fantastic write-up! I'm working on these files now, and I'm glad I stumbled on this thread. This cleared up some of the nagging questions I had around the undersuit.

The one thing I'm still not sure about is the belly parts, where the wallet is. The wings that come out on either side, I see there are clips on the bottom of each wing that look like they connect to something, but I'm not seeing where they would connect to. I also see velcro, which I'm guessing attaches to the vest underneath. Do you have any pictures of where these clips connect to?

I've attached pictures pointing out what I'm talking about.
odst straps.PNG


Thanks again for the amazing files and write up!
 
Oh man, its already been like 4 months since the last update, I'm so terrible at this! Today will be a short post, as its super late, but some content is better than none!

Fantastic write-up! I'm working on these files now, and I'm glad I stumbled on this thread. This cleared up some of the nagging questions I had around the undersuit.

The one thing I'm still not sure about is the belly parts, where the wallet is. The wings that come out on either side, I see there are clips on the bottom of each wing that look like they connect to something, but I'm not seeing where they would connect to. I also see velcro, which I'm guessing attaches to the vest underneath. Do you have any pictures of where these clips connect to?

I've attached pictures pointing out what I'm talking about.
View attachment 316960

Thanks again for the amazing files and write up!
Skpping ahead in the process i see ;) Those parts were added in hindsight, and they actually clip into straps that come of the back of the spine section. It keeps the spine nice and tucked into my back, rather than flopping around everywhere. Ill get some better pics soon!


Anyhow, onto the shins!

As usual, I started with the CAD work. These were a pain in the neck to design, and partially because all my reference images were at an angle :p But we got there in the end.
shin nearly there.PNG

Now these big bois were not gonna fit on my Printer in one go, so I designed a connection point in the middle that would allow them to be connected together in a really snug way. It ended up working really well, and to this day I dont belive they have any glue on them still haha! it uses a screw connection at the front, and an angled connection at the back to just snap in place.

shins exploded.PNG

Shin joint.PNG


From there, the next step was to print! These were some of the longest prints I had, and it was a long period of the printer constantly running.
PXL_20210724_210812311.MP.jpg


But it was worth it! They turned out great! They also allowed a solid range of movement, although they are still the most constricting part of the suit i reckon.


PXL_20210725_094045423.MP.jpg


PXL_20210725_094115557.MP.jpg


original_cffdaa4a-71f7-4e76-9a32-7d906d5a0f7b_PXL_20210725_094144274.MP.jpg

These shins had SO MUCH PADDING inside them to make them fit my leg snuggly, including a wedge at the top that was inserted after the part was put on. this locked it all in place, and meant it didnt shuffle around. And thats the shins! Stay tuned for more!
 
Alright, Im back already and im motivated to get this write up up to date!

Lets go!

Shortly after I finished the shins, I picked up a reisn printer. This thing was used quite a bit for little fiddly details that I really couldnt be bothered sanding later.
PXL_20210728_071036410.MP.jpg


At this point i figured it was time to do a suit up of all the bits I had so far, so here is the result of that:

Capture.PNG
PXL_20210729_105247374.MP_2.jpg


I was actually really stoked by how it was looking, and really motivated to finish the project. (Plot twist im still not completely finished but thats just how it goes :rolleyes:)

Next up on the list was the lower back plate. It was a fairly straightforward design, It cam apart into bits for easy cleanup, and it looked nice enough.
lumbar plates.PNG

Lumbar plate 2.PNG

lumbar plate 3.PNG

It had a simple attachment method at the back (WHich I have ignored so far and just used glue oops) and it went together really well when i built it :) pretty straightforward, and all the straps and buckles really sell the look.
PXL_20210819_120135248.jpg


I also whipped up a foam spine pannel that would bridge the gap between the butt plate and the lower back. Im actually still running this prototype, but it loosk really good with a bit of paint and underneath layers of armor.

PXL_20210820_025649291.jpg


Next up on the list was the forearms! I had been putting these off for aaages, because the reference was again at a weird angle, and the shapes are actually fairly complex. but I dove in and after a couple of days, I had this:

forearm done.PNG


forarm done 2.PNG

forarm exploded.PNG


I am SUuuuper stoked with how these came out, they are probably my favorite part of the whole build to be honest. the fact taht it has so many parts means that clean up is actually really easy with an electric sander, as it all basically breaks down to smooth parts.

PXL_20210901_053233589.jpg


Thats all the parts all printed, and then all assembled:

PXL_20210901_061021931.jpg


I left these little sections clear of material so that I could still bend my arm without restrictions. I mean to go back and add some detail to that area using a flexible fabric.

PXL_20210905_071816232_2.jpg

PXL_20210905_071843805.jpg
No movement restrictions for me!


PXL_20210906_112932846.jpg

At this point, I had completed all the files for the body armour, and I just had to print the other half of everything, and design and print a helmet! I was reaaaaaaally thinking about using dutch props ODST helmet for this build, but I ended up deciding that I wouldnt be satisfied using someone else files for something as central to a build as a helmet. So Off I went designing a helmet because I like making myself suffer!


So, Onto the helmet. This took a bunch of days to sort out, making helmets is hard compared to armour pannels!

but I came out ith something I was happy with, printed it, and cleaned it up.

The upside with designing my own file is that I don't have to worry about scale nearly as much because I can just make it to scale with the rest of the armour from the get go. Scaling is one of my least favorite thing, so thats a big win!

finisehd helmet.PNG


I also made a visor buck for it that I pulled a couple of visors from using a simplified (hackjob) version of vacuum forming.

PXL_20210908_191804475.jpg


The print for this helmet was soooo baaaaaaad! It had corruped and missed some parts under the brow, there was stringing EVERYWHERE, and it was just a mess. But it actually turned into one of my favorite helmets i ever made!

PXL_20210909_060039015.jpg

This is it with an old failed visor, and its not much to see yet, but just wait!

One more suit up to make sure it all fit together and the scale looked good:

PXL_20210909_072759002.jpg


and then it was out to the workshop to start plodding away at the other parts left to print, and then sanding....


Thats all for now folks, ill be back soon with the cleanup process!
 
Ah yes, My favorite part of 3D printing...

Sanding.

Mind the sarcasm.

Either way, that was a big motivation for actually designing my own files for this build. I figured that the more parts I printed it in, the less details I had wo work my way around with sandpaper later! and actually, my plan worked out! of course, there was still a lot of sanding to do.

PXL_20210911_013924646.jpg


Thats like... most of it? still missing a few bits there. Anyway, I dove in, and I think I actually had all of the sanding basically done within 2 days of straight sanding. were those two days hell? absolutely. But it was very easy sanding, and I got it to a level I was really pleased with overall, just because there were so many flat surfaces.

Here are a few "montage photos" (you have to imagine the music yourself :p )

PXL_20210914_074611510.jpg


PXL_20210917_080339872.jpg


PXL_20210918_074509439.jpg


PXL_20210918_092303641.jpg


I dont even think I got a photo of the finished primed stack of parts. it was a journey to say the least, but sooooo satisfying to see a pile of printed plastic turn into actual things that look real!

Also, a neat hack for anyone who hasnt come across it: Use a deck of cheap playing cards to spread your bog. 52 cards in a deck gives you 208 flat spreading surfaces! and the smoother your bog, the less sanding you gotta do. im all about that less sanding.

PXL_20210914_075156387.jpg


SO.

with the sanding out of the way, it was on to the genuinely fun bit! Painting! I love this bit the most out of anything! it all comes to life in this one step, its so much fun.

First up, everything got a coat of silver over the primer.

PXL_20210927_234353894.jpg


This acted as the base layer for the suit. Ill demonstrate with one fo the shoulders my painting process.

Firstly! Silver base coat:
PXL_20210927_234452380.jpg


Next, a bunch of toothpaste and damp salt was applied. this will provide chipping effects soon.

PXL_20210928_001953416.jpg


Then, a layer of paint over the top. in my case, my paint was actually the same primer as I was using earlier.

PXL_20210928_005015552.jpg


Next, the salt and toothpaste from before are wiped away, revealing the silver from before!

PXL_20210928_005853976.jpg


Next, I masked off any detail lines that needed to be added

PXL_20210928_062621559.jpg


and then finally, I painted those lines, and finished it up with some airbrush work to dirty it up, shade the edges, and blend it together.

PXL_20210928_074222450.jpg


This combination of techniques was REALLY satisfying to use, and I HIGHLY recommend you give it a try, it's a lot of fun!

Anyway, I used basically this process for the entire suit, and These were the results on the individual parts:

PXL_20210928_083335140.jpg


PXL_20210928_225107256.jpg


PXL_20210928_225441709.jpg


PXL_20210928_225623352.jpg


With this initial painting all done, I did a suit-up to see how it came together.

PXL_20210930_041837274.jpg


PXL_20210930_041057719.jpg
PXL_20210930_041934661.jpg


I was beyond stoked at how it was turning out, But there were a few paint changes that needed to be made. This included changing the chest plate back to grey again, and adding camo patches to the thighs and forearms.

PXL_20211027_000517136.jpg


PXL_20211028_050124869.jpg


The paint process was made really easy by the fact that everything came apart into bits as well. so much less masking, just pop the bit out, paint it separately, and throw it back on again!

Alrighty, that's all for now, I basically have the visor-making process, the glamour shots, and the Backpack still to go!

-Jono
 

Attachments

  • PXL_20210928_225623352.jpg
    PXL_20210928_225623352.jpg
    4 MB · Views: 125
  • PXL_20210928_225234205.jpg
    PXL_20210928_225234205.jpg
    3.6 MB · Views: 138
  • PXL_20210930_041619125.jpg
    PXL_20210930_041619125.jpg
    2.8 MB · Views: 130
  • PXL_20210930_041116448.jpg
    PXL_20210930_041116448.jpg
    1.4 MB · Views: 142
Alrighty, almost there through this crazy journey!

Onto the visor!

So I dont have access to a vacuum forming machine, and while its on my list of things i wanted to make, I have not got around to it yet. I ended up settling for a "budget version" of heat forming, effectively vac forming without the vacuum.

First I started with the buck I was gonna use, some 1mm PETG, and my trusty heat gun.

PXL_20211018_032334479.jpg


The sheet of PETG was then screwed between two sawhorses.

PXL_20211018_033423239.jpg


aaaaand apparently thats where my record keeping ended. The general gist was that The plasteic was heated up evenly using the heat gun, and once it was very soft, the buck was pressed down into it. The saw horses lean inwards and allow the plastic to wrap around the buck.

Once I made a few attempts at this, it was on to the dyeing process!

This was where I had had problems in the past (see my old warped visor i had been using previously) as I never managed to nail the temperature and kept melting my PETG parts out of shape.

This time i was prepared though, and Bought a cheap thermometer so I would know when it was safe to dip the visors.

This was the dye I used:

PXL_20211018_042525619.jpg


And this was my settup. (carried from the stove VERY CAREFULY outside)

PXL_20211018_043305581.jpg


Once the visor had spent a reasonable amount of time marinating in the forbidden soup, They were given a light spray on the inside using Rustoleums "mirror effect" paint.

PXL_20211018_052848448.jpg


And that was the process!

I got two, TWO.... Presentable visors out of the like 8 that i originally heat-formed xD

One was dyed black, and went off in a clients helmet, the other a blue one went straight into my bucket.

Im actually pretty happy with the result though! The only problem I have with my visor is some slightly splotchy bits on the visor, and a ding caused by heat bending just at the front at the top.

PXL_20211018_052535178.jpg


PXL_20211018_052538493.jpg


PXL_20211018_052541084.jpg


I also threw some old motorbike padding in for a tight fit, as well as some batteries to drive my fan in the forehead.

PXL_20211028_083210092.jpg


PXL_20211028_083410481.jpg


And that's the helmet!

The last thing that I think is worth mentioning is the shoulder attachment system. I originally tried to sew it myself and failed miserably, and I ended up grabbing a shoulder brace from online and attaching my shoulders to that instead. It actually worked a treat, and it comes pretty close to accurate as well!

PXL_20211029_001804875.jpg


And that's basically all the photos I have from that process! So now some mirror selfies, ad then onto the glamour shots!

PXL_20211028_091131268.jpg


PXL_20211029_062525290.jpg


PXL_20211029_062608358.jpg


Conveniently, just after I finished, I had some friends come stay who were pretty into photography, so I took the opportunity to grab some showcase shots of the build. Im really stoked about how they came out!

_B200689 (1).jpg


_B200669 (1).jpg


_B200682 (1).jpg


_B200725 (1).jpg


_B200748 (1).jpg


_B200752 (1).jpg


_B200759 (1).jpg


_B200761 (1).jpg


So thats a wrap on the main build! I have also just complete a backpack for this thing, so im looking forward to showing that off too!

If you want to follow more of my work, you can find me @Fron_the_Brink_Studios on Instagram!

Now that I have finally achieved a write up here, I guess now its time to put a 405th patch on the other shoulder!

Thanks for reading this far,

-Jono @from_the_Brink
 

Attachments

  • _B200680 (1).jpg
    _B200680 (1).jpg
    1.6 MB · Views: 116
That was absolutely amazing! You have the most accurate ODST armor I have ever seen, and your work has inspired me, my friend and I'm sure many others to continue our own projects! Thank you for posting, I look forward to see what you do in the future!
 
Status
Not open for further replies.
Back
Top