ODST Build 1: The Journey Begins

Ok so while I wait for my magnets to arrive, I fussed around with my printer a whole bunch and got it back to production functionality. After 5 ish failed prints I finally got the SMG sight to print at a quality I can work with.

PXL_20210624_234012828.jpgPXL_20210624_234009578.jpg

I do not know why the print has these burrs on it? They fall right off and don't seem to be an issue but does anyone know what they are and why they happened?

Also, I finished printing the barrel/suppressor. It needs a little sanding to fit together perfectly but I think it will work fine.

PXL_20210624_233958135.jpgPXL_20210624_233953771.jpg

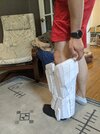
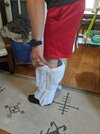
The left thigh us fiberglassed and ready for bondo it looks basically the same tho so no pics. The right thigh is basically pepped. I just need the magnets to arrive so I can pep them into the pattern. The chest base layer is still being bondo and sanded. And I did a little seam filling on the pistol. I sprayed a layer of filler primer to see how I did. It looks ok but there are still some pretty big seams to fill.


PXL_20210624_234022495.jpg

I think thats it tho...


Edit: forgot to add the pics of the burrs on the sight print.

PXL_20210623_212144336.jpgPXL_20210623_174052709.jpg
 
Last edited:
I do not know why the print has these burrs on it? They fall right off and don't seem to be an issue but does anyone know what they are and why they happened?
It could be an issue to do with one of the X or Y axis? Perhaps the belts need to be tightened or are too tight. To me, it looks like the extruder is coming out further past the piece then it should be, adding material to spots where it shouldn't.
 
It could be an issue to do with one of the X or Y axis? Perhaps the belts need to be tightened or are too tight. To me, it looks like the extruder is coming out further past the piece then it should be, adding material to spots where it shouldn't.
Thanks I will do some fiddling with my belts. I didn't know they could be too tight... That seems like a problem I am going to have as I tend to tighten things too much.


Also, I just spent 3 hours unfolding the shin armor and god help me that piece is going to be a pain to pep! I didnt realize the shins were so detailed!
 
Okey dokey. I didn't have much time to work last week or the week before but I do have some updates!

Chest base layer, I have been neglecting bc it's just sanding and boring and loud. I will get to it soon I promise.

Left thigh is ready for paint! I love it. I haven't started painting yet bc I'm not sure if I'ma include some blue on parts of it. My question now is how much does secondary color placement affect tiers for deployment? Like if I add a blue stripe somewhere where there isn't one on any known game image is that going to negatively affect my tier? I have already gotten a little creative with my blue on the shoulders but I'm hesitant to do too much custom painting if it's going to take away from my tier rating. Though, I'm not doing a camo pattern so maybe my tier is already shot? Idk. Looking at regiment people for answers on that.

PXL_20210709_004502594.jpgPXL_20210709_004459854.jpg

The magnets came in for my right thigh and they are awesome. A little too awesome maybe but I'ma still try. They are crazy strong but nice and small still. I fabricated these little pouches out of cardstock with which I can incorporate the magnets into the resin and fiberglass process for the piece. Hopefully that will secure them well enough.

PXL_20210628_135802679.jpgPXL_20210710_001914434.jpgPXL_20210710_001917978.jpg

My issue right now is that if I put them close enough to fit inside those little cutouts they repel each other (or attract each other) and they don't really want to stay put. I think I'ma have to print a bracket or something to hold them next to each other while I resin and fiberglass them in place. So that's a ways out still. I remain hopeful tho and excited for this step bc it's very much something I have no experience with and I'm excited to problem solve my way through it.

No progress recently on the SMG.

I did do some work on the pistol tho. While sanding some bondo the barrel popped off. Apparently the gluing I did was not very strong. So I reattached it and it's now a little off from where it was but it's still usable. One day I may print a better version but that's a project for later. Anyway been sanding and filling and bondoing and whatnot on that.

I think that's all tho. I'm fairly certain that I'm not going to meet my goal of finishing this project before PA school starts in August, but that's ok.. my new goal is to have everything pepped and ready for hardening by PA school. Only got shins and boots left. Unfortunately the unfold of the shins is crashing my laptop and armored garage hasn't answered my emails yet so that might be a while still.
 
So, the magnet problem from the previous post happened because I was seeing if I could get the magnets to sit in the square cutouts on the thigh piece. When they are that close to each other, they repel each other pretty strongly. I was considering using a 3d printed brace kind of to keep the magnets at the right spacing until resin and fiberglass can dry and hopefully hold everything in place. This theory was almost working when the forces actually flipped one magnet (this making it attract to the first) and they snapped together.

To deal with this, I decided to install the magnets separately. So, I got one in place with my make shift enclosure to secure the magnet direct into the piece. I then started applying resin to harden. I skipped a decent radius around the second hole however. My plan is to basically resin and fiberglass everywhere except that one area - thus securing the magnet in place. Then I will install the second magnet and resin/fiberglass the remaining area in a hope to hold it in place. Once all is said and done both magnets should be secured in the piece and good to go. This will be a significant learning process tho. I actually did not take any pics of this yet but I will eventually.


Also, the chest base layer is ready for paint. I ran out of white primer but otherwise it's good to go.

Exciting stuff! I will try to update with pics when I get home tonight.
 
Kinda got distracted. Ok pics of the thigh:

PXL_20210720_135953388.jpgPXL_20210720_135947729.jpg

Had to fix a little tear with some painters tape. I have done this before and it hardens with the resin no problem so It will be fine. First magnet is fiberglassed and installed. Unfortunately, I am out of fiberglass mat so I'ma have to wait a bit until I get paid again to buy some more. (already spent this week's budget on sandpaper and some stuff for other house projects).

Also (while on the topic of thighs), I wanted to make my thighs more interesting but adding some of my secondary color. Since the game images from H3 ODST all use that camo pattern, I was struggling to find any reference for approved color on the thighs. I did, however, find this image on the Halo wiki.

1280px-H3ODST_RangedArmor_Concept.jpg

It has a blue stripe on the thigh pieces. Since this is from the wiki I'm going to consider it canon even though it's clearly not a game image. If I am wrong in this, please someone let me know. I really like the idea of adding some blue to my thighs so I'm going to move forward with adding a stripe to my thigh pieces.
The chest base layer is now silver, tho, I do not really like this brand of paint for silver. I goes on thick to look full and then drips as it dries. So some sanding is coming and repainting. Once the can is empty, I'm going to not buy this again.

PXL_20210720_135939990.jpg

I also figured out where the magnets are going to have to go in the SOCOM to line up with the magnets in my thigh. I cut the first hole and rondo'd some magnets in place. Unfortunately, the cutting process resulted in one of my glue seems coming apart.
But since I was gonna do a batch of rondo anyway I just reglued it with some excess rondo.

PXL_20210720_133230842.jpgPXL_20210720_133700461.jpgPXL_20210720_134148807.jpgPXL_20210720_134201496.jpgPXL_20210720_135932706.jpg
The bean bag is weighting down the seem while it dries and the magnets on the left are holding the right magnets in the rondo with a little pressure. I have high hopes for this process. The magnets reach for each other pretty strongly but, hopefully, a little bondo over the pistol magnets will be enough to keep them from pulling out of the pistol. I just have to make sure I pull it off by sliding down rather than out.
 
Been a while since I updated. I have been working but not much bc... life...

Anyways, where did I leave off?

The pistol is looking awesome. I was going to make some stencils for the "mistiah armory" and whatnot but I just got a lead on someone with a laser engraver so I might investigate that option first. It's 3D printed so idk how well a laser engraver will work with such thin walls...

PXL_20210812_191803424.jpgPXL_20210812_191759643.jpg
You totally can't even tell where I embedded the magnets! So cool!

I tried to stencil on an ODST logo onto my undersuit but it turned out kinda bad. Let's call it weathering. Idk it's an undersuit so I'm not too upset about it.
PXL_20210812_214347911.jpgPXL_20210812_214343209.jpgPXL_20210813_143321346.jpg

My second layer of paint was too thick. I saw it dripping so at least I know where I went wrong. Need more patience.

I picked up some more fiberglass mat so I'm ready to continue on the magnets in the thigh armor just haven't gotten around to it yet.

Pepped the left shin piece. I think it's a bit too big. I think when I updated armorsmith it didn't save my manaquin maybe? Idk I know the shins are chonky but this seems a little excessive.

PXL_20210812_191620457.jpgPXL_20210812_191628812.jpgPXL_20210812_191641734.jpgPXL_20210812_191649096.jpg

Hopefully I can get back to work on this. I gotta recheck my manaquin dimensions and reprint the shins maybe. I'm at like 10 days to school starting so things will probably slow down once that happens... Oh well. It will get done eventually.
 

Attachments

  • PXL_20210812_191634254.jpg
    PXL_20210812_191634254.jpg
    1.9 MB · Views: 132
  • PXL_20210812_191627870.jpg
    PXL_20210812_191627870.jpg
    1.8 MB · Views: 134
Trying to shorten my posts.

Got the other magnet installed in the thigh. Looks awesome but I put it in upside down so it actually repels the pistol a little but what that actually means is that the pistol only sticks at a little cockeyed angle. Which is kinda Kool. I figure I could cut the magnet out and remake the holder and reinstall it in about 3 ish hours. Idk if I want to do that so I might just roll with a crooked sidearm.

The system works tho!

PXL_20210814_220634365.jpgPXL_20210814_220637324.jpg
 
I'm not dead I promise. I'm just in grad school.

I will be making very small amounts of incremental progress over the next few weeks/months. I am likely not going to post updates very often. As it stands, this is where I am:

PXL_20210908_203839568.jpgPXL_20210908_203800319.jpg

Some detailing and weathering and whatnot needs to be done still but generally, these pieces are done (ish). Also strapping is what I'm going to be working on a lot so small detail progress that's not very interesting to post.

It looks pretty cool. One day it will be done.

So don't hold your breath waiting for updates from me.
 
I'm not dead I promise. I'm just in grad school.

I will be making very small amounts of incremental progress over the next few weeks/months. I am likely not going to post updates very often. As it stands, this is where I am:

View attachment 309835View attachment 309836

Some detailing and weathering and whatnot needs to be done still but generally, these pieces are done (ish). Also strapping is what I'm going to be working on a lot so small detail progress that's not very interesting to post.

It looks pretty cool. One day it will be done.

So don't hold your breath waiting for updates from me.
All of you guys are truly inspiring! I wish I could actually create armor that looks as good as that maybe someday, but for now I'll continue to support the small businesses and work through commissions.
 
All of you guys are truly inspiring! I wish I could actually create armor that looks as good as that maybe someday, but for now I'll continue to support the small businesses and work through commissions.
Welcome to the forum! We are a lovely community of crafters. If you look around you will see some incredible armors here (RandomRanger comes to mind also Electraknite), you will see some newbies just starting to get their feet wet, and you will see a lot of people somewhere in between (like myself).
We all have a wide arrangement of skills and experience, but nobody is ever made to feel bad about their build.
I read your introduce yourself post where you said you don't have the artistic skill to make the armor yourself. I would say that's perfectly fine too! We have a lot of people here who work from kits or just do painting or whatever. If you are interested in learning to make it yourself from scratch, I can tell you that this is the best place to learn. Advice is endless, and we even have our own tutorials and patterns available.

I will say that I chose to use Bondo and fiberglass as my medium because I don't feel like I have the artistic ability to work with foam. With paper, the pieces kinda build themselves and the work is really more applying layers of hardener and sanding -easier stuff that's more like woodworking or other hobbies where you build stuff. It definitely can be expensive though and the toxic fumes from some of the chemicals are no joke. So there are other limitations.

ANYWAY... The main point is don't sell yourself short. If you want to eventually build your own armor, this is the best place to learn. Pick a medium and start working. Just keep in mind that it's ok to throw away the first few pieces you make (lord knows I did). It's a learning process and everyone here is here to help.

On the other hand, if it's not a big deal to you to make armor yourself, don't worry about all that! Welcome to the forum and we are all glad you're here!
Oh my god thank you so much! I have so many ideas that I want to bring to life and I hope that through this lovely community I can do just that! Your build looks awesome so far btw!
 
Ooh a shoutout ^.^ FalseShepherd you make me happy. Haha I chose bondo for the same reason. bonus you can recycle the peps that are the wrong size. Can’t do that with foam mwahahaha. pep/resin master race weeeee. I think by now I’ve tossed a couple entire suits worth of bad parts…
 
All of you guys are truly inspiring! I wish I could actually create armor that looks as good as that maybe someday, but for now I'll continue to support the small businesses and work through commissions.

as falseshepherd summed up perfectly don't sell yourself short. personally I prefer foam as its cheaper, quicker and requires less sanding but you won't get the same final results as a pep/bondo build but the first cosplay will never be perfect and trust me, trying to make your first one as perfect as long time professional cosplayers can really hit your motivation and ruin the fun of making cosplay.

I would suggest checking out Andrew DFT: https://www.youtube.com/c/AndrewDFT he has a step by step foam build project for the halo reach odst, odst smg and odst pistol. his work tends to be the popular gateway to halo cosplay and starting with his foam guns can help teach you the skills needed for foam on a smaller scale before you move up to the cosplay itself.

either way foam vs pep/bondo filler have their pros and cons, so research them and decide for yourself which one works for you and any issues you have a long the way the 405th are the best people to help you out as i really wish i asked for their help while i was making my helmet.
 
I'm not dead I promise. I'm just in grad school.

I will be making very small amounts of incremental progress over the next few weeks/months. I am likely not going to post updates very often. As it stands, this is where I am:

View attachment 309835View attachment 309836

Some detailing and weathering and whatnot needs to be done still but generally, these pieces are done (ish). Also strapping is what I'm going to be working on a lot so small detail progress that's not very interesting to post.

It looks pretty cool. One day it will be done.

So don't hold your breath waiting for updates from me.
its amazing the amount of progress you have done so far and how well its all turned out. I still have a few pieces to make but it does not help as me being me i have to make the backpack actually functional, so figuring out how to make it open and close has slowed me down also using a normal pep file for foam dose not really translate well
 
its amazing the amount of progress you have done so far and how well its all turned out. I still have a few pieces to make but it does not help as me being me i have to make the backpack actually functional, so figuring out how to make it open and close has slowed me down also using a normal pep file for foam dose not really translate well
Yeah I also was gonna try to figure out how to make the ruck sack functional. Idk what I'ma do yet, that's why I haven't started working on it yet. I was gonna try to use turbo's ruck sack 3d print file and see if I can fiddle with it. I think his does open and close and whatnot. Might be able to figure out a way to unfold it... Or I might just split it up into a million pieces to print on my itty bitty printer.
 
This thread is more than 8 months old.

Your message may be considered spam for the following reasons:

  1. This thread hasn't been active in some time. A new post in this thread might not contribute constructively to this discussion after so long.
If you wish to reply despite these issues, check the box below before replying.
Be aware that malicious compliance may result in more severe penalties.
Back
Top