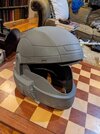
De retour avec un point d'avancement relativement important. J'ai réalisé les bandes jaunes la semaine précédente et retouché le noir et le gris de tout le casque pour obtenir des lignes plus nettes. Je suis maintenant beaucoup plus satisfait du rendu du casque. J'ai donc consacré une journée entière à la peinture finale et à la patine.
View attachment 365614
J'ai peut-être placé mon doigt sur le devant de la bande jaune et je l'ai maculée (nous ne parlerons pas de toute cette épreuve de retouches et de ponçage humide)
View attachment 365615
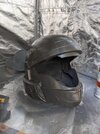
Si quoi que ce soit, cela a ajouté encore plus de petites piqûres pour l'étape de vieillissement, donc je peux l'accepter comme un détail supplémentaire. (certainement pas une solution)
À partir de là, j'ai continué et j'ai utilisé des brosses à déchets que j'ai récupérées dans le magasin de modélisme local pour commencer à ajouter des rayures métalliques, puis j'ai rempli les cavités du casque avec de la peinture acrylique métallique.
View attachment 365616
View attachment 365617
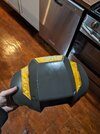
J'ai également pris le temps de commencer à peindre le plastron (je vous en parlerai plus tard), mais j'ai aussi profité du temps entre les couches d'apprêt et de base pour fabriquer plusieurs visières de différentes couleurs. Je publierai un autre sujet pour répertorier les résultats de différentes marques de teinture sur des feuilles de PETG. Ceci dit, je pense que la couleur I-DYE Poly turquoise se rapproche le plus des visières des modèles H3ODST du jeu, c'est donc celle que j'ai choisie.
View attachment 365618
Cependant, observer la façon dont dat_boi_builds fabrique ses visières m'a fait repenser la façon dont je vais les fixer au casque, et j'ai décidé d'opter pour un système de fixation Velcro. Cela me permettra de changer de couleur de visière plutôt que de devoir choisir une visière fixe si je trouve une meilleure précision plus tard. Jetez un œil à son tutoriel sur les visières en résine ; c'est une excellente montre et on y voit son système de fixation à la fin.
Vidéo du tutoriel sur les visières en résine
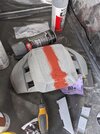
Il ne reste plus qu'à retoucher quelques endroits où l'acrylique a coulé suite au darkwash, à appliquer le vernis transparent et à ajouter les aérations aux trous exposés. Sinon, il ne reste plus qu'à fixer la visière et à ajouter le rembourrage du casque.
View attachment 365619
View attachment 365620


")