3DVagabond

Active Member
Hello and thank you for taking time to wonder into this thread. As a fan of both the Power Ranger and Super Sentai Franchises, I've always wanted to create and own one of my own. Over the years, I've seen plenty of Con Attendees cosplay as characters from Mighty Morphin/Zyuranger series. As much as I enjoyed the costumes seen in my home town, it's been done to death! Anyway, this thread will chronicle, for the time being, the creation of the Red Turbo Ranger that was played by Jason David Frank and Selwyn Ward respectively. I have dreams of pushing the design as far as I can without messing with the aesthetics of the original helmet.

Now, the true reason for the creation of this helmet is because the cost of actually buying one is really expensive. Especially if the cost of one helmet will force you to cut back on to only eat for one week out of the month. Pay rate and all of that. More importantly, I've been trying to challenge myself to create something that could develop into a skill if things goes according to plan. After immersing myself into 3d space on my computer for the past 9 years, this will be my personal redemption for the failure of the last costume that was doomed from its conception.

Anyway, with the tempered skills I've learned and developed using open source program, Blender, here's the start of what I created of the Red Racer Helmet. I want to try to get the detail as accurate as possible so that in the future, I could 3d print it for structural integrity. After wards, I can used what I learned from the last costume and apply it here.

Any feed back is welcome as it would help morph (no pun intended) into a true replica into the fandom.

Red Racer WIP 10_8_2018 9_59 PM.png


Red Racer WIP 2 10_8_2018 9_59 PM.png
 
Today was a true challenge into getting the helmet as accurate to the show as possible! It felt as if the closer I was getting this model done, the more imperfections showed up. After working on this model for 48 hours and 38 minutes as of tonight. I've gotten as close as I could as far as detailing this "royal jewel". I will have to rest for a day while I try to get some more inspiration upon the next step. Unfortunately, I won't be able to print this out unless I actually get the printer. That alone will take some time. I have my eyes set one a printer that I wanted, so I will start saving up towards that. As far as a costume as a whole, I will have to learn another skill, sewing and making patterns. I want to try to get as close to a screen accurate costume as well. I'll come back on a later date to show the progress being made.

Red Racer WIP 4 10_11_2018 10_57 PM.png


Red Racer WIP 4 10_11_2018 10_58 PM.png


Red Racer WIP 4 10_11_2018 11_34 PM.png
 
I had to transverse all over the web to get more information upon making the costume. So during the time I made this helmet, this is what I found as part of the outfit. Please keep in mind that this is the costs of the items of materials as of October 23, 2018.

In order to create your outfit you will have to get some material. The most common material for that was used for the Power Rangers series is shiny lycra spandex. Depending on where you live, you might be able to find it at your local fabric shop. Call in and ask around for prices to gauge how much you are going to need. The standard rate is normally 7.00 per yard as of 2018. (It might wind up being more or less.)

Next are the gloves. When it comes to this accessory, I found out that in order to get a spot on accuracy for the suit, all costumes uses Cacazan Gloves. There's only one way to obtain them and that's through and online purchase.
The cost for a pair of long gloves are:

105.10 For Long Cacazan Gloves
86.00 For Short Cacazan Gloves
30.00 for Leather Gauntlet Gloves White Medium Long Arm Cuff

For majority of the costumes, white gloves are the standard, but they also come in different colors.

For the boots, the only thing that comes close to being screen accurate are Funtasma Men's Captain-100/W/PU Boots. They come in different colors and sizes. However, this is one of those online exclusive items that you will not find in stores unless the store orders it for you. At minimum, you can get it for 44.95 before shipping and handling.

As part of the gloves and boots, you have boot cuffs and glove cuffs. They are normally created in leather, but where leather exists, pleather(artificial leather) can work just as well if you're trying for the vegan option. Once again, ask around for pricing, but they are not that expensive. Like the Spandex, they normally start off from 7.80 per yard. But you will have to catch it while in stock. As a suggestion, you would want to get the texture of the material as smooth as possible.

As of right now, this is the basics of creating a Power Ranger/Super Sentai costume. On the next posting, I will try and uncover the final thing needed to finish the fabric section of the out fit, the pattern design!
 
I was going around the Internet trying to find some answers on making a pattern for the costume. I found a couple of videos making making the actual costume, but I have not found any thing on actual pattern design. I'll keep looking for a tutorial or some sort of idea of making it digitally. Meanwhile, I was able to add on the one final and essential part of of the helmet. Like with all of the Power Ranger and Super Sentai helmets, you want to make sure that each side is aligned properly. In order to make sure that it happens every time all the time, you need extra aligned tabs called register keys. When the helmet, like this, is made, it's then cut in half in order to put the helmet on. However, in order to keep it on for a seamless look, the hardened tabs a.k.a register keys are needed.

Normally, the register keys would be hardened pieces of fiberglass. With the tabs that I set up on the side of the helmet, since the helmet is going to be 3d printed, this set up will ensure that the tabs will align with the other half of the helmet that contain the slot for the tab to go into.

Let me know what you think about the idea. If there's anyone who knows how to digitally create costume patterns, drop a line and I will check out the idea.

Red Racer WIP 5 11_16_2018 07_35 PM.png
 
I was going around the Internet trying to find some answers on making a pattern for the costume. I found a couple of videos making making the actual costume, but I have not found any thing on actual pattern design. I'll keep looking for a tutorial or some sort of idea of making it digitally. Meanwhile, I was able to add on the one final and essential part of of the helmet. Like with all of the Power Ranger and Super Sentai helmets, you want to make sure that each side is aligned properly. In order to make sure that it happens every time all the time, you need extra aligned tabs called register keys. When the helmet, like this, is made, it's then cut in half in order to put the helmet on. However, in order to keep it on for a seamless look, the hardened tabs a.k.a register keys are needed.

Normally, the register keys would be hardened pieces of fiberglass. With the tabs that I set up on the side of the helmet, since the helmet is going to be 3d printed, this set up will ensure that the tabs will align with the other half of the helmet that contain the slot for the tab to go into.

Let me know what you think about the idea. If there's anyone who knows how to digitally create costume patterns, drop a line and I will check out the idea.

View attachment 262341

The fun thing about fabric costumes with stretchy materials is that you can design patterns as a one size fits many but your best off making a true fit to your body with a duct tape pattern. Using this method guarantees a tighter fit and less sagging or loose fit around joints like elbows and knees. Also drawing on patterns such as the chevrons and lines that are on a Super Sentai suit will be hard to predict how they look when stretched to fit your body so saving yourself some stress is usually a good call before venturing forward with a sewing machine.

Digitizing your patterns afterwards is a good option though so that you can use them again later or share with other folks that are looking to follow in your footsteps.
 
So it's been over one month and 10 days since the last post, but I was able to obtain more info in the 3d printing process. Choosing a 3d printer can be difficult when it's time to purchase one. You have your start up kits that are under 100 bucks and your high end expensive ones that will sky rocket the costs into the thousands. Unless you have the funds for it, go right ahead. If you want a good printer with out breaking the bank, there are some printers like the Pursa series printers and the Ender 3 Printer series. In my opinion, it's best to get it at the end of the year either during the holidays or in January.

For the sake of the report, I'm going to tell you the basics of what you need from the info I gathered.

Of course to start off, you are going to need to get a 3d Printer. I'm choosing the Creality CR-10 Ender 3 3D printer. I was able to get it from Amazon.com for 219 dollars. Normally, there are others that sells the exact same thing from other sites. Always make sure that the specs are the same, if you are planning on buying one.
If the time of the shipping is too far away for you, you can also go to Gearbest.com since most of their warehouses are in Europe. Always try to find the nearest place they can ship it to you if possible.

Next you are going to need to get some filament material. I was lucky enough buy some material from a store that was in the metro area. However, things might be different from where you are. Here are some suggestions:

If you can find one in your nearest hobby shop, wait for a moment when it goes on sale to buy it.
If there's at least a Micro Center near by, that's where I got mine from, buy it. If there's not a store like that in your area, go online like Amazon or any other online store that sells it. I bought some Inland filament for this printer, but if you have a filament that you prefer, stick with it.

Another suggestion that you are going to need is a 3d Printer Tool Kit if you can find one. One kit should give you the tools to not only help you remove the print off the bed, but it should also help you remove the supports from the print and help you clean your printer.

SPEAKING OF CLEANING!

You will also need to get some purge filament for the printer. What this type of filament does is that they help you, relativity speaking, help you from being "stopped up" if you catch my drift. Follow the instructions on the packaging to make sure that it flows properly. The one I got only asks to use this when you are going to change colors or materials of the filaments.

Before I close this out, I should mention one other thing. What type of filament you should get! There's your standard PLA, PETG, and ABS filaments and these are the most common ones to use for this. There are dozens of filaments to chose from and there are some with diamond fragments in there too. But let's stick to the three I mentioned.

ABS is one of the most commonly used materials and has been out since the 1940's. If you played with anything plastic as a kid, chances are you messed with it in some form or another. It's easy to print and can be easily sanded, however, there are draw backs.
ABS can stink up the house, it has to be enclosed since it can absorb the water vapor in the open air during the printing process, and it's "vampiric" since it can be damaged by sunlight over time with out adequate protection. If filaments had a video game difficulty level, this would be normal mode.

PETG is the type of material that is also commonly used. It's the same type of material that is used to create plastic bottles. It can be a flexible material to use, however, just like ABS, it can also absorb moisture from the air. Once you are done with the filament, you got to place it in a cool, dry area after usage.
This would be considered to be Hard mode.

Finally, we come to the last of the trio, PLA filament. This type of filament is normally the go to material to use for 3d printing due its low temperature. Due to its different applications from different types of this material, it doesn't stink, it can be electroplated and it's a bit more durable than the others.
Of course there are some drawbacks using this material. For starters, it will deform once it reaches over 140 degrees. To those who lives in very hot areas like Arizona, Utah, New Mexico, Nevada and in some parts of Texas, I have one important statement:

DON'T LEAVE YOUR PRINTS IN THE CAR, PLEASE!

It's also a brittle material so you might want to find a way to strengthen it as well just in case you dropped it one too many times. There is another form of it call PLA+ which is more durable than your standard PLA.

In the next posting, I will show some images on the Ender 3 3D printer and give you a review on it. I will also tell you more information about smoothing the prints. For now, I will leave you a link on the multitude of filaments available in the market.

2018 3D Printer Filament Guide – All You Need to Know | All3DP

Until next time!
 
SPEAKING OF CLEANING!

You will also need to get some purge filament for the printer. What this type of filament does is that they help you, relativity speaking, help you from being "stopped up" if you catch my drift. Follow the instructions on the packaging to make sure that it flows properly. The one I got only asks to use this when you are going to change colors or materials of the filaments.

Purge filament is awesome but another trick you can keep in your back pocket for cleaning a blocked nozzle that you don't have a spare of is the cold pull. It gets the filament pliable and deform-able but not to a melted state where it starts flowing out, this will pull a load of debris and junk filament remnants out of any nozzle.
 
Let's move on unto the next step! Now, that the 3d model is completed, now you will need to try and size your helmet to fit your head.
If you have already measured your head for an accurate measurement, then you can simply skip this step. If not, then you need to take this into consideration. In order to make the helmet just large enough to fit you, but not so small that could give you a bit of a claustrophobic episode, here are the things that you need to know.

The average head measurement, in inches, from ear to ear is 6 inches across.
The average head measurement from the tip of the nose to the back of the head is 8.7 inches.
The average head measurement from the chin to the crown (top) of the head is 9.1 inches.

The main reason why you need to know this is because you need to not only get the helmet large enough to fit inside of it, but you will also have to take into consideration the padding for the helmets. Be it using upholstery foam or using padding used in the military, this is a kernel of info that is universal. With this first image, thanks to the program, Mesh Mixer, I was able to increase the helmet's size so it can fit my head.

The measurements are:

184 milimeters across
244 milimeters deep
245 milimetes high.

I know what you are thinking by having the thought, "Wait, I thought it we were measuring in inches?"

Well, here's something that you need to know. When it comes to 3d printing, you have to use a 3d slicing program before you start printing. You can use any slicer that could measure the print. So for the sake of this entry, I'm going to use 2 programs; one to measure the model and one to print it. For measuring and sizing the helmet, Meshmixer will be used and for the actual printing, Cura will be used. Meshmixer also has the ability to cut the helmet in half. The example of that ability is shown in the second image.

If you never have used the program, it's easy to use once you read the manual or you watch a tutorial. When you do, you need to set up a profile for your printer just in case one does not exist.

Back to the slicer program, I used the arrows to accurately cut the model in half as accurate as I could into 4 pieces. I could print it as a whole piece, but that would mean that you will have to cut it anyway to open it up. Once you have your pieces, you can send it to Cura to have it prepped to print it out.

In the third image, it will show what it looks like when you have your model on the bed ready to print. If the print does not present itself in this shiny color, then you need to go back and make changes to make it fit on the bed. On the fourth image, it will show what the beginnings of the print. Now, here's the thing. At the current state it's not thick enough to start printing. The fifth image is further proof showing as such. So what do you do?
There's one thing to do. You will have to increase the thickness to make it happen. I'll post more at another time.
2019-01-18 09_16_30-Autodesk Meshmixer - Carranger Red Racer Helmet Size Adjustment.mix.png
2019-01-18 09_18_27-Autodesk Meshmixer - Carranger Red Racer Helmet Size Adjustment.mix.png
2019-01-18 09_11_31-Ultimaker Cura.png
 

Attachments

  • 2019-01-18 09_15_33-Ultimaker Cura.png
    2019-01-18 09_15_33-Ultimaker Cura.png
    912.3 KB · Views: 430
  • Picture 21.jpg
    Picture 21.jpg
    62.4 KB · Views: 413
Now, in order to give the part enough thickness, you will have to create a shell inside a 3d modeling program. There are plenty of 3d modeling programs in both the paid and open source sector. For the sake of this log, I will be using Blender in order to create the shell. It is also apparent that you at least have a digital head, as shown in the first image, for you to get a scope on how to do it. In order to pull this off, it's better for you to focus 1 part at a time. First, get the cursor to attach to the head by going into Edit mode and Press Shift+S to make a menu pop up. Choose Cursor to Selected and go back in to Solid mode. That will make the cursor the focal point for the next step. Take one of the parts and go in to back into Edit mode and you are going to change the Pivot Center. Normally by default, it would be in Median Point. It would look like two circles that are overlapping with 1 dot in the center.

Change the selection to the 3d Cursor and select every thing on that part in Edit Mode. This next part is very crucial, so pay attention to the menu on the right hand side of the interface. The third image is where the most significant changes need to be made. In the Scene menu, you are going to change 2 things. You are going to have to change the length to Metric or Imperial depending on which part of the world you live in, but you will have to change the angle part to Degrees. Press the N button on the 3d Space area to pull up a menu. Scroll the mouse wheel or the side bar down until you see the Mesh Display menu. Look for the portion that says Edge Info and click the Length box to see the measurements of the lines.

Select everything for that part in Edit mode by pressing A, press E to extrude and S to scale it down.
Here's the trick. You are going to have to scale it down to a point where it reads 2.5mm or higher in thickness. When you scale it down, the numbers will change along the way. Repeat the process until it is universally the same thickness all around. If the thickness of certain parts of the helmet are not over 2.5mm, change the vertices as much as you can in order obtain that same amount I mentioned, but you don't have to go any higher than 3mm thick.

Now, in my situation, I had to go back and turn all of these triangles back into squares since the import changed the geometry some how. I don't really know how, so don't ask me. I could not give you a straight answer. But chances are that if you exported the file from your modeling program of choice, had it cut into quarters, and then import it back in you are going to wind up with a model like that. In a situation like that "smooth" everything out before you export it again. It will make the printing process a lot easier. Anyway, repeat the step for all 4 pieces and export them out into a folder that you can remember. Afterwards, we are going to move on into the printing stage on my next post!

Until next time, ciao!
Helmet Example.png
Helmet Example 2.png
Unit Change.png
 
You know, when scaling I’ve never considered changing the pivot point to the 3D cursor (or anything other than the active element). I’m pretty excited to try this out next time I’m in blender, and see if I like your process for creating thickness more than the solidly modifier. Thanks for sharing!
 
You know, when scaling I’ve never considered changing the pivot point to the 3D cursor (or anything other than the active element). I’m pretty excited to try this out next time I’m in blender, and see if I like your process for creating thickness more than the solidly modifier. Thanks for sharing!

No problem. I came across the idea after trying out a modifier from another tutorial. I was actually going to use the Solidify modifier as suggested from the video. However, the problem was that it became a bit bloated that could increase the print time if you press the Apply Button on the modifier. I also need to mention that if you chose not to apply the modifier on the interface, but choose to apply the piece when you export, you can still make changes to the model in Blender and export it again. It's a very useful tip to remember because after you print it out, you will need to glue the pieces together afterwards and you need enough thickness to glue it all together. That will be discussed in my next post once I'm able to successfully print out the helmet on the next post.

However, due to the size of print bed on my printer, it will take some time. So if you can, look forward to the next posting.
 
All right. Another entry and more info about the 3d printing process coming your way! It's a long post and requires some math skills. Be prepared.


The process of 3d Print will be long and difficult as you bring something from digital space to the real word as a tangible object. A lot of factors to take into consideration when it comes to 3d printing and I have endured a lot in the process. So before I get into the actual details there are a few things you need to know.

1: Make sure that the printer is leveled and is free of anything that could interfere with the process.
2: The printer must be on a stable surface.
3: All 3d Printers are environmentally sensitive. If you have the printer in a warm area or inside of a enclosure, it will be well suited for printing the objects you needed.

Now, back on January 18th, I stated that size of the helmet would be:

184 milimeters across
244 milimeters deep
245 milimetes high.

Well, turns out it was wrong. If you scale it to these dimensions, sure it would encase your head, but to those who are claustrophobic, that might set that feeling off. So here's the info I found along the way.

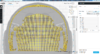
First, take a look at this image.
ArcticCatSizeChart.jpg


This image shows a very accurate chart for people to use to get the right sizing for snowmobiles. Now, this chart can also be used to size the helmet.
How am I going to get the size of the helmet correctly? Think about it like this. In order for you get size correctly, you are going to need to get the circumference of your head. To do so, you are going to need to get a tape measure and with it you are going to encircle the tape across the nose.
The reason why is because the nose is the most extended part of your face. If you try and get it across the forehead, you are not going to get an accurate size. Once you get the measurement, you must now try and get the diameter of the head. To get that measurement, you need to take down how many inches you around and divide by Pi.

For example, my head is 24 inches around the nose overall. So I use this to get my diameter.

24 / 3.14 = 7.64

Since my head is over 7 and a half inches in diameter, I'm going to round up to 8 inches. Now, 8 inches is bigger than the distance from ear to ear, but you still have to take into consideration the padding that's going to be put into place later on. So it's going to be extended to at least 8.1 inches wide. That's 206 millimeters (mm) wide. Now for the vertical height. This will require at least a straight ruler. If you have a lot of hair on your head, it's going to be very difficult to get an accurate reading. For those with shorter hair or no hair at all, this will be easy. On a flat surface or with some very large calipers, take the size of your head from the bottom of your chin to the top of your head. On average, it's going to be at least 9 inches tall. To compensate for padding there, you will need at the most a quarter of an inch. For the sake of my head, it's going to be 251 mm since I plan on talking through the helmet later on.


Finally, there's the back of the head. I took a look around of some sizes going to be needed for it to fit from the tip of the nose to the back of the head. This time, with some pencil or paper, lay your head down on a flat surface and draw a line from the tip of your nose to the back of the head.
For my head it's 8 3/4 of an inch. Compensating for the back of the head and for it to breathe properly, it's going to be 252 mm long.
Now, that we have all the measurements plugged in, it's time to put it into your slicer of choice and size them up.

For the sake of the tutorial, I'm going to use Ultamaker Cura for this entry again. After you import the model into your area, there are a few things you need to know.

1. Never use the Universal Scaling option. If you put in 1 measurement on one of the axis, it's going to size up all of the other axis accordingly. We don't want that. Also uncheck snap scaling as well since it's a similar feature.

2. If you already have your printer placed into the program and it has a large bed, you can place the model into the area for slicing. If you don't see one available, you will have to create a profile based on it by going into the settings and add the printer specs in.

3. Finally, the settings on how to print the model out. You have some default settings that you can set up that goes from extra fine (.06mm) to extra course(.6mm) the finer the details, the less post processing(sanding) you have to deal with later on. You can change and create your own printer settings as well as import other compatible printing profiles to help you out if you don't want to tinker with it.

Now, that you have imported the file or files, plug in the measurements and make sure that the pieces are placed on the virtual bed like the image below.

2019-03-20 12_20_49-Ultimaker Cura.png


As you can see with the image above I'm using the Crealty Ender 3 for now. I once had the Anet E10 which had a larger bed on the Y axis that could cut down on the printing time by printing halves and not quarters, but due to certain complications with the printer like parts not being secured or missing, I had to send it back like Garfield sends Normal to Abu Dabi...

... moving on!

If you are using a smaller bed like the one I have which is 220mm(W) x 220mm(D) x 250mm(H), you are going to have to print them in quarters and glue them together later on. So what I had to do was take each piece in half and move it through the bed. To explain it a bit further, say that I have an object that's 252mm high. With this number, you divide it by 2 which is 126 mm. With this number in hand, go to the Move function and type in -126. You can still change it in order to eyeball the "dividing line" of your helmet. But before you do, you are going to need to duplicate the part in question. So in Cura, you need to choose the object you are going to print and press CTRL + M. A menu will pop up and you can choose how much of that object you are going to need.

Since the objects I have are an exact duplicate, I just need 1 copy for each part. Then I flipped the parts upside down using the mirror function, lowered it through the bed again, and sliced it until I had 6 parts. Once sliced, Cura will tell you exactly how long it will take to print that part. But don't be fooled on the time being displayed. Sometimes it will be longer and sometimes it would be shorter. To give you an idea when it would be done, here's a link:


With this link, after you plug in the hours and minutes, you will get an idea when the print will be done. Now that you know the time it takes to print the pieces, export them out to your MicroSD card, save them under the G code format (.gcode) assign them different folders so you won't get confused.

But before you do, make sure to take a look at your print in the Layer Mode. Once there, look for any physical holes in the structure like this:

2019-03-19 08_35_48-Ultimaker Cura.png


If you see any holes in the model, you need to go back to to your modeling program and fix them if your slicer program does not have a repair function. Cura doesn't have one so you will have to try and fix it by moving vertices and faces so they don't show up anymore. Make sure that you don't see through your print to the other side. When you get to the point where you can't fix it, no matter how much movement you make, you can fill it in with spot puddy.

Before I end this post, I will leave behind 2 more links to help you out with the calculations on the measurements.

Inch Fraction Calculator - Find Inch Fractions From Decimal and Metric Measurements - Inch Calculator and Circumference Of A Circle Calculator And Formula To Find It – Pi Day

They are free to use when ever you need any conversions.

Have patience and everything will turn out fine. Once I have my prints fully created, I will show you the post processing tips needed before you get to the final stage, painting!
 
Last edited:
The following post is supplemental to the previous post I made to the 3d printing section of the blog.

First things first. Yesterday, I received my second printer, the Crealtiy CR-10. It has a much bigger print bed than its little brother, the Ender 3 from the same company. I suggest you purchase that one too as along with the Ender 3 for 2 reasons.

268333


1. With the Ender 3, you can print out the smaller parts to any prop or helmet with out letting all of the heavy burden go to one printer.
2. With the measurements done for your head to fit inside the helmet, you can print out half of your helmets, like the one I'm working on here instead of quarters and use a lot less glue in the process.

My only gripe was that it was on a glass bed, but I will learn to adapt over time.

Which lead us into the next tip in the printing process I just remembered last, but neglected to mention here. You are going to have to perform a "fitting test". This idea was something I stumbled across by Youtuber "Uncle Jessie". He's a 3d Printer enthusiast who also creates props and helmets for who ever wants it. He came up with the idea of making a 3d printed ring to test and see if the current size on your slicer will fit your head. But to make things easier, I'm doing it all in Blender with another modifier.


On the image shown above, I have my current helmet shown on the workspace. So what I did first was to create a cube large enough to encapsulate the helmet and then move it up on the Z axis until it reached the mid way point. Next, I created another cube, sized it up again just like I did with the first cube, but this time I moved it down the Z axis, but to the point where you can create a "thin sandwich" between 2 very large pieces of bread like so:


Before you continue, here's my warning. *Megaphone feedback* Make a copy of your helmet and apply all existing modifiers before you continue! *turns off Megaphone*
I ask of you to do this is because the copy of the helmet is what we are going to cut up to create our fitting ring.
With 1 half of the copied helmet selected, you are going to use the Boolean Modifier. What this modifier is going to do is that it's going to be "consumed" by the object that is being obscured by another object. Once applied, the object that is being affected is going to be missing...

If the concept is hard to imagine, think 3d cookie cutter on virtual cookie dough if that makes any sense.

Once again, with the helmet selected, choose Boolean modifier and you are going to change the operation menu from Intersect to Difference. Next ,choose one of the cubes as the B Mesh and it should look something like this:


Finally, copy the modifier and change the B Mesh to the other cube and press apply on both modifiers. Repeat the process on the other half and you should get something like this:


Keep in mind that once you do away with the cubes, it will not come out as clean as this image shown above. You must get rid of all double vertices, delete edges that are sticking out from the mesh, and dissolve any stray vertices on the edges...

And that's BEFORE you start filling out the faces again. Trust me it will be worth it in the end. Once you clean up the mesh, take it back to your slicer of choice, print it out, and you will have your two pieces out and ready like so:

268334


With the ring printed, try it on and make your adjustments from there. Hopefully, this chunk of information is useful to you. After taking a look at the fitting ring I made, I still have to size it down a bit on the horizon so it can have a semi snug fit. So this time, for sure I should have every dimension finalized and should have this print done by Tuesday if I start today.

Until next time, see you around.
 
April 4th 2019

"After taking a look at the fitting ring I made, I still have to size it down a bit on the horizon so it can have a semi snug fit. So this time, for sure I should have every dimension finalized and should have this print done by Tuesday if I start today. "

Oh, you poor soul. If you only knew what was a head of you...

Greetings, one and all for another entry into this side of fandom. As the deadline approaches for my first con attendance of the year, the final 25 days will be critical. But, after 6 months and 3 weeks of design, preparation, and nearly 20 pounds of filament due to trial and error...

And believe me when I say there was A LOT of trial and error...

Stage 1 of the print is complete!

Picture 53.jpg


Picture 54.jpg


And it fits perfectly on my head!

Now, about that self pity comment. What compelled me to say that? Well, during the process of making the helmet, I had some issues closing it after I printed it out. For some reason I could not get it to close no matter how hard I tried. I first thought it was an issue on the horizontal space, so I increased the size of that portion in hopes to solve it.

It wasn't enough. So I increased it again on the horizontal space... it still wasn't enough! I was getting frustrated trying to find answers, so on the same day of printing that helmet, I taped it up and decided to measure the size of the opening at the bottom of the helmet. I measured the diameter and it showed me that the opening was a bit short of 4 8/16th of an inch. It was at this time that the edges of the opening, where I had "cut" the helmet down the middle, was cutting into my neck. So I did the one thing I never did before when I started. I measured the circumference of my neck. I measure about 16 inches. Using the method of getting the diameter, circumference divided by Pi (X / 3.14), I came up to the number of 5.09 inches. Once I realized the problematic factor in that situation, I increased the size in Blender and measured it in MeshMixer over and over again until I got it to at least a bit closer to 5.2 inches in diameter.

In retrospect, I basically had this moment shown in the video link below:


That's how I was feeling at the time! A bit humorous if you think about it. Moving on!

So once I fixed that issue and printed it for a third time, I was confident that this would be it. "Third time's the charm"! I have solved this one issue and I can now move on. After completion, I tried it on. I cleared the hole at the bottom of the helmet with ease, but another problem arose. It turns out that I did not have enough room to close it completely due to the length of my head from my nose to the back of the head. I did a check and it was off by 2 measly millimeters...

Again in retrospect, this was how I was feeling...


So close and just with out of reach of my goal. Such is life...


I went back into MeshMixer again and this time, I did a test run on how much I need to increase the size in length. To make sure, I don't go down this loop again, instead of increasing it by 2 millimeters, I increased it by 4. I should have done 6 so I can make up for the padding in the future, but at least I finally got all the measurements down.


Which now brings me up to the present day, if I knew what I would have known 3 months ago, I would have saved me at least 400 dollars just to print this one helmet correctly. Now, it is not with out flaw, I still have to fill some parts out and sand them down before I can go to the next stage, painting the helmet. Hopefully, I can get this thing done, get the rest of the suit together and I am ready to hit the town!

Well, that's all for now. I'll be back and shows you how it turns out soon. Ta-ta for now!
 
Okay. So the process of painting the helmet has begun. I had to take a look at a couple of spots on both side of the helmet that I had to fill in as shown in the pictures below.
IMG_20190503_174829_DRO.jpg
IMG_20190503_174813_DRO.jpg

IMG_20190503_174824_DRO.jpg

Afterwards, I at least gave it one coat of filler primer.

IMG_20190503_175912_DRO.jpg

IMG_20190503_175900_DRO.jpg

IMG_20190503_175925_DRO.jpg


But as always, Filler Primer is not a magic bullet.
So tomorrow, I will use some more spot putty to fill in all of the lines, like the image above and smooth them out. Luckily, I should have this helmet completed by the middle of the week. Then, the painting will begin.
 
Sometimes when you look at something you try and figure out what you can do to improve on what you have created. Without trying to start over you try and fix anything that you may have seen as a mistake and then you go and try to chase after it. This is how I feel at the time of this posting. Today, I wet sanded the helmet to the 2000 grit and it was really smooth by the time I was done. Of course, this was after I filled in all the possible spots from the posting shown above. However, as I was spraying the helmet down, in my head, a personification of observance was behind me and said, "You still have ways to go before you paint!" Nearly an hour after the pieces were dry, I realized that I still need to smooth it out some more.

Here's the current status of the helmet.

IMG_20190506_145032_DRO.jpg
IMG_20190506_145051_DRO.jpg
IMG_20190506_145103_DRO.jpg
IMG_20190506_145109_DRO.jpg
IMG_20190506_145118_DRO.jpg


Now, certain parts wind up to be okay, but here's the rub. I need to make another sanding pass for the crevices in order to smooth out the edges. However, looking back at how the helmet looks again. It looks like certain parts didn't have a deep groove as I thought. My mind was playing tricks on me at that time when I was trying to determine if that was an actual carving or was that just painted on. Never the less, I know what to do to fix it, but I'm not going to start completely over now. I'll post a second version of the helmet at a later time. For now, I'll get rid of some of the rough spots again before I paint today... I hope!
 
On this post today, I'm going to make a detour on this path and discuss some of the important parts of the costume.

Picture 55.jpg


As part of any costume, getting the right footwear and accessories are essential. If you pay enough to the detail of your costume, it's a bit of a confidence booster and can make you stand out in a positive light. So let's discuss about the items above. The items on the left are the boots I made from CosplayNow.com. In comparison to other prices that were beyond the 100 dollar range, these boots cost me 80 dollars. It's 60 bucks to make them, but the stinger that shocked me was the shipping costs! So I realized that when you purchased an item, from another website from another country, the only way to pay for it is through PayPal. When you make the payment, you also have to deal with the shipping costs, which was in the 20 dollar range by the way, you also have to pay for an international payment charge as well.

Now for the next accessory, the gloves. There are many ways to get the gloves for a costume for Super Sentai Suits. If you are on a budget, you can get something close to the design and or simply buy whatever color of gloves to suit your needs. But there's only one company in the world that makes the gloves for the franchise and that's Cacazan. These guys are responsible for supplying the gloves for every incarnation of the genre for over 30 years and I was surprised on how fast I was able to get these gloves too. I ordered the gloves on May 2nd and I got them in five days flat.
However, this part of the costume is actually the 2nd most expensive part of the costume coming in at 128 dollars. Once again, I was hit with a international fee during the process, but you can talk to the company about any extra details as far as sizing is concerned.

This morning, I tried the gloves on and for some leather gloves they are pretty soft!

Picture 56.jpg
Picture 57.jpg


One problem! The part of the manual about how to take care of the gloves were written in kanji so I will have to get them translated. I'll post the translation at a later post today. I still have some scratches to buff out. But when it's finally done, I am at fork in the road. Should I or should I not use a black gloss undercoat before I start painting? I want to get a auto show room look, but I'm not sure if I need to do that. More information is needed before I can take that next step.
 
This thread is more than 5 months old.

Your message may be considered spam for the following reasons:

  1. This thread hasn't been active in some time. A new post in this thread might not contribute constructively to this discussion after so long.
If you wish to reply despite these issues, check the box below before replying.
Be aware that malicious compliance may result in more severe penalties.
Back
Top