Thanks! Yeah thought so as well. Already have those transfered to foam
You are using an out of date browser. It may not display this or other websites correctly.
You should upgrade or use an alternative browser.
You should upgrade or use an alternative browser.
SPARTAN-501 "Jordan" Build
- Thread starter EternalSentinel
- Start date
- Status
- Not open for further replies.
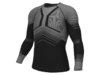
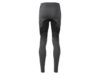
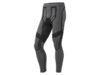
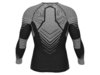
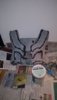
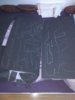
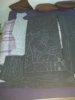
Also thought alot about my undersuit... I think plain black is okay but I find it a bit...boring?
I've found shirt and pants online and they will be in stores near me end of the month... Any opinions?
I've found shirt and pants online and they will be in stores near me end of the month... Any opinions?
Attachments
-
 crivit-pro-herren-seamless-ski-funktionsunterhemd--1.jpg43.7 KB · Views: 325
 -
 crivit-pro-herren-seamless-ski-funktionsunterhose--2.jpg15 KB · Views: 314
 -
 crivit-pro-herren-seamless-ski-funktionsunterhose--1.jpg20.1 KB · Views: 317
 -
 crivit-pro-herren-seamless-ski-funktionsunterhemd--3.jpg54.1 KB · Views: 295
- Member DIN
- S063
I doubt these are game accurate, since they're not built from the game, but honestly for just buying an undersuit from a store these look pretty nice.Also thought alot about my undersuit... I think plain black is okay but I find it a bit...boring?
I've found shirt and pants online and they will be in stores near me end of the month... Any opinions?
Yeah I know they are not game accurate.. it's really hard to find something nice and affordable... So I think they would look nice. I'll probably pick them up and see if I like them. I think the pattern fits nicely with Halo.
Last edited:
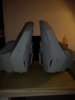
I have not done nothing in the last few days! I had the pause for a few days due to a pulled muscle in my right shoulder which led to me not properly being able to move my arm aka not being able to craft much. But I received some foam clay which I tried yesterday I'm going to use it to seal the seams on the breastplate. I know that I have to still sand most of the foam clay away again but the breastplate is more of a test than anything. I have also been sanding and marking out seams on all of the existing armour pieces aka the chest plate,the jet packs and the stomach plates.
Attachments
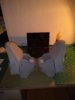
Status Update: still sanding the Breastplate and stomach plates, adding details pieces etc... So many little things to fck up... Also might take some time for the next big update... Since I am also working on a commission with a friend. And here's my Instagram for people if they wanna see some more stuff! Silent's Cosplay Forge (@silents_cosplay_forge) • Instagram photos and videos
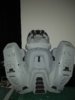
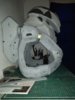
BIG Question... Is the helmet too big? I am very unsure ....
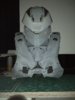
Lil Update... Have been adding details on all parts. Looks like I am done now... But still not happy with how the jetpacks sit. Will rework the attachment points. Will also add attachments at the top,at the two points where front and back meet (currently taped).Any suggestions on how to do them? Since they need to be invisible?
I also added connectors for the sides of the Breastplate
Attachments


You have done an absolutly stellar job! Maybe for the jetpacks you could create some sort of rail/sliding system? A nintendo switch comes to mind for me( being the switch is the chest and the controllers are the jetpacks)
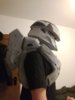
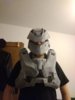
What is this sorcery two posts in one day?!? I decided to glue the jetpack directly to the breastplate after looking at some more reference pictures and not liking how far away they were.Looking great, the helmet I can't really tell until you're wearing it with the chest armor.
Also did the top connectors with Velcro might change that to some stronger velcro because it still feels a bit loose. Also took away one of the snaps on each side that close the bottom part because it is really hard to open both snaps. Might add in the second snap with some elastic so it is easier to open .
I need to redo some little detail bits that sell off but I'm pretty happy that everything fits and it doesn't look that big anymore when compared to the breast play which is good.
And now ..off to play some Halo Wars 2
Attachments

Thank you! I think so as wellLooks damn good, i'd say that helmet is scaled pretty good!
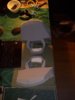
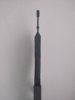
Issuing Special Distress Call...Someone send help ..... Will supply a place to sleep and beer.... This will be alot of cutting....7.2 square meters/77.5 square feet of foam for the entire suit and the Battle Rifle.... Apparently the Materials Group decided it was a good idea to have only one person build an entire suit....
Attachments
- Member DIN
- S530
Boy have I been there! Take your time with all those cuts; you want them to be clean and crisp edges. But yeah, that's a lot of cutting to do.
Yeah I will ...it's gonna take timeBoy have I been there! Take your time with all those cuts; you want them to be clean and crisp edges. But yeah, that's a lot of cutting to do.
Reporting in from the Misriah Armory....
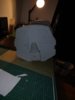
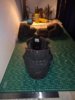
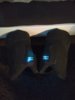
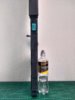
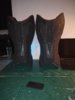
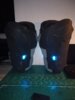
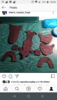
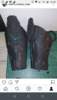
After being placed on some secret projects I finally got back to the Mjolnir Project ... Finished all the pieces, everything is filled and sanded except the shins. Those will be done soon, Primer etc is on the way.
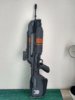
Also finished my BR85 completely out of Foam, need to make the barrel a bit thicker, aaaaand finished armor for the undersuit
Also feel free to follow me on Instagram @silents_cosplay_forge
After being placed on some secret projects I finally got back to the Mjolnir Project ... Finished all the pieces, everything is filled and sanded except the shins. Those will be done soon, Primer etc is on the way.
Also finished my BR85 completely out of Foam, need to make the barrel a bit thicker, aaaaand finished armor for the undersuit
Also feel free to follow me on Instagram @silents_cosplay_forge
Attachments
-
 IMG_20200305_233108504.jpg4.1 MB · Views: 256
 -
 IMG_20200303_234441618.jpg2.4 MB · Views: 249
 -
 IMG_20200303_234454942.jpg2.3 MB · Views: 247
 -
 IMG_20200313_172414042_HDR.jpg4.1 MB · Views: 246
 -
 IMG_20200305_233042606.jpg4.1 MB · Views: 256
 -
 IMG_20200313_172421934.jpg3.5 MB · Views: 254
 -
 IMG_20200305_233047757.jpg3.6 MB · Views: 261
 -
 IMG_20200313_172348119_HDR.jpg3.9 MB · Views: 255
 -
 IMG_20200305_233053879.jpg4.1 MB · Views: 250
 -
 IMG_20200305_233101921.jpg3 MB · Views: 250
 -
 IMG_20200303_234504344.jpg2.3 MB · Views: 248
 -
 IMG_20200304_204905898.jpg3.3 MB · Views: 243
 -
 IMG_20200304_204918313.jpg3.3 MB · Views: 245
 -
 IMG_20200304_204940305.jpg2.6 MB · Views: 239
 -
 Screenshot_20200324-163631.png1.3 MB · Views: 269
 -
 Screenshot_20200324-163845.png1 MB · Views: 263
- Member DIN
- S178
Looks Great! love the tiny lights!
Cant wait to see it worn! Keep up the great work
- Status
- Not open for further replies.
Similar threads
- Replies
- 0
- Views
- 229