The long journey home? (ODST suit build)

Status
Not open for further replies.
Cool stuff!

Have you tried taking another crack at the helmet? The video they linked you is the one I used too. The "measure distance" tool in pep designer is also really helpful. Prior to that tool we would have to print out the neck area and put it on our heads, but know you can just measure what the opening is going to be before you print. Just type @ and my name with no spaces in a post if you want some help.
 
First of. Thanks for the replies ;). Got me motivated to get going again although not with much progress. I hope to finish the boots this weekend and maybe even get a crack on the lower legs.

PerniciousDuke. Have not started the helmet again. Not even printed v4 yet. Scaling problem for me was mostly trial and error. First time i scaled backwards. Made it smaller instead of bigger. Mistake in the calculations. 2nd time i thought i could change all 3 scale sizes independantly. Not noticing the numbers changing. Third helmet try i measured my head wrong. Now with the 4th one i put my head (ear) against the wall and measured the width. Checked and rechecked in real life and in the pep model. Hope this one is right :rolleyes:

Well, just keep at it (and get more paper)

20180222_223905.jpg
 
So here is a little update to show i'm not dead. Work on the suit has ground to a halt. During the week i was sick i got nothing done. First day i was too ill to do anything. Rest of the week my room was too cold to work in.

Now that i feel much better my buddies (or better said one) made a plan to work on some horus heresy armies. For those who don't know about it its for a table top board game (seriously should look it up ;)). With about 70 models to build and 7 built from different parts it has taken all of my time up.

Another problem is that my laptop is now getting to the verge of collapsing on me. Stuff is running real slow. And because my old car broke down and i had to get a new one (14 years old) i am all out off cash for a decent pc for now.

Last lamest excuse is that i also need more paper for peppping.

Plan is to save up for a pc and more paper. Trying to finish the 2nd boot this week and maybe print another shin. Last one was way too small. Hope the laptop handles it. Thats all from me for now :D

Ps. Three models done so far :whistle:

20180314_222302.jpg
 
Man. I am all over the place with scaling. Shins too small and now the thigh is way too big :cry:

Before i can continue i need paper and a little (read: a lot of) help with scaling the leg stuff.

One important lesson learned though. Never print two of one thing before you know if the size is right.

20180321_222630.jpg


20180321_222617.jpg
 
It is a start at least. Scaling is always the monster to any build. Why I gave in a bought armorsmith to save me. But you are starting out well and strong. So resupply and keep pushing though it all and in the end you will be much better then you know it. Keep it up trooper!!!
 
So. Just a quick heads up where i stand now. To get back in the metaphorical saddle i ordered 2 packs of 250 sheets 160gr/m2 paper. Need to pick them up today.

Another thing that ran through my mind is to 3d print the helmet. Hear me out before the shouting starts. I will still try my hand at pepping one so i can scale it right when working on the design. If anyone could help me out. I tried some different tutorials but most are too fast for me to clearly follow :confused:.

I also want to try my hand with armor smith but i'm afriad that will have to wait. About a week ago my first car came to the end of his lifecycle. For work i need one to travel so i bouht another one. Now cash is waaaaaay too low for a decent rig. So that will have to wait.

Thats all for now. I'll just keep pepping :D

20180323_163849.jpg
 
So after being silent for quite a while:

unnamed.jpg


@paganboi . Good idea. Foam might be better than my plan. I wanted to go for elastic fabrics.

As to my progress: the torso stuff is all done and now also hardened. Some parts need another layer but that will come tomorrow, just like the finished leg parts. I just need to do one shin and thigh. But enough talking. Showtime boyz :D

20180806_161751.jpg


20180806_161807.jpg


20180806_161803.jpg


20180806_161759.jpg


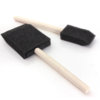
Destroyed 5 relativly cheap brushes on day one :confused: gonna need way more now:rolleyes:
 
Last edited:
I've gotten those.....they fall apart. Go to the Dollar Tree or any $5 and below....they will have the cheapest of the cheap and I have no problem tossing those out.
 
get the super cheap spongy brushes, they're like 75 cents at Micheal's
View attachment 258059

Wait for the 50% off or greater Michaels coupon, grab the six dollar 25 pack of chip brushes, win the game. Get three friends to come in with you and do the same. Now we're just playing on God Mode.
 
Small update as i haven't made a lot of photos. All parts except the arms and shoulder bits have been resined and a few are also fibre glassed.

As for the problem with the brushes. Here in the netherlands we have a store called action which sells them for 50 cents a piece. Bought quite a few of them :D

20180807_105909.jpg


Added bonus is they are quite usefull when dried out and hardened. I use the to push the air bubbles out during fibre glassing :cool:
 
Got quite a few things done today. All parts except the shins and thighs are now fibre glassed.

Up until now i've used 2 liters of resin and 1 m2 of fibreglas mat. I found that the fleece stuff is the best to work with (for me). So without further ado. Some pics to enjoy ;)

20180828_145827.jpg


20180828_145648.jpg


20180828_145738.jpg


20180828_145755.jpg


20180828_145802.jpg


1535548298447431058639.jpg


P.s. what do you think of my prop smg? :D
 
Man-blowing-dust-of-an-old-book-Shutterstock-800x430.thumb.jpg.6782f5ace4cf8569732a2186c0017709.jpg
"cough, cough"

it has been quite a while since i last posted here. During the time other life and hobby stuffs got in the way. Leaving next to no time for my ODST build.

But now i'm back with plans to make it all happen. First of: i have not been sitting completely still.

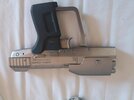
My m6g.jpg

One of my first halo props i finished is this beatifull kit from Timuche props on etsy. its a resin model. I used some spray paints for this one and want to add some weathering later on.

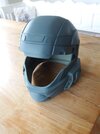
My bucket.jpg

Next up is a 3D printed bucket i also bought off of etsy. this one required a bit more elbow grease to get rid of all the printing lines. that's about three cans of filler primer and an afternoon of sanding. I am already planning on building in some cooling fans.

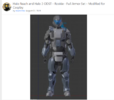
odst armor.PNG

Lastly, i plan on getting most if not all the bits printed. I want to use moesizzlac's wonderfull 3D models for this. I have armorsmith so just need to learn how to properly resize all the stuff. For the "vest" part I bought a plate carrier vest to attach all the things to.

So yeah, I'm back
1d583a81132458822e9195c6ee2737d9.jpeg
 
Status
Not open for further replies.
Back
Top