1st Build WandererTJ's Mjolnir Mk. V (Custom) - S-128 - [Hybrid Build] [Pic Heavy]

Status
Not open for further replies.
I was definitely hoping it would allow more flexibility in the toe having the hinge in it, but it wasn't flexing quite right, partly because the hinge is at the middle of the foot, rather than just behind the balls of the foot, but adding in the buckles also eliminated them being able to hinge inward.

Definitely not an issue at all though, I can move around well in them, and the clam shell design works what it was meant for... allowing you to remove your shoe. Having boots that actually have a separate toe for flexibility is definitely more of a neat trick for the Mark VI and Spartan-IVs.

Once everything is done I won't be doing a walking test... I'll be doing a dancing test. ;)

Also BlazedStarbon, you totally have the 100th post! :)
 
Last edited by a moderator:
Yeeees! This is fantastic. It's so good to see armor built from scratch using reference images instead of just straight Pepakura.
 
Hey all!
It's been a while.

I've been taking somewhat of a break.
Took the month to play some videogames, broke 100,000 Gamerscore with 100 Completed Games at the same time.
Ended up completing about 17 games 100% in about a month's time and then I started playing Destiny: The Taken King which broke my streak.

Just wanted you all to know I'm still alive and kicking and that I'm not going anywhere and that my build is not done.
 
Hey everyone!

It's certainly been a while! I haven't exactly made any forward progress on my suit, but I'm working on making progress, talking with one of the teachers at the high school where I mentor high school students in FIRST Robotics about helping me 3D print off a helmet. I managed to get a "Disguise" brand Halo 4 Master Chief helmet, and while it's nice and all, it's just not what I'm going for with my build. I also got 2 BOOMco M6H magnums, so I'm pretty excited to getting around to painting them.

But, I'm actually here to bring you all some other news, I've been working on some other things, and I wanted to show them off! :)

I'll start by saying that, I've been watching all of the Power Rangers on Netflix, and I decided it would be fun to do some prop designing.
So I've been hard at work in SolidWorks at making breathtakingly accurate models that are intended for 3D Printing.

So far, I've made the Dragon Dagger, Sword of Darkness (aka The Devil Sword Hellfriede), a cosplay version of the Legacy Power Morpher, and two of the Power Coins. After I finish up finalizing each of the models, I plan on doing a bit more, such as the 5 power weapons, and the rest of the power coins, assuming that I can get some income to afford the Legacy toys so I can get accurate measurements off of them.

I'm experimenting with a new concept for 3D-Modelers, and I'm hoping it'll turn out to be a success, maybe some of you will be interested, I'm not sure, but I'm running a fundraiser.
Once the fundraiser has earned enough, the models will all be released for free.

You can find more information about my fundraiser here:
https://www.gofundme.com/wanderertjprops
I would love the support of you all here, but if you aren't interested, no worries!

It hurts me to see models for sale, so hopefully crowdsourcing could be a great way for modelers to get exposure, earn some money for their work, and not have to worry about one person purchasing it and then posting it for everyone to download for free.

Dragon Dagger Render 4.png Dragon Dagger Render 6.png Dragon Dagger Render 1.png Dragon Dagger Render 2.png Dragon Dagger Render 3.png
Dragon Dagger Render 7 - Explode.png
Morpher Assembly 1 - WandererTJ.png Power Coins.png Devil Sword Hellfriede Progress 4a.png Devil Sword Hellfriede Progress 4b.png
 
Thanks to ErMaC, the Halo Reach Commando Shoulder file that I modeled has been unfolded for those of you interested in having a properly accurate version of the armor.
thumb-1322.png

The unfolded file can be found here:
http://www.405th.com/file-archive.php?do=download&downloadid=1322

The original file of the 3D model can still be found here:
https://grabcad.com/library/halo-reach-commando-shoulder-1

It was a massive undertaking by ErMac to unfold the countless polygons that the model is comprised of, so props to him for being diligent to unfold it.
Hopefully this will help the community! :)
 

Attachments

  • thumb-1322.png
    thumb-1322.png
    10 KB · Views: 299
Last edited by a moderator:
While I know this is yet another non-Halo or costuming related post, I did want to update you all with something I've finished.

I have created 3D Models for every Poke Ball ever! (And they can be downloaded for free!!!)
I've also created a diagram of them all.
every_known_poke_ball_to_date__diagram_chart__by_wanderertj-daauwwq.png

http://wanderertj.deviantart.com/art/Every-Known-Poke-Ball-to-Date-Diagram-Chart-622900250

Please note that the available files are in their original SolidWorks format. Converting them to anything else can/will cause appearances to be lost from the models.
https://grabcad.com/library/poke-balls-generation-1-pack-1
https://grabcad.com/library/poke-balls-generation-2-pack-1
https://grabcad.com/library/poke-balls-generation-3-pack-1
https://grabcad.com/library/poke-balls-generation-4-and-5-pack-1
https://grabcad.com/library/poke-balls-anime-variants-pack-1
https://grabcad.com/library/poke-balls-villain-variants-pack-1
https://grabcad.com/library/poke-balls-special-poke-ball-variants-pack-1
https://grabcad.com/library/poke-balls-variants-from-other-games-pack-1
 

Attachments

  • every_known_poke_ball_to_date__diagram_chart__by_wanderertj-daauwwq.png
    every_known_poke_ball_to_date__diagram_chart__by_wanderertj-daauwwq.png
    2.1 MB · Views: 300
A lot of updates will be coming soon!


Armorsmith
I've been a supporter of this software ever since it was in its infancy as an Alpha.
I got this as a tool to alleviate my anxiety, which it did a pretty decent job at.
You may see me complain about it throughout some of my posts, because I tend to push it to its limits and find new bugs.
That's what happens when you have 70+ toggle-able items on a single digital mannequin.
I always had several thighs, cod/belts, and torsos just because they all sat differently, game model vs fan creation.
But my biggest complaint about the software is probably that the way you put the measurements for yourself in, just really isn't the best. Its over simplified, and works better for a mannequin than an actual person.

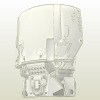
Below is what I envisioned my Spartan would look like fully tricked out. And honestly, this isn't even the latest version of it in Armorsmith at the time of this edit.
Getting all of this finished for Halo Outpost though, is not my goal, I just want to be able to at least get the base components of my armor completed in time for the event.

Despite taking measurements and verifying everything twice, I called up PerniciousDuke and videochatted with him and got assurance with my measurements. I can't remember at what point during the build it was, so I can't remember if it was to fix something or if it was before I started putting everything together, but it gave me some ease of mind. Thanks bro!
IMG_20190423_153047_733.jpg


Mark V Reach/CE Hybrid Chest
Original Version (F):
To start, this is what the original reach chest models look like.
This is the streamlined/female version.
Not shown, I have the bulky/Male version where the back slants down outwardly instead of inward.
The spine plates and lower back plate were removed to improve printability and mobility.
Torso 1.pngTorso 2.pngTorso 3.pngTorso 4.pngTorso 5.pngTorso 6.pngTorso 7.pngTorso 8.png
This was an exclusive Commission by WandererTJ from Cobbatron
These photos are not to be copied nor the work in them referenced for the modeling of others.

Custom Version:
It was based from the released version in Halo Reach but has some subtle changes that pull inspiration from these references below.
For the most part, everything pretty much stays the same except for 3 notable changes:
1) Back/Shoulders - Part of me always felt like something was left out regarding the Mark V armor in Reach, namely the high structures and vents (if that's what they are) that come up the back/shoulders. I really wanted to bring them back.
2) Front Panel - I always found the box that sticks out on the front plate to be... off putting I guess? It sticks out and has no purpose of which that I can tell. It just seemed an eyesore, and wasn't really present on any other incarnation of that Mk.V. It gets dropped.
3) Front Panel - There isn't really anything wrong with the shield emitters on the original, but when you drop the odd shaped box, these needed a style overhaul, and I love the single emitter design.
Torso 1 x.png

References:
I want to highlight here, 3 concept images from Halo Reach.
There was a point in time when Bungie was considering including the raised shoulders with the vents (or whatever they are) as well as the single shield emitter on the chest. In this version, the emitter is on the opposite side from what we got in CE.
w9TadRx.jpghaloreach_character_unsc_noble_member_spartan_portrait_02_by_isaac_hannaford.jpghaloreach_character_unsc_noble_member_spartan_portrait_01_by_isaac_hannaford-294x300.jpgIMG_20190716_213509_242.jpgQqfhon8.jpgremember_.reach_1235229220393840401_2955464218.jpgH2 Halo2_Concept_3.jpgH2 Mark V Gallery_6889_853_280617 1.jpgalmightynabeshin solemnity_by_almightynabeshin-d5kf9ai.png.jpg
Concept Pieces
Photo Credits:
The first photo comes from an artist known as CH,
all the ones in the middle are by Bungie as far as I know,
and the last one is by almightynabeshin


Custom Armor Accessory Parts
Diaphram Electronics Box:
After seeing too many of these that I wasn't happy with, I wanted to come up with one that I was.
I 3D Modeled this myself, tossed it into Armorsmith to check how it fit with the torso, and tweaked it.
Technically, it should be as it looks in the first picture...
BUT, with the way things shift around in Reach, keeping it like that and lowering the stomach plate just didn't look right to me at all.
IMG_20190626_134943.jpgIMG_20190626_021331.jpgIMG_20190626_021648.jpg
So I shifted it up, and trimmed the upper side to match the underside of the torso.
IMG_20190627_162544.jpgIMG_20190627_162128.jpgIMG_20190627_162800.jpg
Finally, I had the idea of "why not make it functional?" So I was working towards making it so that you could drop in lenses, lights, and buttons.
Due to my time constraints, and lack of prototyping capabilities at the time, I ended up just deciding to go with a static version without buttons that worked, but this gives me a way to upgrade and options of where I might put a soundboard.
IMG_20190627_162320.jpgIMG_20190628_150851.jpgIMG_20190628_152027.jpg
Modeled by: WandererTJ
Shield Emitter Lenses:
WHAT ARE THOSE?
ARE THOSE LINES?
Is what I thought to myself as I zoomed in on screenshots of my MP Photos. These aren't simply little LED covers, these have style to them.
IMG_20190808_175127.jpgIMG_20190808_175126.jpg
It is also very important to note, that all of them are oriented differently left vs right EXCEPT for the front ones near the armpits (shown above) and the ones on the thighs.

Solution? I 3D Modeled lenses to be printed in Natural PLA so they'd be semi-transparent.
The lenses are given ridges, recessed on the outside to receive a line of black wash paint to make the effect pop even more.
Shown below are two different versions, one with lips to catch from the back and one without.
IMG_20190627_143326.jpgIMG_20190627_143347.jpg
Modeled by: WandererTJ
 
Last edited:
Dude can't wait, if you want the pictures I got of you from the photoshoot yesterday, they are in the group chat or I can send them to you
 
It's been 4 years since I've started this, and even longer if you include me losing weight so I could be the best version of myself before starting to cosplay.
The CQC shoulder is one of the first things I worked on and it even appears way back in my 3rd Instagram post.

Well, when I first made it, it was sadly at 60% scale. That's been corrected now.


CQC Shoulder Version 2 - Built & Detailed


Progress Pics:
The majority of this was scratch/freehanded, making my own templates. The center section if the shoulder piece is removable, something I also did on the original and will involve some fun in the future . It also took an entire 4-pack of foam to give it the bulk it needed.

The range of motion with the shoulders is already rough enough without the torso. That'll be a fun test. I'm betting 30° max lateral lift and less then that with a front raise and then reaching out.
Honestly not sure that saluting will be possible.

The last image shows the difference in size between the bicep, the old CQC, the new CQC, and a Commando shoulder.
IMG_20190708_095424.jpgIMG_20190709_141911.jpgIMG_20190710_153727.jpgIMG_20190711_075024.jpgIMG_20190711_122419.jpgIMG_20190711_122424.jpgIMG_20190711_122429.jpgIMG_20190711_122440.jpgIMG_20190711_122455.jpgIMG_20190711_122609.jpgIMG_20190711_122409.jpg
Model Referenced:
My personal file rip from the Halo Reach game.
It was predominately just used to obtain the overall shape. All the details for it were free-handed.
The shoulder is 4 layers thick in order to give it it's needed bulk.

I created a breakaway section in the middle of the shoulder piece to insert magnets and to provide a way to give people access to my Social Media via a QR Code.

Reference Photos:
12 (WandererTJ).jpg19 (WandererTJ).jpgreach_5153528_Full - Labeled.jpgreach_5153533_Full.jpgtex_shoulder_cqc.jpg
Credits: WandererTJ, Bungie​
 
Last edited:
The Undersuit - Part 1

I used 1/2" upholstery foam for the Undersuit. and It got expensive fast. The rolls are far more expensive than EVA rolls.
It was also off-scaled quite a bit in the end, I used Armorsmith to scale it, and despite it overlapping with the flesh of my digital body it was more than 2" too big in any direction. This led to a lot of cuts I would have preferred not to make, but went ahead and did anyways. (See part 2 in the next post).

The Corset:
So I made a thing...
I cut a lot of templates just to dissolve them down to 12 pieces. Really glad I did though.
Ended up laying the templates out differently for the 1st picture than I used for the foam, but I forgot to take a pic.
It fit until I started adding more pieces... As in the hips fit but the top absolutely does not. I'll need to split it down the back and figure out a zipper or something.

½" Upholstery Foam and Super 77. Offset some of the pieces a little bit for depth. For great exterior seams/mountain folds, pinching with your fingertips works amazingly on this foam.
Also, thank god for Pam cooking spray, used it to get the glue off my hand when spraying it.
IMG_20190531_225545.jpgIMG_20190602_110408.jpgIMG_20190602_174357.jpgIMG_20190602_174425.jpgIMG_20190606_002834.jpgIMG_20190606_002900.jpgIMG_20190612_140310.jpg
The Shorts:
Fake it till you make it. When you don't have much of an a$$ and the Halo Reach booty be you make yourself one.
½" Upholstery Foam & 3M Super 77.
It was impossible not to get glue on the interior sides, so I definitely lost some thigh hair when taking this off from the test fit.

There are a few fixes that need to be made, I'm probably going to take things in a bit, because I definitely didn't plan to be this thicc, but I'm probably going to wait for the torso to be done first before I do the upper section.

For the shorts, I definitely plan to take some of the outer side of the thighs out to take them in, might add a zipper to get in and out of them once I do though.
The inner side of the thigh near the crotch bulges a bit, not 100% sure how to correct that.

Zipper thoughts/ideas:
Outsides of the thighs, hidden, zipping up, but maybe not all the way, keeping it attached at the top.
Zipper for the crotch (will be hidden by the codpiece) to compensate for the thighs not opening up.
Zipper up the back of the torso (there is already a seam here), and velcro-ing the spine plates on to hide the seam.

Yes, I can lift my legs, though it does stress me out doing so because I don't want to rip a seam, but after a few test lifts, nothing came apart.
IMG_20190605_122630.jpgIMG_20190606_005849.jpgIMG_20190606_225227.jpgIMG_20190610_174727.jpgIMG_20190611_223347.jpgIMG_20190611_223426.jpgIMG_20190611_223658.jpgIMG_20190615_183855.jpgIMG_20190620_130718.jpgIMG_20190620_131143.jpgIMG_20190620_131210.jpgIMG_20190620_131214.jpgIMG_20190620_140252.jpgIMG_20190712_104442.jpgIMG_20190712_105411.jpgIMG_20190712_105439.jpg

IMG_20190712_111241.jpgIMG_20190712_111250.jpgIMG_20190712_111255.jpg


EDIT: DON'T USE SUPER 77 trying to glue this foam together, it all falls apart eventually if you do. :mad::mad::mad::mad::mad:
 
Last edited:
The Undersuit - Part 2
Tailoring the Shorts:
I took out a good chunk of the torso in the back to make it nice and tight.
I took out about 2" front-to back cutting the shorts in half through the thighs and crotch.
I was getting odd bunches in the crotch, so I tailored those out as well by laying flaps I could pull with the foam and laying it flat.
IMG_20190717_160540.jpgIMG_20190719_114357.jpg
Shoulder Covers:
I got Armorsmith to decrease my anxiety, and sometimes it does in the form of replacing it with frustration, but at the end of the day, it's helping me kick this build's ass!
I scaled the shoulder covers wrong the first time. There's a really annoying trend here, but I survived.
I've messed up more than I'd like to count with this build prior to Armorsmith, and even a little with it, whether it was starting a piece and stopping or finishing a piece and figuring out how wrong it was after pouring hours or days of work into it.

There have been 12 things thus far I started or finished that were wrong. Easily 20+ if you include all the patterns I've printed just to change my mind about later. In fact, for most of the pieces, the first time I made it was crap. But I did it again and it came out how I wanted.
You just gotta keep at it.
IMG_20190726_095212.jpgIMG_20190726_114242.jpg
Arm hole covers are....done? My shoulder armor tends to catch it when I rotate. I contemplated redoing these in EVA, but ended up being satisfied once they are mounted up with velcro.

Something to keep in mind: If you use the male/female chest, make sure to use the files for the matching arm-hole covers.
IMG_20190727_181852.jpgIMG_20190727_181902.jpgIMG_20190727_182158.jpgIMG_20190807_170703.jpgIMG_20190807_170708.jpgIMG_20190807_170711.jpgIMG_20190807_170715.jpg


The final covers came out quite well.

Models Used:
Personally ripped models, heavily tweaked and modified and later detailed to match the game textures.

References Used:
The folder is honestly too big to upload.
 
Last edited:
Grenadier Knees - Version 2
After looking back at the old knees, I wasn't satisfied with my work anymore. There were details I missed and I wanted to upgrade them and make them look better.

This time I used the game model and freehanded all the special details.

Progress Photos:
IMG_20190727_164058.jpgIMG_20190727_210903.jpgIMG_20190727_210916.jpgIMG_20190727_210922.jpgIMG_20190727_211221.jpgIMG_20190727_211233.jpg
Reference Photos:
05b02021e0b05861370720babc67d912 - Copy.jpg3058265-h5-guardians-reach-armor-hero-chaingun - Copy.jpg3058265-h5-guardians-reach-armor-hero-chaingun.jpgHalo-5-Guardians-Memories-of-Reach-Watch-Your-Back.jpgtex_knee_grenadier.jpg
Credits: 343i and Bungie​
 
Last edited:
So, to be completely honest with everyone, I gave up last time when I made it to the torso. I scaled it wrong like I had done other things and my anxiety won. I came back a few years later just for it to happen again. This Log is starting at Torso Part 3 even though the others are being skipped over.
Patterns were made, foam was cut, but nothing happened past those things.


Torso - Part 3
I owe this 100% to the help of TurboCharizard aka Skookum Props to which I also owe immeasurable gratitude.

In case you missed post #111, this torso is a custom design, based on many versions of the Mark 5, including the concept photos from Reach.
The custom design maximizes the accuracy of the design from reach while also providing my own personal flavor to it.
After having a fully accurate version made while referencing the game model, the following changes were made:
Key Changes:
1) The front panel has been heavily changed and simplified. The odd shaped box was dropped and instead of 2 Shield Emitters, there is a single one recessed in a wider slot.​
2) The Shoulders were made more aggressive and the two recesses were but in each side.​
3) This is also a Female torso. It's back slants in as it goes down instead of out. The reason was to attempt to give the build a slightly sleeker look.​

Also in post #111, I 3D Modeled the electronics box that goes up front under the breast. I also modeled all the lenses for the LEDs because I wanted them to match their in-game effects.

I did a lot of grinding and finishing on this. I dremeled out a lot from the collar and had to figure out a way to make alignment keys since we forgot them in the model. They aren't perfect, but they work. They're also super stabby, sooo I have to be very careful putting it on otherwise they can gouge into my undersuit.

3D Printing:
• Printer Used:
• Grey Filament: eSun PLA+
• Clear Filament: Spool3D Natural PLA (used for the emitters, these prints will appear later)
• External Coating: XTC 3D (epoxy resin)
IMG_20190625_190452_735.jpgIMG_20190625_190458_322.jpgIMG_20190627_192122_381.jpgIMG_20190627_192126_858.jpgIMG_20190628_164212_805.jpgIMG_20190629_143707_966.jpgIMG_20190629_143712_442.jpgIMG_20190629_143716_226.jpgIMG_20190629_143835_943.jpgIMG_20190629_144050_908.jpgIMG_20190629_230857_959.jpgIMG_20190630_133441_418.jpgIMG_20190630_133601_024.jpgIMG_20190630_133616_061.jpgIMG_20190715_101844_431.jpg
Photos above courtesy of TurboCharizard
Mail Call:
I got this from Turbo with 22 days remaining until Halo Outpost Houston. (Scream).
Had some warpage in the mail thanks to 100°F heat in Oklahoma, which caused the front to not line up perfectly with the back half.
IMG_20190722_094318.jpgIMG_20190722_094321.jpgIMG_20190722_094325.jpgIMG_20190722_095512.jpgIMG_20190722_095611.jpgIMG_20190722_095623.jpgIMG_20190722_095636.jpgIMG_20190722_095640.jpgIMG_20190722_095742.jpgIMG_20190722_095749.jpgIMG_20190722_095752.jpg
Sanding, Grinding, Smoothing:
Currently sanding in some of the details and getting everything to fit right.
I had to install some metal alignment keys to get everything to come together. It isn't perfect, but it'll do.
There was also a lot of XTC put on it, which has dulled some of the detailing. I've done my best to recover some of them, but I'm not perfect.
IMG_20190723_204236.jpgIMG_20190726_183135.jpgIMG_20190726_183138.jpgIMG_20190726_183143.jpgIMG_20190726_183152.jpgIMG_20190726_183200.jpgIMG_20190726_183208.jpgIMG_20190726_183239.jpgIMG_20190726_183331.jpgIMG_20190726_183336.jpg
 
Last edited:
The next following pieces were all freehanded.

Stomach Plate:
It's easy to take a lot of the details I've added in for granted. It's also easy to forget that Halo Reach came out 9 years ago on a previous generation of consoles.

What some may not know, is that games have ways of playing tricks with details.
The actual models that are used are very dumbed down and simply have layers of images stretched over them.
There are UV maps, Normal maps, and others, and what they do is simulate details in a way that adds depth.

One big downside for cosplaying things like this, is that depending on what angle you look at, these textures can be stretched in weird ways, deforming things or making a detail that you thought was raised is actually recessed (or vice versa). Shown below are 3 images I've hand drawn out.
The one at the top is based on the texture file.
The bottom left is an unfold of the game ripped model.
The bottom right comes from an on-screen reference.

All 3 of these are different and yet somehow are supposed to represent the same thing.
So which one is right?

The one you end up freehanding.
IMG_20190729_172417.jpg

It's kinda difficult for me to explain how I freehanded this one, I kinda just went to work and started cutting and shaping to see what I could come up with. When I was done, I fell in love with it. A few things are a little off and didn't get glued straight, but when you go back and look at the armor that was used for the first live action suits and realize yours is more accurate? It feels good!

I did my best to capture everything perfectly including a small ridge that only catches light at certain angles.

It is fastened to the Torso with Elastic, the intention was to make sure it was always pulled back against my body thanks to the tension, but how I mounted it could be better, as it can shift down and out.

When designing the electronics box at the top, I knew that the top side wasn't cut off, but with the shifting textures and details based on all the references I flipped through, I decided it would be best to go ahead and trim it slightly. Position mattered a lot to me and having it any lower would have looked off.
IMG_20190730_172506.jpgIMG_20190730_172509.jpgIMG_20190730_172512.jpgIMG_20190730_172515.jpgIMG_20190730_172527.jpgIMG_20190730_172532.jpgIMG_20190730_172533.jpgIMG_20190730_172540.jpg
IMG_20190804_223046.jpg


Neck Seal & Neck Gasket:
Oh yes, the two things that are more overlooked than anything else on our costumes.
A neck seal is one thing, but how many of us bother to actually cover up that front gap?
It's one of those minor details most people probably wouldn't even notice while playing the game. I don't think I've seen anyone make the gaskets for their Mjolnir Mark Vs, and I've only seen a handful that actually had neck seals.

My torso honestly lives and dies thanks to the front and back neck gaskets. What I mean is, I don't have anything really holding my torso in place. These gaskets keep it from shifting around in ways I want to avoid. You really want your neck sticking out from the right spot, otherwise the torso slopes forward or backwards too aggressively.
The rear seal isn't anything special, no details, just a curved cut on a piece of foam, beveled underneath to match the neck seal's slope. It isn't shown here, but you should be able to view it in photos of the torso later on.

If you look closely in the references you'll notice... wait... is that a space zipper??? That's what I'm assuming and using an actual zipper made capturing those details even easier. It was too long, so I cut off the excess and used some hot glue at the top as stoppers. Not perfect, but it works.
I'll hit it with some silver paint to make it pop later.
If you look at the reference photos below, you too will see what looks to possibly be a zipper.

My biceps are strapped up to the neck seal. Trying to buckle them sucks, but it does a great job at holding them up and likewise they keep the neck seal straight.

Progress Pics:
IMG_20190729_133511.jpgIMG_20190726_212347.jpgIMG_20190727_230358.jpgIMG_20190727_230404.jpgIMG_20190728_133705.jpgIMG_20190801_222044.jpgIMG_20190808_011348.jpg
IMG_20190728_214841.jpgIMG_20190730_195614.jpgIMG_20190730_195626.jpg
References:
34 (WandererTJ).jpg35 (WandererTJ).jpgFred-104.pngOfficial_-_Carter.jpgIMG_20190812_212645_752.jpgreach_1334878_Full.jpgUndersuit-NeckFront.jpgUndersuit-NeckSeal.jpgUndesuit-NeckBack.jpg
Credits:
Wanderer128, Brandon McClain, Roadwarrior

Mk V Neck Seal.jpg
Credits: Bungie


That's all for tonight!
I'll do my best to try and come back and expand on things.
 
Last edited:
Amazing work and write ups WandererTJ. Seen the suit all on instagram but never knew how the suit actually came to be. Awesome job with the upholstery foam. I never knew it had so much versatility. Is it easy to seal using spray on sealant like leak seal or plastidip(for upholstery foam)?
 
Status
Not open for further replies.
Back
Top