WinterHuntsman’s ODST build WIP

Status
Not open for further replies.
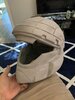
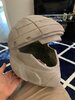
Welp I almost got the final sanding done today. I’m so close to finishing this sanding of the helmet. I chipped a piece of the ridge on the back of the helmet (green spot on the back of the helmet)and now I’m debating if I want to go back and bondo that spot or not. It’s been almost a year since I started this helmet and I’m itching to move on to the next step. I’ll try to finish up the sanding soon but I feel like I’m in a good enough spot once I’m done to move on.
It’s still my first time doing this so I’m ok with it being not perfect. I’ll still probably go fix that one chipped spot. Also anyone got a tutorial on how to make the visor?
50823E93-0D85-45C6-9DA3-EFB5EE7878A9.jpeg

2D36DE1E-0781-44BD-BCC9-95851ADD3CA2.jpeg

96FA54AF-638F-4536-854E-06F8EA95A645.jpeg
 
Last edited:
The sanding for the helmet is finally done! Now I need to figure out how to pain this thing and what kind of paint to get as well. Took a long time to get to this point but I’m glad I did it. I know I need to add those extra vent like things by the jaw area, but if there are any important details I’m missing please let me know.
B9BEAC23-829F-4862-9792-86E7806624BD.jpeg

4CA7E791-554E-4DB1-818B-F842D56C7707.jpeg

1F389E10-AF5C-400A-826F-6589FB3E59FD.jpeg


edit: I just realized I forgot the line that bisects the chin and the little rectangle on the forehead. I’ll carve that out tonight after dinner and post a new photo.

edit 2: and those details I missed have been carved in.
BF859FD8-C74D-4218-BEE5-45F10B8E9424.jpeg

71B528CD-790D-4084-A3F2-16522D781D2B.jpeg

Edit 3: Is there a specific recommended primer for bondo or just any normal white spray paint primer will work?
 
Last edited:
Great job, if you are ok with the nicks go ahead and start priming. It is highly suggested to use rustoleum primer Filler (2 in 1). that's what I did. I would highly suggest you pick up a tube of spot putty to fill in all those small nics though. Unless you are going for a more weathered look.
I only suggest this because you have put so much time into it, I want you to be happy with the end result. but those nicks can be weathering points if you go for that too!
 
Thanks he4thbar. I’ll have to think on the putty because I do want a weathered look, like the armor has seen some action. Problem is I can get very detailed focused so if I were to start fixing every tiny nick, I start trying to fix every single flaw, which means the helmet will probably never be done.
I’m super happy with how it’s turned out though, and I’m planning to do a second helmet (Mark v from reach) that I may spend more time on those details on that.
What I’ll do for now is order the paint and work on the foam stuff while I wait for it to arrive. During that time I’ll think on the putty and if I want to use it.

Thanks everyone for all the help you have given me through this project. I could have never imagined my first attempt at any cosplay armor going so well.
 
Got the primer ordered and the reflective visor material as well.
I still need to figure out how I’m going to make those vent like things on the jaw area. You know those 2 vent like things on each side of the jaw area. Maybe I could carve out some foam pieces and glue them on or I can see if I can get those parts 3D printed.
Looking at photos of those parts I think I can shape some plastic into the needed shapes.
 
Last edited:
I am new to this forum, however, reading this whole thread has been pretty helpful. I started my ODST build last year but did everything wrong like I build the helmet out of foam but used the paper files and with hot glue so that took longer and turned out pretty bad. then the glue melted in the sun and turned out bad. also started on all the other parts and did the shoulders, chest, forearms, boots, and all with hot glue. now looking at this thread and doing the thighs with Contact cement thinking I have to re-do everything. or try and save it and put the time into it. I think I can save some things and re-do others. I am concerned with how much time everything takes but all of you are very helpful and nice about everything. my brother has a 3d printer but it's small and is printing an assault rifle right now and printed a helmet but it's not easy and still a lot of sanding. I'm impressed with how much sanding WinterHuntsman has done.
 
I am new to this forum, however, reading this whole thread has been pretty helpful. I started my ODST build last year but did everything wrong like I build the helmet out of foam but used the paper files and with hot glue so that took longer and turned out pretty bad. then the glue melted in the sun and turned out bad. also started on all the other parts and did the shoulders, chest, forearms, boots, and all with hot glue. now looking at this thread and doing the thighs with Contact cement thinking I have to re-do everything. or try and save it and put the time into it. I think I can save some things and re-do others. I am concerned with how much time everything takes but all of you are very helpful and nice about everything. my brother has a 3d printer but it's small and is printing an assault rifle right now and printed a helmet but it's not easy and still a lot of sanding. I'm impressed with how much sanding WinterHuntsman has done.
To give you an idea, this helmet has taken about a year now of off and on again work. Not because it’s boring but because of real life. It’s probably possible to do this faster if you know what your doing and have the time to just do it all. Patience is the key. The foam body armor has taken a lot of trial and error to get right because I initially tried to rush it. There is a lot of learning involved as well as cleaning up/detailing if you want it. If you want to, you could start your own thread like I have and we can help you along the path.

As for updates on my stuff, I picked up that 2-1 filler and sandable primer, and ordered more foam. The chest plate pieces have been cut out and will need to be assembled. I should hopefully be priming within a couple days. From what I read, I am supposed to do 2 coats, and sand with a very fine sand paper. If there is anything else to the priming process let me know.
 
To give you an idea, this helmet has taken about a year now of off and on again work. Not because it’s boring but because of real life. It’s probably possible to do this faster if you know what your doing and have the time to just do it all. Patience is the key. The foam body armor has taken a lot of trial and error to get right because I initially tried to rush it. There is a lot of learning involved as well as cleaning up/detailing if you want it. If you want to, you could start your own thread like I have and we can help you along the path.


That's, not a bad idea. also yes I how long everything took and just need to realize that its gonna take some time. I re-did shoulder and looks a lot nicer. however yes life does get in the way.
 
My visor material arrived! I hope it’s enough material. I assume I cut out the visor pattern then cut out those templates from the material.
I’ll have to do the paining and everything before I can do anything with the visor probably.
 
Last edited:
Helmet has been primed will be sanded with a very fine grit tomorrow. Now what kinda paint do I paint the helmet with anyways?
Also here are photos of the helmet, it looks so good now that it has been primed.

Loaded question..........there is a ton of different paints to use. What gives the best results? That is begging for an opinionated answer at best because everyone will/might say "this brand or that brand". Its what you think works best and looks best....for you. Not for someone else.
 
Then I’ll just grab normal spray paints for what I need to do.
I got everything sanding now and I can paint. Is this a case where I do light colors all over first and then use painters tape to cover up the light spots I want to keep and then spray paint the rest a darker color? Or do I just do everything dark and added the bright color afterwards, using painters tape to cover the spots I don’t want to be brighter?
Also you guys got any recommendations for color combos? I was thinking about doing my usual halo reach look which was dark grey and red.
 
Last edited:
While I still am trying to find time to paint, I have went ahead and cut out the small details for the helmet out of foam. I’m trying to figuru out the best way to attach and paint them to the helmet. I was thinking of doing the method I would normally do with the rest of the armor and use contact cement. If you guys have a better option let me know as I’m wondering if I should attach these little details before fully paining the helmet.
 
Hey WinterHuntsman, I can't help withe the color schematic but in regards to which to paint first, I would do the lighter color and then the darker color over that. The darker color would "bleed" through a lighter color. Darker would cover over the lighter better. And yes, I would also put the detail pieces on first and then fully paint the helmet. If you put them on after and mess up a bit, and only have spray paint for the base...you have to tape over the detail piece or other parts that you don't want to spray over....its more complicated.
 
So been kinda busy and not much has happened. Before I paint the helmet I need to find that plasti dip stuff so I can coat the foam extra parts and glue them on. Also need to figure out how to coat those pieces (paint it on, dip it in, pour it on top?) and if I should prime them after they are dry before I glue them to the helmet. This and what I do for a sealer coat when the helmet is all done and painted.
I wish I could say that the helmet and chest are completely done now but I have just been to busy to get any work done.
Hopefully my next update will have some stuff finished.
 
Status
Not open for further replies.
Back
Top