Grenadier Spartan III

tahu505

Well-Known Member
Member DIN
S505
Finally getting around to documenting my first full armor build, a grenadier spartan III, my custom character from Reach. I already made the helmet and gloves a couple years ago and now I plan on 3D printing the rest of the armor.
20200515_161338.png


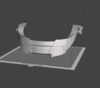
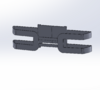
The only part i'm missing right now is the collar/breacher chest piece attachment. The rest of the armor pieces were made by MoeSizzlac
S-505_start.jpeg


Here's the helmet I made with pepakura
IMG_20170824_161247_414.jpg


and here's the gloves
20200515_155355.jpg


I'll try to keep you guys updated as I go!
 
Finished making my models for the collar/breacher chest attachment! The collar is a modified model by MoeSizzlac that I edited in Meshmixer. I designed the buckle, clip, and shotgun shells in Solidworks. I didn't want to have this attachment be one solid piece of plastic since I'm going to 3D print this. Instead I went with making separate parts that I can combine together with fabric/elastic actually running through the buckle in the middle.

CollarBreacher.jpeg


Halo The Master Chief Collection (10).png
 

Attachments

  • Collar_Mesh.PNG
    Collar_Mesh.PNG
    218.7 KB · Views: 268
  • Buckle_SW.PNG
    Buckle_SW.PNG
    139.7 KB · Views: 253
  • Clip_SW.PNG
    Clip_SW.PNG
    118.7 KB · Views: 257
  • Shell_SW.PNG
    Shell_SW.PNG
    124.7 KB · Views: 272
Quick update time!

I realized that the data pad model that I had for the arm was completely solid so there wouldn't be a way to place a screen/phone inside once I print it out, without just going ham and cutting through a bunch of PLA. So after an hour of trying different ways to import the model into Solidworks to shell it only to find out once I got it loaded in as an object that my Surface Pro 4 still couldn't really process shelling the imported model. So instead, I just ended up spending the last 4 hours recreating the part in Solidworks. In the end it turned out that I still had issues shelling it so instead I used an extruded cut and got close enough to what I wanted. I'm not sure what phone/electronics I want to put in there yet, but once I figure it out I know I can easily make space to adjust for it and add a back cover.

1590884585620.png


1590884620450.png


Now you're probably wondering "Is there and easier way you could have done this?" and the answer is "Probably". Either way, my goal was to have a hole in the data pad that I could put electronics into and I accomplished that.

P.S. If anyone does know an easier way to do this I would very much appreciate you letting me know to make things easier in the future.
 
Another quick update!!

Last night while I was playing MCC, I noticed there were green lights on the wrist data pad that I hadn't noticed before and decided that I should add in the holes for them this morning. When I loaded up the game to get references I noticed there were some inaccuracies between my model and the game model, so I went back to edit my data pad to make it more accurate to the game.

The green circle is where I noticed the lights should be added at, the red circles are features that I needed to remove, and the blue circles are the features that I completely redid to get more accurate shapes.
data_pad_V1.png

Halo The Master Chief Collection (11).png


Now I present, data pad 2.0!!!
1590967021603.png

1590967070361.png
 
Got around to shelling out the inside of the data pad plus I also made a lid to cover the back and added threaded holes for size #0 screws. At this rate I probably could have made a separate thread for this but I consider it being made for the grenadier armor. I've also had some people request the files for download, so I'm also going to be working on uploading those after I double check some things on the parts and make sure everything is solid.
1592260911737.png

1592261028089.png
 
More updates! I got the second forearm printed as well as both of the bicep pieces! I feel like I've got a good amount of arm flexibility so far that I'm pretty happy with. We'll see how much that changes once I make the chest piece. This also means I've finished printing all of the base armor for the arms and I'm going to move on to either the chest or legs.

IMG_20201208_110615_009.jpg

IMG_20201212_093431_713.jpg


Also here's all of my armor so far. I might redo the helmet at some point but if I do that will be last so I can see how the current one looks with the rest of the armor.
20201216_141059.jpg
 
so much progress I’m amazed, the forearm and bicep pieces look especially great.
the helmet looks detailed too how long did it take you to build the helmet?
So the helmet I actually started almost exactly 5 years ago, and that took 2 years of on and off work on it. I put together the pepakura pieces while in an art class in high school so I only got 45 min a day. Then by the time I got to the painting step, I was leaving for college, so I got the painting, padding, fan, and visor done as I was coming back home for breaks.
 

seeing how you aced that tac pad in solidworks makes me want to improve my skills in 3D drawing. furthest i've gotten was importing stl files into inventor and then convert them to solids.
Go for it! All it takes is putting in the effort for practicing. I learned my solidworks training through my university but I know there's plenty of tutorials and lessons for various modeling software online.
 
Go for it! All it takes is putting in the effort for practicing. I learned my solidworks training through my university but I know there's plenty of tutorials and lessons for various modeling software online.
its a ton of work, need to wrap my head around the workflow and need to bypass some errors but this is one hour of work.

started with a "tutorial". was just a sped recording of a dude making an iron man helmet. following those steps i ended up here:
Knipsel 1.PNG Knipsel 2.PNG

thanks for the encouragement, was the final kick i needed to go for it :D
 
Late update time!

I feel like not much has happened lately due to classes starting again but I still wanted to make an update since it's been a while. A while back I posted this model below in the free 3d model index, which I plan to use for this build. It's Moe's Carter chest, but I (with the help of Moe) modified it using Meshmixer, Blender, and Microsoft 3d Builder to add holes and slots for lights.
chest_front.PNG
chest_back.PNG


Also, as I'm sure a lot of you saw, there was a new Armorsmith update! So with that I did some slight modifications to the scaling of the parts I have yet to print, mainly the new chest piece. I also started color coding a bit, the orange parts are the ones that are already printed out, that way I can keep track of what I've already made.
Armorsmith3_1.PNG


I've also added the vents made by TurboCharizard on the back, using light blue to represent the part that will be printed in resin so it can light up.
Armorsmith3_2.PNG
 
This thread is more than 4 months old.

Your message may be considered spam for the following reasons:

  1. This thread hasn't been active in some time. A new post in this thread might not contribute constructively to this discussion after so long.
If you wish to reply despite these issues, check the box below before replying.
Be aware that malicious compliance may result in more severe penalties.
Back
Top