Status
Not open for further replies.
Yikes, what do your wall, infill, support density settings look like? I way overdid the thickness on my arms and it was still a fraction of that time.
I get Moe's Carter forearm to about 23 hours with either opening on the print bed. 2 walls that are .5mm thick, .2mm layer height, 8%infill (could go to 15% but I doubt anything higher is worth the extra time) supports set to cover 65° overhangs, support density at 1% and only 1 support wall thickness. Print speed is 50mm/s not that changing the speed makes too much of a difference.
 
Last edited:
Now if I was a forward thinking person, I would have used my 1/4inch drill bit to widen the holes for the screws BEFORE getting them stuck. They now thread into the superglued nuts and fall out when unscrewed! Crisis averted
 
Last edited:
20211113_014459.jpg
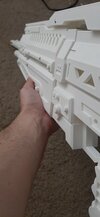
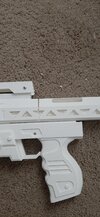
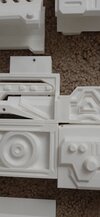
Hard to notice when it's assembled but the front of the handle print warped a little. Now I'm not sure if this Is causing aliment issues as there are 4 openings for screws to connect the under barrel to the handle and I can only get the top OR bottom set to line up. Not an issue really as a touch of super glue and the internals that hold the upper barrel to the handle should lock everything in place.
And look how clean this is! Haven't even sanded yet.
20211113_014526.jpg
 
" One of these days you're going to print something as stubborn as you are."

20211113_235227.jpg

Well that's odd. With the internal details in their places the exterior covers don't sit flush when screwed in. I can see two options, I sand the insides down an extra few mm which would make the outside line up or I just don't screw the top plate in and hope that glue keeps everything together. I won't mess with it yet as I'm curious to see how the stock is going to line up with everything.
 
" One of these days you're going to print something as stubborn as you are."

View attachment 311698

Well that's odd. With the internal details in their places the exterior covers don't sit flush when screwed in. I can see two options, I sand the insides down an extra few mm which would make the outside line up or I just don't screw the top plate in and hope that glue keeps everything together. I won't mess with it yet as I'm curious to see how the stock is going to line up with everything.
Glad I didnt print it first.
 
Had my second problem with the printer the other day. Whenever the hot end would move on a diagonal the left Y axis roller would vibrate really loud. Wasnt causing any print quality issues that I could see but I adjusted the offset nuts on the guide wheels so hopefully everything is snug again.
 
Had my second problem with the printer the other day. Whenever the hot end would move on a diagonal the left Y axis roller would vibrate really loud. Wasnt causing any print quality issues that I could see but I adjusted the offset nuts on the guide wheels so hopefully everything is snug again.
Okay.... problem not solved... I get back to that later
 
Okay.... problem not solved... I get back to that later
Don't know if you clean your printer regularly but cleaning your guide rods, rollers, belts might help with reducing the chance of sudden vibrations. I had an older printer that needed the guide rods cleaned regularly or else it would squeak and vibrate really bad, stopped me from printing for a long time.
 
Don't know if you clean your printer regularly but cleaning your guide rods, rollers, belts might help with reducing the chance of sudden vibrations. I had an older printer that needed the guide rods cleaned regularly or else it would squeak and vibrate really bad, stopped me from printing for a long time.
I think its long overdue for a deep clean. I'll give it some much needed attention soon.
 
Sorry to go a little off the rails here but I just saw something while in Infinites multiplayer that made me very happy!
While this is not a spoiler in the sense of story, it is something Incredible that some may wish to witness first hand.

Started my first BTB game on the map Highpower which turns out to be a total control game. Cool.
About 3/4ths the way through I get blown out of a wasp and as the death cam pans up I see a beautiful UNSC frigate on station over the map.
Respawn and the first thing I look for is the frigate but thats not the first thing I see. There, across a valley is a CAS assault carrier. My jaw is dangling at this point, I find the frigate over my right shoulder.
A hint of blue from the frigates bow builds into a bright glare and I can see what is about to happen. Its MAC fires and I follow the streak of light to the CAS and see its shields ripple from the impact.


I was in awe the whole time, unintelligible sounds being made as I watched this unfold.
GG 343
GG

Halo ship lovers rejoice!
 
I heard that adding a small concrete block underneath the printer may solve this issue.
For some time I've had the printer on a relatively sturdy desk that's braced against the wall, another desk, and a tall drawer. I also leave two weights on the front and side of the printer to fight any shakes and this was all working very well up until now. The top left carriage that moves down the y axis is where the noise comes from and when I hold this the sound stops. I cleaned the rails, re adjusted the wheels and tightened almost every screw I could find on the printers frame. Need to try running a cold print with no filament extrusion to see if it's still going on. There is a flat spot I can feel when I move the hot end around so maybe new guide wheels are needed? It's not even causing print issues it's just so annoying.
 
If you listen when the hot end moves down and right you can hear what's left of the noise I've been figuring out. It's not nearly as aggressive as it was but it's definitely still there. Maybe I'm just nuts but I don't think it was ever that loud. The ender 5 is certainly not quite, I just can't tell if that's normal.
 
New axis wheels and some stepper motor gaskets inbound. Still can't tell if the noise is gone but I need new wheels anyway and hopefully the gaskets reduce any vibrations that the motors are causing.

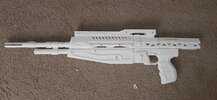
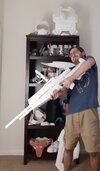
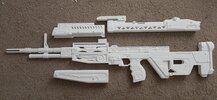
Emp Frosty All that's left for the DMR is a magazine (or a few), the trigger, hand guard and bolt handle! Total length is at 111.5cm, mass is around 1.2kg.
20211118_020312.jpg
Everything ended up going together nicely in the end! The bolt and cheek rest area line up with the holes on the internat bits now but I didn't end up screwing them down in every spot. Only real problem spot is the front of the handle with only 1 set of screws lining up.
20211118_020350.jpg
Again, this is probably from the warping I had but even with just the top set it's super sturdy! The build called for 50 m3X10mm screws with matching nuts but I only used 31. Definitely would want to use hardware on this as I don't thing just glue and pegs would cut it after putting it together. And use supports blockers in the openings for the screws and nuts like the thingiverse page says! You do not want to spend the time I did scraping out stuck support.
20211118_015949.jpg

This whole thing is already overdone so I'm going to see if I can get some sort of magnetic mount for different sights put in. This was really interesting to put together and pretty easy to print too. Very little support usage depending on how parts get orriented. Best of luck to y'all printing a stanchion!
 
Wow

How much better is that! The board fan is deafening compared to the x and y axis motors now. I'm surprised these arent installed at the factory, only $12 for 4 dampeners and 4 stepper heat sinks. I'm curious to see if there are any quality issues with these installed but I'd think less noise = less vibrations which means more stable printing!
 
Printing TPU successfully after 4 hours of trial and a whole lot of error. The solution was switching over to the TPU material option in CURA. I wish I'd done that when I started!

While I fix up a few things with this new filament and print one of those squishy octopuses, I'm left to wonder how awful it would be to print parts of the undersuit and attach them to a foam or fabric base.
 
Status
Not open for further replies.
Back
Top