Iron Man Mark 50 custom version

Status
Not open for further replies.
Here's a question that just popped in my head with the recent update. Have you ever heard of heat sealing the foam? After looking at the image, I saw some dark patches under neath the red paint. Anyway, heat sealing the foam actually closes up the microscopic indents left behind when the foam was being made. All you need is one heat gun to close up the pores and then cover it with the Flexpaint before you paint over it. It could minimize the black patches on the costume.
 
It was heat sealed yea, then sanded, resealed, painted with a silver base coat to lighten the red too.

I think its from the brush, the red has 5 coats now. Thats why I wanted to try air brushing. The larger the flat area the more aparent it is. On the plus side its only visible in direct daylight. Ill try airbrushing in the future. Technically this is still my forst cosplay project so still learning.
Wait, you sanded the foam after you heat sealed it? Why?
 
Update.

Im glad I bought spare electrics because in true tony stark style, my first repulser went boom when i turned on!

However! I persevered, insulated them and ran the power suply out of the glove! Thats the glove at full power in a light room. You can go for a walk in the pitch black using that as a torch its that bright! So in public might have to dial it down to 25%

The power pack will have a housing inside the forarm, i was going to have it in the handplate bit it was too thick, even as AAA batteries.

Thats all the electrics in now, since i didnt have time to build a prototype of light up eyes you could see through!

Now its just got the knees and thighs left to modify and paint, time is closing in!
 

Attachments

  • 20191027_170740.jpg
    20191027_170740.jpg
    1 MB · Views: 173
SMDs, 4 of them in parallel running off 3 AAA batteries. The board allows 4 settings for brightness, 10%, 25% 50% 100%

Id love a diffuser cover to disperse the light a little more but future upgrades!
 
This was my first venture as well.

Most tutorials i saw involved normal LEDs, but they are quite large and the main spec of this suit was it had to be a tight exosuit. I didnt want empty space inside the armour.

An SMD is about 1-2mm thick.
The board its miunted on is 1mm thick.
In my case i have other stuff on the board, the tallest is about 4mm high, the soulder on the under side is 2mm ball. So the entire electrical plate is 6mm thick and solid.

I encased is in EVA foam so its safe, but that adds about 6mm to the thickness. The advantage tho is my palm is pressed against the inside of the glove so there is no bounce.

I technically cheated on these, i ordered some cheap under counter lights of Amazon, canabalised them for the SMD board and battery case, then separated the power pack from the board so i didnt need the batteries inside the glove as that would be hell to get at. I encased the now long wire connectors in plastic tubing for protection and encased the lights and battery pack in foam, painted it and glued the lights inside the glove, leaving the battery pack hanging out for hiding in the arm.

Ive deliberatly not painted the forarm yet as i didnt know how it would attach to the hand, but with the electronics in i can visualise it now.

Im going to use 2mm foam to make a wrist that will attach to the glove and go 6 inches up the arm, that will slide inside the forarm as i left the end large enough to squeeze my hand through to avoid a join. Inside the forarm, either on the wrist of the interiour forarm, ill secure the power pack with velcro so it wont move but can be seperated easily. The 2mm wrist will smoothly rotate freely inside the forarm to hide the joint and the cable wont end up getting caught!

I still need to attach the fingers for the left hand and make the right hand ones but thats easy conpaired to getting the hand to actually work! Party is on saturday so gonna be a busy week
 
Oh they are, so you can make your own. Im looking at using them for eyes, by making a housing for them so only one direction is exposed, in theory i can line the outside of the eye piece in them and because they are behind foam looking outwards they shouldn't blind me.

They are quite fiddly little things but basically you just need SMDs a resistor and a power supply, plus the wires and something to mount the SMD to.

For the hands and chest it made more sense to repurpose a prebuilt one
I don't know how much room you have in that helmet, but a few years ago I saw a mask that the party store was selling that had some LEDs shining straight down the forehead, and right where the eyes would be behind the mask were thin squares of plastic that were chromed on one side reflecting the light out through the eye sockets, but you could see through the clear plastic and no light was shone into your eyes. I don't know if it would work better than your way, or if it would work at all, but it is worth the mention.
 
If i find one ill canabalise it to test! Sounds interesting

The helmet is aboit 5mm larger then my head all round. So it sits flush around my skull without looking like a churchill bobble head. I had to rebuild the helmet too tho from the one i originally did, i was trying the eyes out and it rolled on a plastic table cloth and ripped a huge chunk of flexipaint off. I tried repairing it for an hour with no luck. But it only too about 45m to rebuild it! As i made the template myself i can easily alter it to elongated the skull 1cm or so without it looking like an alien or making it massive!

Perks of working on the templates for a year, i dont even need pepakura viewer to assemble them amd more haha
 
A word of warning to this tale, dont have a glass of wine when working on fiddly bits! I totally ruined my gloves left hand fingers while putting them on, and the rubber glove tore a little when removing them!

The tear is small so shouldnt compromise it but its irritating. As is having to rebuild 15 finger sections!

With all the guides and tutorials on cosplay there is a real lack of detail when it comes to assembling! Both joints and moving parts!

Ive glued my new fingers together and should get the seals filled soon so they can dry overnight ready for sanding and painting tomorrow, but its a few hours of extra work that really wasnt needed!

Ive got till saturday lunchtime to get it finished, 3.5 days remaining!
 
Update:

Was up till midnight last night doing seams and base coats and it was worth it!
+The thighs are built, painted and sealed.
+The boots are painted and sealed.
+The knees are in place with their base coat
+ all fingers are built, 2 silver base coats and 1st red coat

I massivly underestimated how far flexipaint goes, 1 bottle of red was plenty... i bought 3! Least ill have spares for improving coverage when i invest in an air gun.

Id submit an image but the suit is all round my house hiding from pets and children.

Remaining work:

+Finish painting the knees and seal them
+2nd coat on fingers, seal them and assemble them on hands.
+work out where the battery pack is gonna hide!
+paint and seal handplate.
+play with knee joint, either attach it to the shin using strapping or a hinge
+sort out strapping to hold thigh into cod piece securely
Line all movong joints with loop velcro for a squeekless movement, its very squeeeky currently!

Looks like a lot but most of it is little bits. The hands are the biggest as assembling them is something ive not worked out yet... but sealing the fingers will mean i cant wreck them!
 
Does anyone have any tips for fingers, im aware of the pun too!

My 3d image is so out of proportion for finger length but im not sure if maybe i should pad the ends out to maintain proportion
 
Update:

Up till now i always planned on the gloves being built round a glove, and while good in theory it wasnt in practice as you cant get inside it.

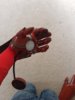
After staring and rotating them for a few hours i had an epiphany. The fingers need to be able to close and then reopen, returning to a baseline position, or in other words, the joins stretch out. Enter elastic! Previously I glued the fingers onto a rubber glove, but when i bent the fingers it went pear shaped. This time the fingers are totally independant.

Each finger is split into 3 parts, each part lines up with the next all the way to the finger. Along the top of each finger, the part that will open, is a strip of 1 inch wide elastic, going from the tip to about 1 inch past the base of the finger. The center of each finger has a blob of glue, only enough to stick a 1cm circle of the elastic to the foam. This gives lots of elastic to stretch, but doesnt put pressure on the glue joint. A big blob of glue is placed on that excess at the base and thats glued inside the hand. The result is flexable fingers that sit open when not in use but that can close! The handplate is also secured with elastic to allow movement, but is seperate from the forarm so it can rotate.

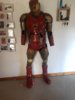
All thats left is a once over to check things work and then a test fit with the undersuit!

On the one hand im so glad i made it to the end as after a year it was getting bleak, but looking at a complete built, and seeing all the things ive learnt from the trial and (many) errors in fabricating it, im sure it was worth it. After all, whats more conplicated to built then a full body exosuit!
 

Attachments

  • 20191101_133646.jpg
    20191101_133646.jpg
    1.3 MB · Views: 174
  • 20191101_133702.jpg
    20191101_133702.jpg
    1.7 MB · Views: 170
Last edited:
Status
Not open for further replies.
Back
Top