you don't have to remake it, just switch them around.
With Kat she only uses one bicep because of her robo arm, and that would be the left one. So there is no way for me to turn it around

you don't have to remake it, just switch them around.
This is important. Even god rested. LOLZI had a long day just relaxed once I got home. I fell asleep!
Are you kidding me !!
I just looked back at the file and the maker of the folder I used named the right bicep as the left and the right as the left... Not a happy camper at the moment, but I'll get over it. I'm going to remake that bicep later, because I want to get the cod and shins started!
I will post an update later!
With Kat she only uses one bicep because of her robo arm, and that would be the left one. So there is no way for me to turn it around
This is important. Even god rested. LOLZ
wow, sorry about that but yah, when i got the file i printed out the left because i thought that it was he right so now i just use it for the left but yah that sucks because Kat does only have one bicep and the bicep is a real pain to make and that is why i haven't made a second one yet because it took me over 3 months to make it, sorry about that
just found out something about your shoulder, just use it for here left shoulder you don't have to make a new one!
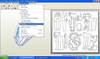
You can flip the pattern by using Pepakura Designer. Then, just print it from Designer because if it's a trial version, it can't be saved. You may have to re-arrange some of the parts to fit the printing area after flipping but it shouldn't be a problem. This will result in a right-arm bicep after assembly. This should solve your dilemma...I think.

dnt make kat... make ur own spartenWith Kat she only uses one bicep because of her robo arm, and that would be the left one. So there is no way for me to turn it around
haha)dnt make kat... make ur own sparten
Im not 100% sure what you were getting at here but if It was something about me using your Chest, then I would love to but I actually am on a deadline which is April! and I'm hoping to get everything ( Or almost everything ) Peped over Christmas break! but thanks for the offer!Ah, yet another Kat. I have PLANS for making Kat as well, although, still have yet to even do anything. I actually DID have some stuff pepped, but I threw most of it away.................I'm gonna foam build now! haha The weather here sucks for the resin stuff, plus I hate working with that stuff.
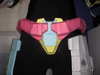
Not exactly sure if you are working against a deadline, but I am currently reworking Kat's chestplate that was modeled by my friend, TheDigitalFix. He has a thread with his models that are dedicated to the female armor from Reach. Since I have a tendency to scrutinize every bit of detail, I noticed some detail on the chestplate that was overlooked and have added it. It's really hard to notice on some of the pictures taken of the back, but I did the smart thing.............I went into forge, ran around, did some test poses, blew myself up with a rocket launcher a couple times then went into theater mode, got as close as I could and zoomed in and checked out EVERY little thing. That was when I noticed something with the little vents on the back of the chestplate. I'm hoping to have the chestplate done soon because I want to get started on my foam build! XD
I actually plan on editing quite a few of the models for Kat, however, I won't release them to the public unless the original creator says that it's okay. Of course, I will credit the person that made the model in the first place, but I don't want to post it and have them not be too happy. TheDigitalFix won't really mind. I've known him for too long.
___________________________________________________________________________________________

wow nice pep work there
(btw good thing with the manaquin might get me one 2 for just this reason haha
also having the dummy is awesome! and "He"/"She" Looks awesome in your room lolWell, I figured that you would want to go with the female version of the chestplate since it is different than the one used for the males and the model was designed off Kat's chestplate to begin with.Im not 100% sure what you were getting at here but if It was something about me using your Chest, then I would love to but I actually am on a deadline which is April! and I'm hoping to get everything ( Or almost everything ) Peped over Christmas break! but thanks for the offer!
I'm so bad at scaling and I know that I will mess it up and have to do it all over again. Does anyone have ANY tips at all on how I should scale my chest and Helm.I really like your pep work and can't wait to see more progress. I hope you make your deadline in april. Keep up the good job!
I know this has been stated before by HaloGoddess about TheDigitalFix's work, but you may find that this file would suit better as your bicep piece...
http://www.4shared.com/file/F0s4PHSt/KatBicep_SmoothUnfold_Edited_b.html
Lastly.... Guys I'm scared to death to make the helmet and chest I'm so bad at scaling and I know that I will mess it up and have to do it all over again. Does anyone have ANY tips at all on how I should scale my chest and Helm.
Well the chest is really easy. Try using Lex's new file or one that has the inner part of the chest in it. then just measure from shoulder to shoulder. That will get you a good chest. As per the helmet measuer from the base of your chin to the top or your head and add about an inch for padding and what not. I dont know female proportions that well but for guys, 265-300mm in the norm.
My guess would be anything from 240-260mm. 241 is 9.5 inches. Hope this helps.
I would recommend using the shoulder measurements as mentioned above. There is a lot of room in the chest pieces of all the armour associated with Halo. I guess the heroic proportions of the characters include a big chest
If for some reason the shoulder measurements work for you but there is not enough room in the chest piece, remember that during construction you will seperate the chest into a 'front' and 'back'. Then you need merely clip them together to wear it. If you necessary, you could build extensions in the area where you would clip it together to move the front out more.