Noble Spartan(mod's/add-on's begin)

Status
Not open for further replies.
I'm starting to see the term "wet sand" more and more So I want to clear clear up something with my build.

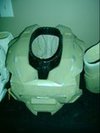
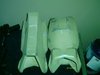
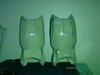
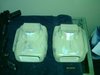
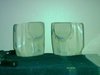
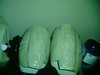
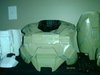
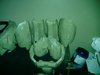
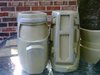
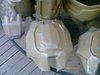
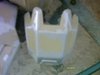
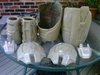
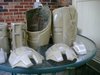
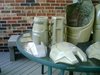
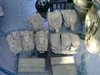
(1.) I started with sanding the plastic (smoothcast 321.) Then I primer coated the part. I then sanded that with 100 grit sand paper, and primer coated it again.

(2.) After that I used a protective enamel to seal the primer coat and sanded that with a 400 grit sand paper.

(3.) Then added the card stock parts and sealed it again. Now that I had 4 coats of paint on the part I needed to "wet sand" the part with 600 grit sand paper to get rid of the orange peel and/or runs, and to smooth the part out.

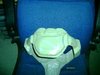
(4.) Next will be the brushed metallic silver only sanding any runs. I will then add my mask/p. jelly over spots on the metallic silver for the bare metal effect.

(5.) After that will be the Flat cameo color, and if needed to remove runs and/or to remove anything that gets into the paint I will sand that with a 100 grit sand paper before 2nd coat.

(6.) Then I will use a rag to remove any p. jelly revealing the Brushed metallic silver.

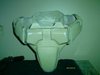
(7.) From there I will sponge paint high lights and black wash the whole part and add fine details with fine point brush.

(8.) Finely I will clear coat it with a flat clear coat. As you can see I will be using allot of paint so sanding each part on each step of it will make a big difference in keeping each coat thin and free from runs and/or to remove anything that gets into paint being I'm painting this outside.

I hope this clears up the confusion on Why,What,Were and/or When I'm "Wet sanding"

And finely this weekend. It will not be doing much because I'm still really sore and/or tired from the last 2 weeks of work so I will be posting next week.

Try this for painting. He explains it better than I could.
marshon Tutorials are some of the best
Tutorial-Painting-systems-for-realistic-results
http://www.405th.com/showthread.php/33236-Tutorial-Painting-systems-for-realistic-results
 
Last edited by a moderator:
Thanks Thorn,
I was going to suggest clarifying process but you beat me too it. :) Some may think your process it long but from experience I know it will pay off big time. I'm looking forward to seeing the results.
 
I have a nice update for you this week.
1.) I rondo'd the Chest and Cod.
2.) Worked the Biceps
2.a) Wrapped the Biceps in paper to hid the oily problem.
2.b) used spot putty to smooth them out a little.
2.c) Sanded it down
2.d) Primed
2.e) Sealed
2.f) Added small details

3.)And with all this talk about painting. I did up a few parts.
3.a)Sprayed Battered Metal paint on a few parts.
3.b)Then hit them with P jelly for the chipped paint look.
3.c)I then put on the camo paint, and let it sit over night.
3.d)This morning I rubbed off all the P Jelly

So here are you're pic's of the base paint so far. ( I only got so far till I ran out on paint, so I still have 4 parts that are ready for this stage to do yet. Plus the 2 forearms. )

th_IMAG0457.jpgth_IMAG0455.jpgth_IMAG0454.jpgth_IMAG0452.jpgth_IMAG0451.jpgth_IMAG0450.jpgth_IMAG0449.jpgth_IMAG0446.jpgth_IMAG0447.jpgth_IMAG0458.jpgth_IMAG0460.jpgth_IMAG0444.jpg

Next week I'll be working on the Forearms. I still have allot of work to do on them. It will probably be 2 weeks till next update, But I will try to get something up sooner if possible.
 

Attachments

  • th_IMAG0457.jpg
    th_IMAG0457.jpg
    4.8 KB · Views: 175
  • th_IMAG0455.jpg
    th_IMAG0455.jpg
    4.2 KB · Views: 153
  • th_IMAG0454.jpg
    th_IMAG0454.jpg
    3.7 KB · Views: 188
  • th_IMAG0452.jpg
    th_IMAG0452.jpg
    4.9 KB · Views: 170
  • th_IMAG0451.jpg
    th_IMAG0451.jpg
    3.6 KB · Views: 162
  • th_IMAG0458.jpg
    th_IMAG0458.jpg
    5.1 KB · Views: 173
  • th_IMAG0447.jpg
    th_IMAG0447.jpg
    3.8 KB · Views: 184
  • th_IMAG0446.jpg
    th_IMAG0446.jpg
    4 KB · Views: 201
  • th_IMAG0449.jpg
    th_IMAG0449.jpg
    3.9 KB · Views: 183
  • th_IMAG0450.jpg
    th_IMAG0450.jpg
    4 KB · Views: 183
  • th_IMAG0444.jpg
    th_IMAG0444.jpg
    4.8 KB · Views: 175
  • th_IMAG0460.jpg
    th_IMAG0460.jpg
    4.5 KB · Views: 168
Looking good Thorn, excellent job on the paint job so far. Glad to see continued progress on this build, as I'm very much looking forward to seeing it finished. Keep up the great work!
 
The paint looks really cool. I just looked through the rest of your build and wow your peps are so awesomely detailed and clean, I'm literally in awe.
 
Looking good Thorn, excellent job on the paint job so far. Glad to see continued progress on this build, as I'm very much looking forward to seeing it finished. Keep up the great work!

You and me booth I can almost see the light at the end of the tunnel, And thanks for the comment.

Looks awesome Thorn! Nice to see it all coming together.

Thanks, I'm hoping to get to finish paint soon. But I still have to do the strapping first, so that the finish paint will cover all the Chicago screws and such. And thank you also for the support.


The paint looks really cool. I just looked through the rest of your build and wow your peps are so awesomely detailed and clean, I'm literally in awe.

Thank you. I checked in on you're build also. You're off to a great start.


looking damned good so far! keep it up!

Thank you,I've been following you foam work for a bit now. So I can say the same to you.

And thank you to everyone whom has been watching this build on its long journey. I'm getting there just a few more months.
 
Time for the weekly update.
1.) I rondo'd the Forearms and shoulders
2.) Worked the Thighs some more
2.a) Hit the thighs with two coats of Bondo Glass
2.b.) cut off top inner thigh ring and fitted it with foam for more Mobility.

I'm now in love with Bondo Glass. It's the best medium that I have worked with some far and I would highly recommend it for by its self and as a rondo. Thanks to Starvinartist80 and his build http://www.405th.com/showthread.php/32617-WHS-Red-vs.-Blue-build-(Very-Pic-Heavy) for getting me onto this.

3.)And with all this talk about painting. I did up a few parts.
3.a)Sprayed Battered Metal paint on a few parts.
3.b)Then hit them with P jelly for the chipped paint look.
3.c)I then put on the camo paint, and let it sit over night.
3.d)This morning I rubbed off all the P Jelly

4.) Added some pouches to the mix.
4.a) 3 frag pouches
4.b) 3 40mm pouches
4.c.) 1 3x pistol mag. pouch
4.d.) 1 cleaning kit pouch
4.e.) 1 accessory pouch.

So here are you're pic's of the base paint so far.

th_IMAG0525.jpgth_IMAG0520.jpgth_IMAG0521.jpgth_IMAG0522.jpgth_IMAG0519.jpgth_IMAG0518.jpgth_IMAG0524.jpgth_IMAG0467.jpg

Next week I'll start to pep the helmet. mark V(b).

And as always, Please feel free to leave any and all input, comments, criticisms, or suggestions. For they are most welcomed and appreciated. (they also keep me from triple posting) :D Thanks for watching my build.
 

Attachments

  • th_IMAG0525.jpg
    th_IMAG0525.jpg
    5.8 KB · Views: 175
  • th_IMAG0520.jpg
    th_IMAG0520.jpg
    5.7 KB · Views: 170
  • th_IMAG0521.jpg
    th_IMAG0521.jpg
    4.1 KB · Views: 157
  • th_IMAG0522.jpg
    th_IMAG0522.jpg
    6.6 KB · Views: 154
  • th_IMAG0519.jpg
    th_IMAG0519.jpg
    6.3 KB · Views: 164
  • th_IMAG0518.jpg
    th_IMAG0518.jpg
    7.1 KB · Views: 157
  • th_IMAG0524.jpg
    th_IMAG0524.jpg
    6.3 KB · Views: 186
  • th_IMAG0467.jpg
    th_IMAG0467.jpg
    4.3 KB · Views: 163
dude this is amazing!!

do you have the pep link for your knee pieces? its the fj/para ones if im not mistaken. ive been looking for them and i havnt had any luck yet.

thanks :)
 
dude this is amazing!!

do you have the pep link for your knee pieces? its the fj/para ones if im not mistaken. ive been looking for them and i havnt had any luck yet.

thanks :)

ForgedReclaimer's pieces i believe. here ya go
http://www.405th.com/showthread.php/31200-quot-Halo4-quot-ForgedReclaimer-s-Pepakura-Database

Lookin good Thorn! Are you using foam to make the raised details? can't remember. I've been using styrene and a heat gun, and its a B***h!!
 
dude this is amazing!!

do you have the pep link for your knee pieces? its the fj/para ones if im not mistaken. ive been looking for them and i havnt had any luck yet.

thanks :)


Page 4 for all links. But here you go just to give Ruze some more credit for his fantastic modeling/pep
Spartan FJ/PARA Knee
Model: Ruze789
unfold: Ruze789
http://www.filefront.com/17207229/Ru...each-Knee.pdo/

And thank you.


Lookin good Thorn! Are you using foam to make the raised details? can't remember. I've been using styrene and a heat gun, and its a B***h!!

Foam is too soft for me. I use true 110lb card stock. 2-4 pieces glued together and sanded around the edges. Then I glue them onto the part and seal them with paint. Remember paper on a hard surface is hard, its wood pulp. Paper also becomes very durable when painted with a few coats enamel, it absorbs it like....well paper. The only thing is to glue one piece at a time when doing curved surfaces so that it won't bind. I forgot that on my shines but I did it up as damage. Oh and lite sand between coats to get rid of the little fuzzy's. I hope this helps

Thanks for the comment. :cool
 
Looking extremely excellent! Not sure how I've been missing this build since you started, but this reply should keep it in my watch list :) Gonna have to take a few hours to completely read through this and see what you're doing, because this is some lovely work and, from what little I've been able to skim, your technique looks very interesting! Keep it up!
 
Looking extremely excellent! Not sure how I've been missing this build since you started, but this reply should keep it in my watch list :) Gonna have to take a few hours to completely read through this and see what you're doing, because this is some lovely work and, from what little I've been able to skim, your technique looks very interesting! Keep it up!

Thanks, I'm working on getting everything to the same stage right now. So Hopefully I will heave the helm and boots done by Sep.


Hey dude you're making a fantastic job! Your bondo step is perfect; I love it.
I hope mine will be as great as yours :)

Thanks, I'm sure you're build will get there it just takes time. I'm hoping to see you make you're deadline but if you miss it just keep moving along.

I can tell you mine WILL be ready for Oct. But I will also say that after that deadline I will probably be adding things and/or making things better. So it will probably take a few more years to have every last part looking just so. Weapons, Lights, fans, Under suit. Oh yea, it takes time :cool
Just gotta work on it a little at a time, And keep working on it.
 
Starting pep on Mark V(B) helmet today will post pic's in this spot later this weekend, going to try to knock this out this weekend. I'm already starting to remember how long pep takes and can't wait to get all the work done so I don't have to do any more. Ya, I'm even start to have a very strong dislike for pep. Till then have fun it the sun.


EDIT: Well it looks like it's going to take me a little longer than I though. I'm going to have to print up a bigger pep. This one fits spot on as of right now witch doesn't leave any room for padding and lights. All well back to the drawing board.
 
That is some amazing work.

Thank you LCBeagle, It's allot of work but in the end it's all well worth

Ok Quick question. How do you change the font size (the numbers) in viewer? I can barely read these on this helmet file. Thanks in advance.
 
Quick question. How do you change the font size (the numbers) in viewer? I can barely read these on this helmet file. Thanks in advance.

Hey thorn696! With the Viewer (Designer might be slightly different) you can find the modifier for the edge ID font size in the settings window (follow below).

(Setting) > (Other Settings) > (General Settings) tab

I actually have a quick question for you if you have a moment. I recently picked up some smoothcast toward my attempt at molding/casting but was brainstorming the use of the plastic to harden pepakura pieces. Once the sloshed plastic is cured on the inside of a paper piece would you be able to remove the paper from the plastic (if not, maybe a sealant layer between the paper and plastic might help to release the two). My intent is to get rid of the paper before shaping the piece. With your familiarity with the material (evidenced by this great build of yours) I would appreciate your opinion.

All is looking well with your build. I feel the helmet is really going to cap off the armor (pun). Godspeed.
 
Status
Not open for further replies.
Back
Top