OpticChief
New Member
Hey everyone!
This is my first Halo build, and I wanted to start a thread to show my progress and also gather some advice before I move into the next stages.
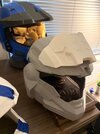
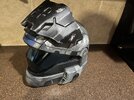
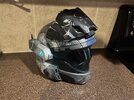
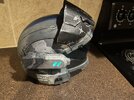
Here’s my current WIP (my two printed shells + top plate):

(No Sanding has been done. This is the raw print from my P2S Bambu Lab.)
I’m getting ready to glue the helmet together, start sanding, filler priming, and all the painting steps, so I figured this would be a good time to ask the community for wisdom before I accidentally learn the hard way. Trying to avoid COSTLY FAILURES.
If there’s anything you ran into on your first build that you’d warn a newcomer about, I’m all ears. I’ll keep updating this thread with progress pics as I go.
Thank you so much for your attention and participation.
This is my first Halo build, and I wanted to start a thread to show my progress and also gather some advice before I move into the next stages.
Here’s my current WIP (my two printed shells + top plate):
(No Sanding has been done. This is the raw print from my P2S Bambu Lab.)
I’m getting ready to glue the helmet together, start sanding, filler priming, and all the painting steps, so I figured this would be a good time to ask the community for wisdom before I accidentally learn the hard way. Trying to avoid COSTLY FAILURES.
Looking for Advice From the Vets
1. Assembly / Gluing
- Any common mistakes do first-timers make when joining big helmet pieces?
- Best internal reinforcement: epoxy, fiberglass, JB Weld, something else?
2. Sanding
- Grit progression that works best for PLA?
- Do spots people forget to sand until it’s too late?
3. Priming & Painting
- Favorite filler primer for Reach helmets?
- Tips for clean panel lines or masking?
- Anything you wish someone had told you before painting your first piece?
4. Visor Tips
- Best Noble Six/Commando visor approach for beginners?
-Film-based tinting or liquid-based tinting? - Mirror-tint tricks or vacuum-forming advice?
(I own a DT2 Vaquform machine)
Open to Any Rookie-Saving Tips
If there’s anything you ran into on your first build that you’d warn a newcomer about, I’m all ears. I’ll keep updating this thread with progress pics as I go.
Thank you so much for your attention and participation.