- Member DIN
- S505
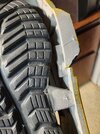
A lot got done today. Starting with the boots. I got slip on Aisics and put shoe goo on them, pressing them against the back of the back foam piece. This is when I noticed shoe goo's cure time is 24-72hrs. So instead I used high temp hot glue to get things in place. I also added scraps of foam to the sides for support.
I then added these tabs (also made of scrap) a bit higher up on the boots as an anchor point to attach the front. I started high because these would be hard to reach spots with the front on.

With the front of the boots on, I added more scrap tabs near the bottom.

Then I wedged a large scrap piece of foam in the front (covered in hot glue).

After that came the boot cover plates.

Then to finish it off, I reinforced everything with shoe goo and let them hang by the little tags at the back of the actual shoes. I didn't want them sitting on the table incase they got shoe gooed to the table.

On to weathering...
I finished up the black acrylic today, which will easily be the longest part of my weathering process. I feel like I've kept uo well with the explosion from behind theme and I think it all looks good together so far.


Selfie time


I then added these tabs (also made of scrap) a bit higher up on the boots as an anchor point to attach the front. I started high because these would be hard to reach spots with the front on.
With the front of the boots on, I added more scrap tabs near the bottom.
Then I wedged a large scrap piece of foam in the front (covered in hot glue).
After that came the boot cover plates.
Then to finish it off, I reinforced everything with shoe goo and let them hang by the little tags at the back of the actual shoes. I didn't want them sitting on the table incase they got shoe gooed to the table.
On to weathering...
I finished up the black acrylic today, which will easily be the longest part of my weathering process. I feel like I've kept uo well with the explosion from behind theme and I think it all looks good together so far.
Selfie time