OJ102
Member
Hey there,
I thought id share a progression story of my first build. A mark 50 Iron Man suit. Its a thin shell design with a LOT of surface details to fight with.
A year ago i started working with pepakura as a hobby after an opperation and for 9 months successfully failed to produce a single suit as i never felt it was good after glueing to progress.
I went through the cardstock-fiberglass approach to find it was too ridgid and heavy. So i looked into EVA foam, initially 45gsm but found that while it was easy to work with it wasnt tough enough. So i upped the density to 65 gsm. 5mm thickness.
Getting a scale was tough as it not only has to fit snugly, you have to get inside it! Certain parts need minimun clearances, like the cod piece needs to fit past your hips, the abs need to fit the cod intersection smoothly etc. Another aspect with scaling was realising your not naked under the armour! you need to take into account clothes. Not just for size but also temperature and ventilating your self. EVA foam doesnt breathe, you do!
I chose to plan to wear a unitard style full body suit with a zip back.
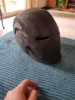
Initially i was always building helmets, but the front was always so close to my face i found it hard to breathe. But if I made it bigger my head rattled round inside it... i found the answer when hanging up my kids cycling helmets. Sponge pads. Attacking them to certain points within the armour maintained the correct spacing from your body to the armour, allowing air to move and more importantly for you to breathe. I decided to leave the helmet quest however and focus on the torso as it needed tighter margins for fitting and not being huge.
I cut out the components for the chest and the back seperatly and assembled them according to the 3D design, but it was tacky. Some aspects of a 3D image cant be copied into EVA foam as they are too small. I also found that seams were all over the place and i couldnt fix them. I found the answer to this to be simplicity itself. Its your design, if it looks like it wont work on paper, change it.
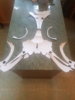
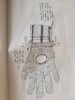
So i printed my templates out on card and assembled them flat to see what parts could be combined.
If 2 parts meet flush for a curve, i joined the templates and cut them out as a single part. This removed a seam and a weakness.
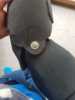
If 2 parts meet and form a step or ledge, extend the lower one out 2cm, making sure to trace the shape for alignment, then you glue the flap to the underside for a stronger bond and neater seam.
On some occasions i found a flush seam couldnt be avoided or combined and in those cases lined up the edges while on a worktop and then place a piece of foam on the inside of the component covering the seam, this reduced stress on the bond.
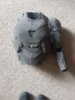
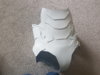
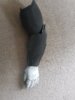
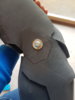
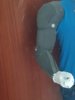
I used this style to make the Cod piece. The part just tof over my hips so met the minimum size. It was spacious on the tummy so sponge strips will maintain positioning. I then made the Abs to the same scale so they fit but found the gap between the 2 components unbearable. I noticed however that the 2 parts sync up perfectly on paper so tried joining them, not easy on completed parts but i got there, reinforced the joins and used a LOT of filler to smooth the joints. I could have combined the parts before assemble if i had the thought to but live and learn.
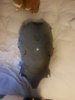
Once sprayed with plastidip it looked far better. And more importantly went on easily without the nasty joint. An important note is to think about where you keed to bend. You dont actually bend your torso until above your tummy so these parta could work.
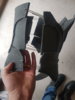
I thought the next logical step was the upper torso. A chest and back part. From previous experience i know the seam between them would be under a lot of stress when moving, i also knew combining them post assembly would be hard and messy so this time i cut the templates for both together and flat assembled them, within each component i joined what i could and simplified details that couldnt be made neatly. I then looked at places where the chest and back meet, and combined the flush parts there as well.
Im looking at making the upper torse as one component. But as it goes on from the top, ive made the neck line first, by combining the half on the back with the chest collar i made the entire ring confirming it would fit over my head. I will build down from the neck, combining all i can for the most seamless version i can. Depending on the fit will dictate if i can combine the bottom of the torso, so ill be trying it on as i move down and go slow.
Ive attached the cod/abs section below. Its had 1 coat of plastidip. Another to follow. Ill post the upper torse once its got more then a collar. Hopefully someone finds my exploritory apporach to learning this usefull of lets them skip some pitfalls!
I thought id share a progression story of my first build. A mark 50 Iron Man suit. Its a thin shell design with a LOT of surface details to fight with.
A year ago i started working with pepakura as a hobby after an opperation and for 9 months successfully failed to produce a single suit as i never felt it was good after glueing to progress.
I went through the cardstock-fiberglass approach to find it was too ridgid and heavy. So i looked into EVA foam, initially 45gsm but found that while it was easy to work with it wasnt tough enough. So i upped the density to 65 gsm. 5mm thickness.
Getting a scale was tough as it not only has to fit snugly, you have to get inside it! Certain parts need minimun clearances, like the cod piece needs to fit past your hips, the abs need to fit the cod intersection smoothly etc. Another aspect with scaling was realising your not naked under the armour! you need to take into account clothes. Not just for size but also temperature and ventilating your self. EVA foam doesnt breathe, you do!
I chose to plan to wear a unitard style full body suit with a zip back.
Initially i was always building helmets, but the front was always so close to my face i found it hard to breathe. But if I made it bigger my head rattled round inside it... i found the answer when hanging up my kids cycling helmets. Sponge pads. Attacking them to certain points within the armour maintained the correct spacing from your body to the armour, allowing air to move and more importantly for you to breathe. I decided to leave the helmet quest however and focus on the torso as it needed tighter margins for fitting and not being huge.
I cut out the components for the chest and the back seperatly and assembled them according to the 3D design, but it was tacky. Some aspects of a 3D image cant be copied into EVA foam as they are too small. I also found that seams were all over the place and i couldnt fix them. I found the answer to this to be simplicity itself. Its your design, if it looks like it wont work on paper, change it.
So i printed my templates out on card and assembled them flat to see what parts could be combined.
If 2 parts meet flush for a curve, i joined the templates and cut them out as a single part. This removed a seam and a weakness.
If 2 parts meet and form a step or ledge, extend the lower one out 2cm, making sure to trace the shape for alignment, then you glue the flap to the underside for a stronger bond and neater seam.
On some occasions i found a flush seam couldnt be avoided or combined and in those cases lined up the edges while on a worktop and then place a piece of foam on the inside of the component covering the seam, this reduced stress on the bond.
I used this style to make the Cod piece. The part just tof over my hips so met the minimum size. It was spacious on the tummy so sponge strips will maintain positioning. I then made the Abs to the same scale so they fit but found the gap between the 2 components unbearable. I noticed however that the 2 parts sync up perfectly on paper so tried joining them, not easy on completed parts but i got there, reinforced the joins and used a LOT of filler to smooth the joints. I could have combined the parts before assemble if i had the thought to but live and learn.
Once sprayed with plastidip it looked far better. And more importantly went on easily without the nasty joint. An important note is to think about where you keed to bend. You dont actually bend your torso until above your tummy so these parta could work.
I thought the next logical step was the upper torso. A chest and back part. From previous experience i know the seam between them would be under a lot of stress when moving, i also knew combining them post assembly would be hard and messy so this time i cut the templates for both together and flat assembled them, within each component i joined what i could and simplified details that couldnt be made neatly. I then looked at places where the chest and back meet, and combined the flush parts there as well.
Im looking at making the upper torse as one component. But as it goes on from the top, ive made the neck line first, by combining the half on the back with the chest collar i made the entire ring confirming it would fit over my head. I will build down from the neck, combining all i can for the most seamless version i can. Depending on the fit will dictate if i can combine the bottom of the torso, so ill be trying it on as i move down and go slow.
Ive attached the cod/abs section below. Its had 1 coat of plastidip. Another to follow. Ill post the upper torse once its got more then a collar. Hopefully someone finds my exploritory apporach to learning this usefull of lets them skip some pitfalls!
") , it'll be even better at proper length.
, it'll be even better at proper length.