Status
Not open for further replies.

midnightranger

New Member
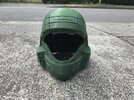
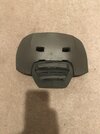
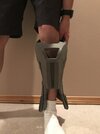
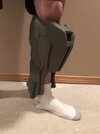
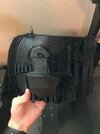
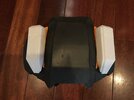
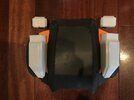
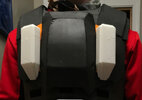
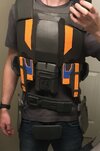
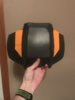
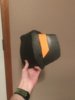
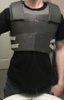
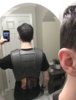
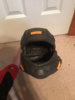
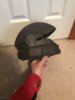
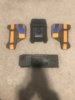
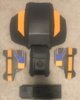
Hello I’m new here and I am making my second ODST build. My first build was a couple of years ago and it was the Andrew DFT ODST templates I and it turned out fine, but I wanted more detail and game accuracy so I purchased the Hero’s Workshop foam pepakura templates and have been using those. I have already built a few things from it including the helmet, the base chest, the main chest plate, the three lower abdominal armor bits and the belt buckle. I’ve been using harbor freight foam, some craft foam I got at target for the thinner details and hot glue to hold it all together. Here are the pictures I have so far. Does anyone have any tips for straightening out the helmet? Also I was thinking about cutting off about an inch or two from the bottom front of the armor to have the 3 abdominal armor pieces sit on a belt so when I turn or bend it moves like in the game where the main chest plate moves separately from the lower parts, tell me if this is a bad idea so I don’t completely ruin it. When I first made the base torso armor I made it wayyy to big on accident so I’ll include pictures of that cause of how laughable it is. I was also thinking I should make the main chest plate removable so I can change it out to be a character from Halo 3 ODST or my own custom character. I eventually want to print and cast a helmet but my 3D printer is too small to be printing helmets without a ridiculous amount of seam lines.
 

Attachments

  • 75FCBB1B-4ECA-4F08-B2F8-FFBBBF77A5F4.jpeg
    75FCBB1B-4ECA-4F08-B2F8-FFBBBF77A5F4.jpeg
    1 MB · Views: 257
  • DE307B64-62BE-4323-B562-C75601FFE631.jpeg
    DE307B64-62BE-4323-B562-C75601FFE631.jpeg
    1 MB · Views: 240
  • 70411EAD-4DF2-4A8D-8DCA-4111F889F96C.jpeg
    70411EAD-4DF2-4A8D-8DCA-4111F889F96C.jpeg
    1.1 MB · Views: 247
  • 7D59514B-C695-478C-A115-E902274EE722.jpeg
    7D59514B-C695-478C-A115-E902274EE722.jpeg
    880.7 KB · Views: 262
  • 7E15C489-A95D-43CA-A63A-F127750C321C.jpeg
    7E15C489-A95D-43CA-A63A-F127750C321C.jpeg
    591.3 KB · Views: 291
  • 575F1C97-82A8-40A6-B4CE-59C42DE197EB.jpeg
    575F1C97-82A8-40A6-B4CE-59C42DE197EB.jpeg
    1.6 MB · Views: 285
  • 84D773DA-8268-4309-9D48-D9DFF2848909.jpeg
    84D773DA-8268-4309-9D48-D9DFF2848909.jpeg
    1.2 MB · Views: 263
  • 5D947BA7-4B95-4855-86E8-04BC23D0D132.jpeg
    5D947BA7-4B95-4855-86E8-04BC23D0D132.jpeg
    1 MB · Views: 274
  • 75DF0519-BF7A-42E9-89AD-3056998306EE.jpeg
    75DF0519-BF7A-42E9-89AD-3056998306EE.jpeg
    1.3 MB · Views: 266
  • 5AAA6144-04E2-432E-A893-86CEBEB29B73.jpeg
    5AAA6144-04E2-432E-A893-86CEBEB29B73.jpeg
    1,020.5 KB · Views: 261
  • C92D9665-7423-4533-9065-1E065873B279.jpeg
    C92D9665-7423-4533-9065-1E065873B279.jpeg
    1 MB · Views: 259
  • 56228BC6-F653-4703-AE86-03B399FAFF73.jpeg
    56228BC6-F653-4703-AE86-03B399FAFF73.jpeg
    912.5 KB · Views: 262
  • 2811AA8B-2814-41A0-9853-473216EB460A.jpeg
    2811AA8B-2814-41A0-9853-473216EB460A.jpeg
    608.3 KB · Views: 263
Last edited:
Welcome to the 405th! You're armour is coming along nicely. For straightening the helmet, typically one could do it by heating it up and manipulating it into shape (heat forming). However, because you're using hot glue (which would melt with heat), I'd recommend using some sort of structual support, such as armature wire glued to it to keep it in shape. You can also do the same with foam but that requires a bit more fiddling.
 
Welcome to the 405th! You're armour is coming along nicely. For straightening the helmet, typically one could do it by heating it up and manipulating it into shape (heat forming). However, because you're using hot glue (which would melt with heat), I'd recommend using some sort of structual support, such as armature wire glued to it to keep it in shape. You can also do the same with foam but that requires a bit more fiddling.
Thank you! I'll be sure to pick up some armature wire then and thanks for the tip!
 
Just make sure it is thick enough (has a high guage? I forget the terminology). For your helmet it shouldn't be too bad because it's not out of shape too much. I used some sort of steel (I think) wire in my Marine helmet, epoxied the ends to glue it in and block off the sharp edges, then covered it with foam for comfort.
 
Just make sure it is thick enough (has a high guage? I forget the terminology). For your helmet it shouldn't be too bad because it's not out of shape too much. I used some sort of steel (I think) wire in my Marine helmet, epoxied the ends to glue it in and block off the sharp edges, then covered it with foam for comfort.
Alright, will do! Thanks again by the way
 
Hi again, sorry I've been pretty inactive on this forum. I do have some progress to show for it though!View attachment 297532View attachment 297533View attachment 297534View attachment 297535View attachment 297536View attachment 297549View attachment 297537View attachment 297531View attachment 297538View attachment 297539View attachment 297540
View attachment 297544
Alright, so now I'll explain what all these pictures are. So, I 3d printed a helmet which turned out fine with the scaling but, I had turned on a setting that is supposed to help overhangs turn out better, but it made it really difficult to remove and I thought it was more trouble than it was worth, so I sold that one and printed another or at least tried to before I had a print fail. it was my first time printing with PETG and I think I know what the main problem is, which is the bowden tube is too long and causes friction which in turn caused under extrusion and made a bunch of strings everywhere instead of putting own support and at one point when I thought it was really bad on the front because it had made a big hole where no filament was going, I actually bridged the gap with a 3d printer pen and it helped a lot surprisingly, but in the end what had happened was the nozzle got caught in the strings and it had pulled the entire helmet off the print bed and made a huge pile of wasted filament. I've got to figure out how to print just the top of the helmet then I'll sell this helmet too and hopefully the third times the charm. I got the cod piece, the buttplate, the armor that goes on the sides ( I don't remember the name of those parts) and the hip armor done. I'm considering redoing the side armor parts to be one piece and not the 3 that pepakura wanted. I got one shin almost done but the way the front of the shin was shaped was different than the one in game so I was going to put it off until I could get a chance to make it more accurate. I had one gauntlet armor done but it was pretty big on me and i forgot to check the scale before I made it so thats annoying. I have a 10% smaller version almost done and it fits way better. On the codpiece you'll see some pen on it because I harvested it from a chunk of the original torso base I made that was way too big. For the shoulders I'm going to use Kirrou's files because I like them better than the foam files and I actually already have it printed after it took a while to sort out the parts that I don't need since I'm using foam. A big piece of news is that I finally got my pouches for the chest finalized and listed on etsy, I'll figure out a way to link it either in my profile or on this thread. Something kind of funny though -not so much to me, but to other people it might be- recon service over on instagram saw my pouches and so he asked if I would send the files over to him, but I didn't really trust him not to just tweak them and sell them himself so I told him I wasn't going to be sending the files out since I'm selling the printed product and it was all fine and dandy until like a week or two later I see he copied my idea and added another feature and now it looks like he's getting all the credit for them. I guess you can't really blame him for not wanting to buy mine and he had the resources to model it himself and everything, but it still sucks for me and yes I'm super salty about it and I wouldn't even be as upset if I didn't think he was going to sell them since he has his own etsy shop. Anyway on my etsy shop there's a bunch of different options like having the pouches not openable or a set of pouches specifically for dutch's rucksack so you should check it out, it's relatively affordable too being $8 for the cheapest option of two pouches for the front that aren't openable. In the picture with the most armor on, a lot of the parts are being held on by masking tape which is why it seems like there are some insecure parts. I was trying to get a set of pouches completely finished and painted to show what they'll look like for customers even though the rest of the armor isn't ready to be painted or anything, but I ran out of filler primer, so hopefully the next can gets here soon. Anyways now this thread is completely caught up as of October 8th. You can go follow my instagram @midnightranger405th where I'm doing a giveaway of a set of openable pouches when I hit 250 followers and instagram is a lot easier to keep up to date so you'll see more frequent posts there.
 
Looks like there was an issue with the photos, do you want to try uploading them again?
 
Looks like there was an issue with the photos, do you want to try uploading them again?
Oh shoot, yeah I'll try to re-upload them- can you see them attached to this reply?
 

Attachments

  • IMG_1474.JPG
    IMG_1474.JPG
    802.4 KB · Views: 152
  • 2TcYb79DRCC89PVLvgkmPQ.jpg
    2TcYb79DRCC89PVLvgkmPQ.jpg
    1.2 MB · Views: 144
  • k9KB4p8BRZukwqATfL6JHw.jpg
    k9KB4p8BRZukwqATfL6JHw.jpg
    2.9 MB · Views: 142
  • oMC8tyc%QsO6NM9jw3JSBg.jpg
    oMC8tyc%QsO6NM9jw3JSBg.jpg
    1.3 MB · Views: 144
  • XU6NJ+2mSmOtPk9NI1KP6Q.jpg
    XU6NJ+2mSmOtPk9NI1KP6Q.jpg
    1.1 MB · Views: 135
  • IMG_1876.JPEG
    IMG_1876.JPEG
    1.1 MB · Views: 150
  • IMG_1989.jpeg
    IMG_1989.jpeg
    1.3 MB · Views: 131
  • %rJpruu1TvW7bEiEo74lNw.jpg
    %rJpruu1TvW7bEiEo74lNw.jpg
    2 MB · Views: 136
  • IMG_2129.jpeg
    IMG_2129.jpeg
    2 MB · Views: 144
  • 15B77BDC-88D8-453B-A02C-1DADB291364F.jpg
    15B77BDC-88D8-453B-A02C-1DADB291364F.jpg
    377.6 KB · Views: 138
  • ly0AfAH2TqiBH759SThwyg.jpg
    ly0AfAH2TqiBH759SThwyg.jpg
    2.2 MB · Views: 138
  • u1bBkJdSQ5Cj2JQD02QSNw.jpg
    u1bBkJdSQ5Cj2JQD02QSNw.jpg
    2.4 MB · Views: 133
  • IMG_2113.jpeg
    IMG_2113.jpeg
    541 KB · Views: 140
i wish I was good at foam smithing :/. But other than that cool, I like the orange and black color scheme!
 
i wish I was good at foam smithing :/. But other than that cool, I like the orange and black color scheme!
Thanks! I'm not super good with foam either, but practicing lots of different techniques really helps, my first few attempts with foam turned out pretty crappy, but it was good practice and I eventually got the hang of it (I think)
 
Status
Not open for further replies.
Back
Top