Oof. It has been a minute! Unfortunately, I don't have much in the way of update. But I do have a little so, let's go!
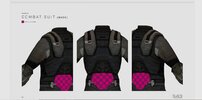
The thighs look awesome.
View attachment 318944View attachment 318943View attachment 318939View attachment 318940
I got the strips glued on and everything covered in plastidip to even out the color. I don't know how to weather it such that it looks like fabric/kevlar type stuff. Get to that later. I have been working on the pants and attaching the thighs so that they stay in place. I am using two snaps per thigh sewed into the pants and "glued" onto the armor AND, bc that wasn't strong enough, I am adding in a strap from the thigh piece to my belt. I initially didn't want to do that bc I didn't want the strap to be visible, but it hides perfectly under the hip plates so, win! Need to do a final fitting with the straps in place to see how it actually all goes together. I will say it's pretty uncomfortable. It's definitely wearable, but I see the allure of foam. By the time I harden and get my pieces testable and realize that they are
just too small, I have sunk a lot of work into them and I don't want to redo them. That's a problem for v 2.0.
View attachment 318942View attachment 318945
I also tightened up and improved the butt piece so it sits well on my belt.
Let's see... I broke my smg again while smoothing out the barrel and put it back together. It keeps breaking along print lines. I am really seeing how orientation of a print can make it stronger and will absolutely take that into account on future prints. And I haven't started the resin process on the shin bc I still haven't bought a new respirator. I did finish one boot covers too!
View attachment 318941
Oh yeah! And my cod piece came disconnected from the straps that were holding it in place. Just need to reglue it. Shouldn't be too much of an ordeal.
I think that's everything from the past 2 months... See you in two more!