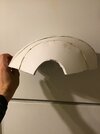
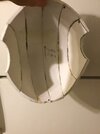
It looks okay from that angle. Can you send multiple angles? Also, what was the problem? Sizing? Forming? Or does it have something to do with the overall shape? Some more pics would be great!
You are using an out of date browser. It may not display this or other websites correctly.
You should upgrade or use an alternative browser.
You should upgrade or use an alternative browser.
thinking about starting over
- Thread starter Mechace13
- Start date
- Status
- Not open for further replies.
I second the Barge contact cement. It has given me an incredible finish as opposed to hot glue and although you have to wait for it to fully dry, you can have perfect seams and you don't have to worry about glue burns.People like barge contact cement, I’ve only use lepage brand. most heavy duty contact cements will do fine.
Utility knives for big cuts, exacto knives for small precise ones. Rotary tools are also really handy if you can get one for cleaning up jagged cuts. youll either need to stock up on blades or use a sharpener to prolong the life of one. 400g Sandpaper will work to sharpen blades as well.
i Use plasti dip to seal my foam, it stays fairly flexible that way. You can use mod podge or latex as well. depends on preferences and what finish you want.
black is My fav base color, grey works too.
- Member DIN
- S128
If you need to start over realize it is not defeat, it is progress.
Mechace13
Jr Member
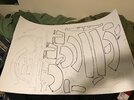
size i'm trying a different templat (link below) and the video i can clearly see his cuting at an angle but i can't tell what angle i should cut and the building part is too fast for meIt looks okay from that angle. Can you send multiple angles? Also, what was the problem? Sizing? Forming? Or does it have something to do with the overall shape? Some more pics would be great!

Halo 3 ODST Helmet Tutorial
Hi everyone. Today I'm building one of my favorite helmets. A Halo 3 ODST Foam Cosplay Helmet. I also show you how to make an ODST Visor with materials you can probably find locally. No Vac form machine needed. Halo 3 ODST Foam Cosplay Helmet Foam Pepakura File Template...
Mechace13
Jr Member
thanks my roommate told me that tooIf you need to start over realize it is not defeat, it is progress.
Halo 3 ODST Helmet Tutorial
Hi everyone. Today I'm building one of my favorite helmets. A Halo 3 ODST Foam Cosplay Helmet. I also show you how to make an ODST Visor with materials you can probably find locally. No Vac form machine needed. Halo 3 ODST Foam Cosplay Helmet Foam Pepakura File Template...
Fallen
DTO, RCO & BCO
Division Staff
Midwest Regiment
405th Regiment Officer
Longsword
Community Staff
Stream Team
- Member DIN
- S922
I wouldn't stress too much about getting the exact angle, but rather if the direction of the angle should be inward or outward from the edge and make your best estimation as to how much.
Even if the bevel isn't quite accurate, foam gives or you can cut off some more of the edge for an under bevel. For over beveling on the inside of the piece you can not push the whole of the angles together and fill in the gap with hot glue, foam clay, or whatever to take up that space.
If you really want to get as close as possible to the exact angle, you'll likely need Armorsmith(US$35). More than happy to show you how to do that if you want.
You got this! Just keep building and remember that even "mistakes" are just more practice. As long as you're having fun and learning something new you'll get better with every build/attempt.
Last edited:
Mechace13
Jr Member
what is $35 anywhyI wouldn't stress too much about getting the exact angle, but rather if the direction of the angle should be inward or outward from the edge and make your best estimation as to how much.
Even if the bevel isn't quite accurate, foam gives or you can cut off some more of the edge for an under bevel. For over beveling on the inside of the piece you can not push the whole of the angles together and fill in the gap with hot glue, foam clay, or whatever to take up that space.
If you really want to get as close as possible to the exact angle, you'll likely need Armorsmith(US$35). More than happy to show you how to do that if you want.
You got this! Just keep building and remember that even "mistakes" are just more practice. As long as you're having fun and learning something new you'll get better with every build/attempt.
Fallen
DTO, RCO & BCO
Division Staff
Midwest Regiment
405th Regiment Officer
Longsword
Community Staff
Stream Team
- Member DIN
- S922
I'm a little confused by this. Are you asking what costs US$35 or that $35 is negligible to get a more accurate angle?what is $35 anywhy
Mechace13
Jr Member
the armorsmith thing what is itI wouldn't stress too much about getting the exact angle, but rather if the direction of the angle should be inward or outward from the edge and make your best estimation as to how much.
Even if the bevel isn't quite accurate, foam gives or you can cut off some more of the edge for an under bevel. For over beveling on the inside of the piece you can not push the whole of the angles together and fill in the gap with hot glue, foam clay, or whatever to take up that space.
If you really want to get as close as possible to the exact angle, you'll likely need Armorsmith(US$35). More than happy to show you how to do that if you want.
You got this! Just keep building and remember that even "mistakes" are just more practice. As long as you're having fun and learning something new you'll get better with every build/attempt.
Fallen
DTO, RCO & BCO
Division Staff
Midwest Regiment
405th Regiment Officer
Longsword
Community Staff
Stream Team
- Member DIN
- S922
Armorsmith is another software option for viewing, editing, and printing pep files and/or templates. As mentioned it costs US$35, but is a fantastic alternative or complimentary tool to pepakura. Some benefits to it include having a customizable avatar that you can set to your measurements and scale parts to your avatar. One of my favorite features is the non-uniform scale feature since we're not all built with the same proportions.
Related to your asking about angles, in the pattern layout page there's an option to show the edge angles. It's not 100% perfect, but it gets you pretty close.

Worth noting, if I'm recalling correctly (please someone correct me if I'm wrong on this) it takes the full angle between the parts and divides it in half. So, for example, the 45° angles on that hexagon would have a 45° on the little piece to create depth if you were making this out of paper. Since foam creates depth just by thickness a straight down cut would make more sense than trying to cut a 45° on this side and a 45° on a connecting "ring" piece.
Related to your asking about angles, in the pattern layout page there's an option to show the edge angles. It's not 100% perfect, but it gets you pretty close.
Worth noting, if I'm recalling correctly (please someone correct me if I'm wrong on this) it takes the full angle between the parts and divides it in half. So, for example, the 45° angles on that hexagon would have a 45° on the little piece to create depth if you were making this out of paper. Since foam creates depth just by thickness a straight down cut would make more sense than trying to cut a 45° on this side and a 45° on a connecting "ring" piece.
- Member DIN
- S068
Right you are! These angles also round fairly accurately but sometimes when you're working with parts that need precision you have to be a little more careful and build a mockup first.Worth noting, if I'm recalling correctly (please someone correct me if I'm wrong on this) it takes the full angle between the parts and divides it in half. So, for example, the 45° angles on that hexagon would have a 45° on the little piece to create depth if you were making this out of paper. Since foam creates depth just by thickness a straight down cut would make more sense than trying to cut a 45° on this side and a 45° on a connecting "ring" piece.
- Member DIN
- S128
Battle damage is certainly a well used reasoning behind crafting mistakes, but you still want to fix as many mistakes as you can while building if you have the opportunity.i really want to know if something i'm planing on doing to my helmet is cheating covering where the lines are with the add on armor form reach and saying that the errors are battle damage to my friends
Mechace13
Jr Member
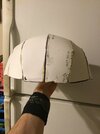
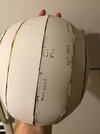
ok mk 3 odst helmet so far thoughts any areas that i should care about ps i'm using my ipod camera i found areas that could use more work so i'm going to use hot glue to fix them

Attachments


Last edited:
- Member DIN
- S068
They look fine. Overall you're going to want to focus more on the joins at the edges of your pieces and at the outward facing joining surfaces (there's a few points that pucker and pull the foam inward). Just be sure to take your time and be firm but gentle when pulling foam into place for assembly. Pre-forming either by rolling or by heating and forming the foam into a curved surface will greatly help on those arcs.ok mk 3 odst helmet so far thoughts any areas that i should care about ps i'm using my ipod camera i found areas that could use more work so i'm going to use hot glue to fix themView attachment 307645
Mechace13
Jr Member
- Member DIN
- S128
Personally I don't have the patience to use contact cement. You have to wait like 5 minutes before gluing each piece! CA glue is so much faster. What do you use indigoD0g?That helmet has a nice shape to it! I see you’re using contact cement, how is that working out for you?
- Status
- Not open for further replies.