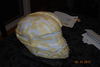
Your helmet looks amesome! Loving the lights. I'm pepping this same model. Can't wait till its finished. Espeially after seeing yours competed. Good luck on the rest of the build.
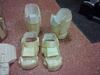
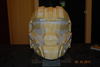
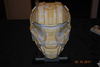
thanks blackula, i was really hoping that the blue instead of the generic white would look a lot better and i think it turned out pretty well. good luck on the pep! take your time thats all i gotta say because most of this helmet is really small pieces lol. you might have to widen the helmet a bit because it is a little narrow around the cheek area. good luck on your build as well!
Wow, very impressive work! Those lights really sell the helmet. I'm looking forward to seeing more progress on your suit, from your work on the helmet, it looks like it's going to be a GREAT set of armor.
thanks flyerfye! it's always nice to have infantrymen comment and like your stuff especially since i'm still considered a noob lol. These LEDs are extremely bright! i can actually walk around a dark house and see everything only that its a shade of blue and not white. it kinda reminded me of i think it was halo 2 where MC had a flashlight in his helmet lol. thanks for the compliment!
The LEDs make it look even more epic! How is that possible?
haha thanks rangebro, i'm glad you like my work! stay tuned for more updates!
")