Status
Not open for further replies.
Doing great so far!! Anyway you can link the tacpad screen? I can't seem to find it on here
Thank you!! So sorry this took a lifetime for me to get back to you, I'll try to attach the tacpad picture I used. All credit and appreciation to Rick Martinez for this template!
FB_IMG_1552174491119.jpg
 
Hey there! I'm back for another update!! I've worked slowly since my last update, my health hasn't been the greatest. But I've been feeling much better for about a month now, and uncoincidentally I've been crafting like crazy for about a month! I tend to put off these updates, it's always hard to go back and get my head around everything I've done since the last update, and it's even harder for me to sit down and write about it when I'm in the middle of crazy crafting focus and getting things done. I tend to go back and forth from piece to piece when crafting, so nailing down a readable timeline for you guys takes a while lol. But this week I don't have access to my craft stuff and I have loads of free time, so why not bite the bullet and get you guys up to date!
There are some pieces here that I've now updated or plan to redo, but I will still be posting most of it so that you can see my process and figure out if you'd like to utilize a technique for something of your own even if I decided it wasn't right for whatever piece I used it for.

Update time!

Let's start with the left arm. I used my duct tape dummy to pattern out some left arm undersuit details with plastic wrap and tape.

PXL_20210726_034817227.PORTRAIT.jpg

PXL_20210726_034501289.jpg

PXL_20210726_035234317.PORTRAIT.jpg


PXL_20210726_035246338.PORTRAIT.jpg


A couple reference photos:
PXL_20210726_032927844.MP.jpg

PXL_20210726_031954163.MP.jpg


The flattened elbow pattern. This is a piece I ultimately ended up doing twice, but I used this same pattern. For my first attempt I cut the pieces out of a flexible foam I got off amazon a few years ago (I think I've got it linked on an older post on my patreon, which is totally free, hopefully the link still works). I coated the pieces in plastidip and contact cemented them to my undershirt. I did the same for the shoulder and underarm details, which I currently plan to keep as is.
PXL_20210803_211323160.jpg

PXL_20210808_182805343.jpg

PXL_20210726_044802667.jpg

PXL_20210808_202133292.jpg


Wedging the shoulder pieces in to see how they look.
PXL_20210808_213332567.PORTRAIT.jpg


The messy process of trying to glue some shapes to a shirt.
PXL_20210901_013838279.jpg


Shoulder and elbow details glued in. I think it looks pretty cool, but a couple weeks back I decided to incorporate more sewing into this build than I originally planned. I don't know why I had so few plans to sew for this, I must've assumed I just couldn't do it when I was planning the build. It's a fully new skill to me, but I'm recently comfortable with the idea of trying and struggling with it and learning. I've always wanted to learn to sew and my mind has decided it seems doable, necessary and exciting now.
PXL_20210910_223812169_2.jpg


Onto the fabric version of the elbow!
PXL_20220323_015044343.jpg


I cut off the sleeve and used it to make my pattern. There were some revisions during the sewing process, but basically I separated this into the wrist, forearm, and upper arm. I bought some moisture wicking fabric for the forearm, and will continue to use it beneath armor parts in future sewn areas, like under the shins and thighs. Keep in mind I have virtually no experience sewing, I've sewn one zipper to an already made shirt, and pretty crappily taken in a pair of pants and a premade vault suit. I only recently am able to thread my machine without looking up how to do it lol. Let's get to it!
PXL_20220323_023106057.jpg

PXL_20220323_023053190.jpg

PXL_20220326_034739044.jpg


So to keep some dimension in the design and to keep thick material between armor pieces on my arm for better proportioning, I found some stabilizer that seemed like a good thickness and squishiness, and sandwiched it between my yaya han rubbery stretch fabric and some thin stretch fabric. It's tricky to figure out seam allowance and exact patterning without messing with it, especially on edge pieces like the wrist.
PXL_20220321_182628755.jpg

PXL_20220326_045031104.MP.jpg


Wrist and forearm put together.
PXL_20220326_050824756.jpg


The white is tailors chalk.
For the little hole details on the elbow I carefully cut tiny holes in the top fabric and then used some black acrylic paint on the stabilizer where the holes would sit. Before sewing the detail lines into this, I used a spray fabric adhesive to tack down both sides of the fabric to the stabilizer. I may try other methods in the future, but I do think it helped the fabric stay in place when the presser foot was squishing it.

PXL_20220326_065947349.jpg

PXL_20220326_085536537.jpg


Sewing the new sleeve onto the shirt.
PXL_20220326_090605430.jpg

PXL_20220326_100020641.jpg

PXL_20220326_100126368.jpg


3am fashion show for myself.
PXL_20220326_095702215.jpg

PXL_20220326_095733777.jpg


And that's the current sleeve! It's a tiny bit tight, but it has better mobility than before and I think I really like how it came out.

Next up: some arm and neck seal stuff


I used the arm hole templates that come with this chest file as a jumping off point, and then added a lot of depth to them to be able to cover it in fabric and mount it how I want. I don't have pictures of the part of the file that I used but it was made to be a detail in paper/foam attached directly to the edges of the chest, so it was much smaller than I needed and just served as a good way to know the curve I was working with.

Eva foam base in progress.

PXL_20210803_212601480.jpg


Covering in the same rubbery fabric as most other pieces.
PXL_20210805_185925628.jpg

PXL_20210804_010235385.MP.jpg


Part of the neck seal.
I believe this is 5mm foam and 1mm foam, which I contact cemented together and then covered in fabric.


PXL_20210805_184637538.jpg

PXL_20210805_191459585.jpg

PXL_20210805_192141520.jpg


Compared with an attempt from a few years back. Upholstery foam, one piece of fabric, and spray adhesive, vs eva foam, 3 pieces that were then adhered to fabric with contact cement and then attached together.

PXL_20210805_212746139.jpg

PXL_20210805_212417492.jpg


So I don't have many photos of the process, but I also redid the abdomen section of my undersuit early last fall.

I've known for a long time that I either needed to fix up the first one and revise some things, or completely remake it once I had an idea of what changes needed to happen. This time I went with eva foam for the base. If I had the skills, time, space, and money to do a rubber cast of one I would, but this will do (or I remake it again if I figure something better out??)! The process is the same here as it was for the back of the helmet and the other fabric covered foam. I used the same pattern I originally drafted for the abdomen a few years ago.
PXL_20210910_015007312.jpg


For the back attachments I used a nonstretch black cotton fabric, and glued it as little bridges between pieces with E6000, and some Shoe Goo around the edges. I also use a hairdryer on cool during this process to speed it up a little.
PXL_20211009_010236681.jpg

PXL_20211009_005457770.jpg

PXL_20211009_005454660.jpg


I've made hips for it but I may have to re-size them so I haven't attached them yet. Here's a picture of a lot of the details together, though its not totally up to date (the elbow area), it's my old cod piece as a stand in, paint job needs touched up and finalized, it fits me better than it does the mannequin, and I'll probably redo the inner neck seal but it was fun to see so much of it together!
PXL_20211015_203921664.PORTRAIT.jpg

PXL_20211015_203432100.jpg


Okay I'm gonna end it here so I can get the rest of the pictures and info together for another update very soon! I still haven't gotten you up to date yet, we've got some leg armor and robot hand coming your way as soon as I'm able to write it all up. Thanks for reading, feel free to ask questions and have a great day!
 
You ever see someone's post but have no words to describe how amazing it is that you go looking for gifs only to find none that quite meet the level of awesome for them? Just happened. This is absolutely gorgeous work!
 
Well, I know what I'm using for an undersuit reference! Holy cow that's awesome, well done!
 
This. Is. Amazing.

Like Fallen said, there are no words to describe how awesome this is. I was looking at this and i'm sitting here geeking out. Very cool, great work!
 
You ever see someone's post but have no words to describe how amazing it is that you go looking for gifs only to find none that quite meet the level of awesome for them? Just happened. This is absolutely gorgeous work!
:D You've just made my day, thank you so much!!! Comments like this make it so fun to share the build process, I really appreciate it!

Well, I know what I'm using for an undersuit reference! Holy cow that's awesome, well done!
That's great to hear, I'm so glad sharing my process will actually help someone figure out their own!! Thank you so much!!

This. Is. Amazing.

Like Fallen said, there are no words to describe how awesome this is. I was looking at this and i'm sitting here geeking out. Very cool, great work!
Ahhh thank you so much, I truly appreciate the kind words!!! :D
 
No no please… i cant redo my undersuit for a 4th time this is too much. My urge to compete with you is too strong.
For real though your undersuit has got to be the most accurate one ive ever seen
 
Hello again! Hopefully I can officially have this thread up to date with this post.

Lets get into the next update!

Let's start with the shins. I built a pair of shins a couple years ago when I was first going hard on this build, but I was never super happy with them so I've been ignoring them since then. I recently realized it's because I just don't find the game accurate shins to be flattering on me in real life. They're a strange shape, they don't contour in a way that I like. I've seen them look totally awesome on other peoples builds but I just wasn't feeling it for myself. Now there's a chance I'll go "nevermind, I prefer game accurate" when I get to the end of this build, because I tend to really aim for accuracy when I can. But I decided to draft a new pattern/design to see if I could combine reference images into something I liked more. For reference I used action figures, the game, other cosplays, other gens of Halo armor, concept art, my first freehanded Reach shins from like 7 years ago, and just what I thought looked cool. And a couple people were kind enough to volunteer close ups of their shin pieces so I could see what I liked!

Here's the first pair that I made a while ago with an older thigh piece and knee as well.


PXL_20210910_230125813.MP.jpg


For the new shin I started with the front center panel as a jumping off point (not pictured individually, but it's basically a slightly tapered rectangle), and worked my way to the back of the shin piece. This is the side panel, which probably holds the most weight as far as what the whole shape looks like in the end. This is my first iteration of the side panel, and as I built the basic shape of the shin I was pulling apart and cutting materials away on a foam mockup until I had a shape I liked, and would use to make a new variation of pattern and build from that.

PXL_20220323_211511916.jpg


The new mockup WIP shin compared to the older one.


PXL_20220324_010511482.jpg


Adding edges to the leg holes.

PXL_20220324_070029446.jpg

PXL_20220324_070050745.jpg


Wedging something into the shin to make sure its the width I need before I pattern the rest of the edges.

PXL_20220324_070604679.jpg


One of my favorite ways to pattern, just holding or pinning some tracing paper over blank space where foam is needed. I like to use a fine tip sharpie to get a pattern drawn out because it writes without much pressure needed, which is nice when your paper is just sitting in the air without support.

PXL_20220324_070702434.jpg


A completed base shape!

PXL_20220324_075341684.jpg

PXL_20220324_075415497.jpg


Different pics in the process of me detailing and making sure I still like it.

PXL_20220327_224717380.MP.jpg

PXL_20220324_082556876.MP.jpg


Fully built shins and starry eyed little Grogu :D

PXL_20220406_043612537.MP.jpg

Screenshot_20220412-234142.png


I do think I prefer this silhouette, so these are my chosen shins for now!


Now onto some new thighs and thigh seals! I originally made thighs a few years back as well, which I think show up earlier in the thread. Since then I've known that I wanted to resize them slightly (especially after thinking through how I will do the pants), and alter some details. They also got a little texturey when I plastidipped them at some point. I just made these new ones a week ago and haven't been able to detail them yet, but I'm happy with the scale so I did go ahead and get some thigh seals done because I couldn't wait!

PXL_20220416_002355489.jpg

PXL_20220416_002358807.MP.jpg

PXL_20220416_002402069.jpg

PXL_20220416_002408076.jpg

PXL_20220416_002409973.MP.jpg


For the thigh seal pattern I taped up my mannequins leg and got to work drawing it out. I mainly use in game screenshots for my references. I drew on some undersuit pants detailing as well, to figure out how those future shapes would work together.

PXL_20220416_033025432.PORTRAIT.jpg

PXL_20220416_033036398.PORTRAIT.jpg

PXL_20220416_033047507.PORTRAIT.jpg


Making sure it generally fits the same and can be pulled up where it needs to be.

PXL_20220416_040544487.jpg


The pattern lying flat but still one piece. The pattern was then cut/traced into 3 main pieces and 4 smaller detail pieces.

PXL_20220416_042320710.MP.jpg


A note for this picture, the top pattern piece here was altered slightly soon after this. There was a piece cut off and turned into the 7th pattern piece, because I realized it needed to be layered a different way. Sorry I don't have a better picture of what I'm talking about lol.

PXL_20220416_043829787.jpg


I don't always pin my patterns down, but tape patterns tend to shift a little more than paper for me. Just a tip that might be super obvious, if you need to pin a pattern down on a piece of foam that's too thin, put a scrap piece of thicker foam underneath it.
I'm using 2mm HD foam for these pieces btw.


PXL_20220416_044916650.jpg


Checking the fit with the thickness of the foam.

PXL_20220416_050936467.jpg


For the detail pieces I used a lot of 1mm foam, so that once it was covered in fabric it would still have a pretty low profile.

PXL_20220416_192114010.MP.jpg

PXL_20220416_202210692.jpg

PXL_20220416_212344638.jpg


Super glue does a pretty good job of adhering the rubber sides of the fabric together (though I did my best to leave some blank foam on the "seam allowance" wherever I could to ensure good grip), I wouldn't trust it for everything but these pieces shouldn't have much strain on them so that's what I used to attach pieces together. The fabric is once again adhered to the foam with contact cement.

PXL_20220417_014637160.MP.jpg

PXL_20220417_021126254.jpg

PXL_20220417_021136018.jpg

PXL_20220417_021145057.jpg

PXL_20220417_021216279.MP.jpg


And that's as far as I've gotten on the legs!

Now for some more robot arm progress!

I had already made the thumb and main hand plate a while ago, so I recently got down to making the fingers and figuring out the glove details. This will definitely be slightly annoying having my dominant hand covered in worbla, but I think it looks too cool to not go through with it lol. Also I got the base gloves many years ago at an antique shop, I have really small hands and antique gloves are freakishly tiny, just a tip for those tiny handed people out there.

I started patterning by taping up my fingers while wearing the glove. I didn't use anything between the glove and tape, I just cut the tape off into a flat pattern and added tracing paper onto the back to take away the sticky aspect of the pattern piece. Hopefully that makes sense.

I'm not super practiced in working with worbla and what I'm doing is pretty simple, but if you are looking to get into it I recommend watching ludus_cosplay on instagram, his thermoplastic work is absolutely insane and there's a lot of great tips on working with the material.


PXL_20220402_202820022.MP.jpg

PXL_20220402_203721437.jpg

PXL_20220402_203724561.jpg

PXL_20220402_215635339.MP.jpg


I had some worbla pieces for the palm, but it would just be impractical to wear, so I took some shinier rubbery fabric that I believe is also from the Yaya Han line, and used it for the palm details. Someone who's more practiced at sewing could've maybe sewn these details on, that would be my first choice if I knew how to go about it, but I just used E6000 to glue it on. I will likely go back and touch up some areas if any of it gets peel-y, but after some hours curing (after these pictures) it looks pretty sturdy.

PXL_20220408_180351581.jpg

PXL_20220408_211907029.jpg


And we have a mostly built robot hand!! It's all straight up black worbla and foam dowels, I didn't sandwich any foam because I wanted it to be relatively fitted and thin on my hand. I sanded the fingertips to get rid of some edges/overlap/uneven-ness.

I'm really looking forward to seeing this thing painted, I love how it's coming out :D

Also I was so so lucky to win this magnum print by Spacemeat Cosplay last month!! It was perfect timing to get something this cool right as I was getting back into building, it definitely jump started some inspiration.


PXL_20220403_061932354.jpg

PXL_20220403_061904017.jpg


Alright, I think you're all up to date! Thank you to those who are still following this build, I'm so happy to be working on it so much lately and getting feedback makes it even more fun. Have a good weekend!
 

Attachments

  • PXL_20220416_043829787.jpg
    PXL_20220416_043829787.jpg
    2.5 MB · Views: 103
inspirational work
Thank you so much!!

No no please… i cant redo my undersuit for a 4th time this is too much. My urge to compete with you is too strong.
For real though your undersuit has got to be the most accurate one ive ever seen
:eek: Fam your suit is SO insanely good, this is crazy flattering to hear from you! That's the best compliment ever :oops:
 
WOAHHH! So thats how you made patterns! This is such an amazing build so far and I cannot wait to see it done! You keep getting closer and closer, keep at it girl! Really want to see that helmet with your chest haha!

Keep up the wonderful work!
 
I've always used this thread as a reference for an undersuit (and just that sweet sweet clean foamwork) and it seems 3 years later I am still doing it. Can't wait to try some of those techniques myself soon!
 
I'm convinced that you aren't a builder, you're a magician.
This is absolutely incredible work, wow...

I also am liking the black and white foam, it looks so clean it's almost a shame to paint it :lol:
 
This is the most impressive foam work ive ever seen! Absolutely incredible!! I can't wait to see it when it's all done!
 
Hey everyone! This will be where I post progress and details of my new Reach suit. I've created two Reach suits in the past, one for myself and one for a friend. Hopefully this one will be even better looking and better functioning. This suit will be pretty much all foam, made with pep patterns and freehanded. The undersuit is probably gonna be upholstery foam, huuugely inspired by Lost Viking Props. Halo:Reach armor is my all time favorite design, so I hope to make a suit that I feel like I don't even have to improve upon after it's done lol!

Here's what I'll be making:
View attachment 264132
View attachment 264133
View attachment 264134

I started on a chest piece a few months ago but I'm pretty sure it's too small, so I started this new one last night, hopefully it'll be the right size:
View attachment 264135
View attachment 264136

That's all I have right now! If you have any questions about how I've done something or how I plan to do something feel free to ask! I don't have a specific deadline for this, I'll just be working on it as often as I can. Have a great weekend ^-^
Love it! I used a lot of your posts for references on my own reach armor! Keep it up
 
Update time!!!

Hey everyone! I haven't had a ton of time to sit down and post, but I've been working crazy hard (like 6-8 hours a day) on my build, and I'm out of town now with a little time to relax so I figured I'd fill you all in on what I've done! It's gonna be a big update lol. I only just realized how behind I left this thread, I was too focused on building everything I had time for :lol: I'm still trying to finish a version of this build for Orlando Outpost. Idk if it's possible or not, and I'm not going to destroy myself over it. There were a couple weeks I was working so hard and I was so scared of wasting time and just felt like constant con-crunch and anxiety, I sort of had to tell myself that I was giving up on the outpost plan so that I could calm down lol. I'm working so long as its still fun and worth it, there's no point in me building anything if it's too stressful for it to be fun. With that being said, I'm still able to work about 6 hours a day on it before it stops being fun, so it's still possible for it to get done in time. I'm also prioritizing certain pieces, so I may not have the robot arm, chest attachment, helmet attachment, thigh attachment, anything extra, for the first version of this suit. I'm willing to wear a more simple suit to Outpost and then upgrade afterwards. Now with that update on my plans and state of mind, lets get to build details!


Where to start. Well here's a master list I made after being inspired by Sodiumcat on instagram. I love a good list.
View attachment 270174


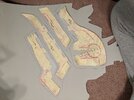
I made a forearm. It was one of my least favorite pieces, they're just so detailed and weird lol. I worked on it for like 9 hours straight and hadn't even gotten to the details.
View attachment 270129
View attachment 270130
View attachment 270131

Here it is all done and detailed up in comparison to a screenshot
View attachment 270132
View attachment 270133


I soon got to work on the tacpad, which only took me a few hours to make.
View attachment 270134
View attachment 270135
View attachment 270136
View attachment 270143

Thank you very much to Rick Martinez (I'm not sure of his forum name) for the tacpad screen detail sheet and permission to use it!
I downloaded the picture of the screen, and sized it in microsoft word, put a layer of blue plastic over it and plastazote (see-through foam) underneath to diffuse the light. The tacpad isn't put together at all, I need to seal and paint it before I can secure it together.


This is everything I had at the time, tried on. I made shoulders as well but I don't have many pictures of them alone or in progress.
View attachment 270137

At this point it was pretty apparent to me that I needed to make a slightly larger chest piece, which I'll show soon.
Next I got started on the COD piece.
View attachment 270138
View attachment 270139

Here's another pic of everything I had, with a more finished COD piece, and a test glove.
View attachment 270140


I've also made a boot. It's pretty dang inaccurate, but I put crazy high heels in my boots to add height and be a big girl spartan lol so it's okay with me for now. It went as planned.
View attachment 270141
View attachment 270142


Here are some things I ordered, Jorge's dogtags for future photos, clear Sea Foam spray for the visor, and spray adhesive. I wanna give a huge thank you to Gabe Schulz of Lost Viking Props for answering any questions I've had trying to figure out my visor and undersuit plans, I've had vague ideas for stuff but he definitely helped me confirm things and think stuff through! I also wanna shout out Andrew Gillen of Infinite Props for sharing his undersuit research with me and giving me someone to talk stuff out with! You guys were very very needed in my process!!
View attachment 270144


Now let's get onto some undersuit build details!!

First I started with covering my duct tape dummy (its not currently the most accurate, but pretty close in size to me) in cling wrap, then in masking tape, and began drawing on the undersuit pattern and details. I used parts of my old suit to help a little with spacing and sizing, and just looked at a million references.
View attachment 270146
View attachment 270147
View attachment 270148

Here's the waist pattern all flattened and cut. The front pieces will just be flipped to make the entire piece, and the back will have a seam with a zipper.
View attachment 270149

So far I'm using 1/4 inch, and half inch thick upholstery foam, 1mm and 2mm thick craft foam, spray adhesive, and yaya hans matte 4 way stretch fabric (with a huge coupon of course) that's kinda rubbery.
For my size I decided it would be best to use 1/4 inch thick upholstery foam for the majority of the undersuit. Most of the pieces for the waist were simple and didn't need any detailing, but for certain spots I beveled the underneath edges a bit and then reglued them together so there would be a prominent pointed edge showing under the fabric.
View attachment 270150
View attachment 270151
View attachment 270152

Here I'm just laying out the foam pieces on the back of the fabric, marking where it needs cut and cutting the fabric for glueing.
View attachment 270153

This is during the glueing and wrapping process. Spray glue on back of fabric and front of foam.
View attachment 270154
View attachment 270155
View attachment 270156
View attachment 270157
View attachment 270158


This is a craft foam back piece that gets covered in fabric, and then I add velcro to the underside so it can be placed on the back and cover most of the zipper. I'll also attach some spine pieces to it. I may need to widen it just a tiny tiny bit, as it becomes a little too thin once the undersuit starts curving around me, like it won't 100% cover the velcro placed for it. Also sorry the past tense and future tense are getting messed up with this whole post, I did so much of this so long ago so it's hard to keep track and phrase things correctly and have it be easy to understand (plus its hella late and I'm very sleepy lol :sleep:).
View attachment 270159
View attachment 270162
View attachment 270163

This is the main structure of the back, with the velcro for the back cover, and some elastic glued on the inside for attaching to the rest of the waist.
View attachment 270160


Before I get to the last undersuit pics I have, here's the new chest piece I slaved away at for a little over a week. I worked on it for so so so many hours and it still took that long lol. I'm much happier with the size.
View attachment 270164
View attachment 270165


Now here's the part I kept telling my husband I was insanely proud of and couldn't wait to post about, but I wanted to get the waist wearable before I posted! He had to hear about it for quite a few days before I could tell anyone else :p I seriously couldn't sleep the night after I made this because I loved it so much.

View attachment 270166
View attachment 270167
View attachment 270168

Testing the look and size of everything with my old helmet.
View attachment 270169
View attachment 270170
View attachment 270171

One of my many reference pics.
View attachment 270172

It most definitely will crease with wear, and I'm not really sure how to help that currently. It's also gonna be dang hot. But oh well. I love it lol.
Its not fully done, I need to reinforce the whole thing and add a few small detail pieces, before Outpost if I have time but we'll see.
This is the current inside. I've used lots of glue of different types, and some sewing so far. Each separate piece is connected with elastic. I think I have some better ideas for the legs though.
View attachment 270173


Since hitting the milestone of wearability on the waist I haven't been able to work a ton, but I did manage to make the thighs way quicker than I thought I could. I forgot to save the original pictures though, so they come with instagram story captions heheh. I also used armorsmith designer to size my thighs, cause homegirls got some thighs lol. It helped SO much, and made them way less intimidating knowing I didn't have to alter them as much by hand. They also aren't as accurate as I could make them now, but they'll do just fine.
View attachment 270175

I tested out the sizing of my old soft case to see if I could just add it to this build to add some character without taking lots of time to build a new one.
View attachment 270176
View attachment 270177


And now we're up to date with me visiting lots of family for some graduations. I'll be out of town for a total of two weeks which is so much build time to lose, but it's fine cause I love being here with my family :) I did actually bring any paint ready armor pieces I have up here, so during down time and good weather I'm getting a little work done on those.
View attachment 270178


I just hit the limit for attached files so I suppose I'm done! Sorry if it takes me forever to update again, just know I'll be working hard and I will get to comments and questions when I can, so ask away! I do want to mention that I have a ko-fi, so if you feel like you wanna support my work in that way, I would so so so appreciate it. I spend lots of time on my craft and I wanna share and freely offer my gathered knowledge to those it could help, I love that part of this community so much. My art and costumes do obviously cost money though lol, so if you feel like you'd like to help me out in that regard (you of course do not have to), it would make my day and make my crafts even easier to continue!

Have a wonderful rest of your week, and keep building!
-Kitkat
I’ve been following your build on Instagram. I love it! I’ve used some of your photos for reference for my own as well. Keep being awesome!
 
Status
Not open for further replies.
Back
Top