Props Mendez's 3D Printed Halo Guns!

Status
Not open for further replies.

CPO mendez

Active Member
Heyo 405th! so, i have a thread over in the 3D modeling section where i'm basically just systematically going through and bringing every single gun from every single halo game into the 3D printing realm! now, obviously, i'm gonna make some of em! i've actually been working on and off for a WHILE, but only just starting to get somewhere with em! now, i started with the halo 4 carbine on my personal printer, but thanks to my job as the sole technician in my university's fabrication lab, i have 24/7 access to a bank of 3 printers (two printrbots and an ultimaker2) that very rarely get used. so, after asking a bajillion times to make sure it was alright for me to basically 3D print a GUN, i started printing the halo 5 customizable AR over there!

So, let's start with the Carbine!
IMG_20170131_085445269_HDR.jpg
IMG_20170131_100632859_HDR.jpg
IMG_20170131_100716211_HDR.jpg
IMG_20170201_192553186_HDR.jpg
IMG_20170328_090505541_HDR.jpg

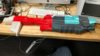
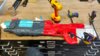
So this is where it's at now, looking ENORMOUS, as most of the halo guns are.
IMG_20170402_224056914_HDR.jpg
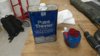
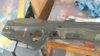
I attempted a long print over the weekend to knock out a huge portion of the pieces, but it ended up failing in the weirdest way. i'm used to a big spaghetti ball, but this was a semi-successful print that just came out... fuzzy. certainly weird. also a good lesson in not doing 80 hour prints and leaving it unattended!
IMG_20170402_174053677_HDR.jpg
IMG_20170402_174251415_HDR.jpg
IMG_20170402_174301682_HDR.jpg
IMG_20170402_174307745.jpg

That's it for the initial post, next up is the AR!
 
Alright! next up: the Halo 5 AR, one that i'm REAL excited about! now, this one was done entirely in the fab lab at my Uni, since i ran out of filament for my home printer and couldn't get some for a while (which is why the carbine is so far behind)

So, let's get to it:
IMG_20170224_121332073_HDR.jpg
IMG_20170224_121337317_HDR.jpg
IMG_20170224_130151007_HDR.jpg
IMG_20170227_130434778_HDR.jpg
IMG_20170228_113435941_HDR.jpg
IMG_20170228_113508931_HDR.jpg
IMG_20170228_114851553_HDR.jpg
IMG_20170301_125358638_HDR.jpg
IMG_20170301_130735553_HDR.jpg
IMG_20170302_112803602_HDR.jpg
IMG_20170302_112810090_HDR.jpg

Just when everything was going great, i got a bad case of butter fingers and dropped the assembled front half! smashed the barrel real bad and knocked the flashlight out of its hole. flashlight could be fixed, barrel needed to be replaced:
IMG_20170302_123401590_HDR.jpg
IMG_20170302_125809870_HDR.jpg
IMG_20170315_112703333_HDR.jpg
IMG_20170315_112712867_HDR.jpg
IMG_20170315_124950648_HDR.jpg
It's coming along swimmingly!
IMG_20170315_125003360_HDR.jpg
IMG_20170315_125014489_HDR.jpg
IMG_20170316_112936878_HDR.jpg
IMG_20170316_125312418_HDR.jpg

Aaaand that's the image limit. should be two more posts to cover all my progress. stay tuned!
 
ASSAULT RIFLE PART 2!

time for more pics! so, at this point most of the body was finished. however, i didn't take into account how much smaller the build plate is, so the hand guard and receiver block were both too big and had to be fixed.
IMG_20170316_125456410_HDR.jpg

So, in the mean time, i printed some of the extra bits! started with the rail cover and recon sight

IMG_20170327_105332577_HDR.jpg
IMG_20170327_105344903_HDR.jpg
IMG_20170328_112220317_HDR.jpg
IMG_20170328_114347918_HDR.jpg

Next problem was: how the hell do i get the sight onto the rail? this is a pretty standard piccitany rail, and the sight has a standard shoe. what it DOESN'T have, is a shoe that can be adjusted in width so it can actually fit into the rail!

so, my solution was to basically make it into a sort of puzzle piece attachment. i snipped off two of the rail pegs, and then filed down the rail shoe on the sight until it was juuust small enough to fit into the gap, then i was able to push it back so it locked in place, and the rest of the sight covered the gap in the rail.
IMG_20170328_114403801_HDR.jpg
IMG_20170328_114350591_HDR.jpg
IMG_20170328_114434570_HDR.jpg
IMG_20170328_114446000.jpg

Now, back to the printing. the next thing to do was the mag well:
IMG_20170328_114804520_HDR.jpg
IMG_20170328_115953083_HDR.jpg
IMG_20170328_120042050_HDR.jpg

With that done, the final pieces were the (fixed) handle and receiver block!
IMG_20170329_165136695_HDR.jpg
IMG_20170329_170251572_HDR.jpg
IMG_20170329_171558572_HDR.jpg
that's it for the image limit! next up: FINISHING THE ASSEMBLY!
 

Attachments

  • IMG_20170327_135852710_HDR.jpg
    IMG_20170327_135852710_HDR.jpg
    664.2 KB · Views: 568
  • IMG_20170328_090505541_HDR.jpg
    IMG_20170328_090505541_HDR.jpg
    720.6 KB · Views: 512
Looks great so far! Are you giving it the standard paintjob or do you consider remaking one of the many multiplayer skins?
How much does it weigh?
 
Oh man this is fantastic. How much filament do you go through for a full prop like this?
 
Thanks again for the files you provided i`ll try to clean some of them up and modify them. I´m personally interested in making a plasma pistol with some of the internal parts seen in the idle animations....
 
Looks great so far! Are you giving it the standard paintjob or do you consider remaking one of the many multiplayer skins?
How much does it weigh?

It's getting the standard paintjob, but i'm definitely at least going to look into doing a wrap of some of the goofier skins (Last Slice is top of the list, baby!)

Oh man this is fantastic. How much filament do you go through for a full prop like this?

God, i don't even wanna think about that... i'd put it at around... 3 full 1kg reels, maybe? it was split between the ultimaker and the printrbot, which both use different filament thicknesses (which changes how far a reel will go) and i was bouncing between several different reels, so i don't have an exact number.

Thanks again for the files you provided i`ll try to clean some of them up and modify them. I´m personally interested in making a plasma pistol with some of the internal parts seen in the idle animations....

No problem man! good luck with the detailed plasma pistol.
 
Alright, time for the finished assembly! however, i've run into another problem. the mag well (hole that the magazine goes into) is only half the depth that it needs to be. this was because of the automated STL fixer that i use (windows azure, for those curious) just did away with the mag well on the top half of the cut up model. and, since its automated, i had NO say in how it fixed the model. I've since learned how to fix it with the rest of the UNSC guns, but since this AR was the first time i ran into the problem, i decided to deal with the problem after printing. Thankfully, its a fairly straightforward fix. all i gotta do is trace the shape from the bottom half of the mag well and carve it out!

I used a hand drill to start drilling out the perimeter, then started pulling out chunks with a pair of hand pliers:
IMG_20170329_180957911_HDR.jpg
IMG_20170329_181300305_HDR.jpg
IMG_20170329_181435437_HDR.jpg

Finally, with the mag well done, i could fully assemble the rifle!
IMG_20170329_182906079_HDR.jpg
IMG_20170329_184411308_HDR.jpg
IMG_20170329_190429746_HDR.jpg
First-person glamor shot!
IMG_20170329_190448465_HDR.jpg

sliding the mag in:
IMG_20170331_121747737_HDR.jpg
IMG_20170331_122045232_HDR.jpg

Now, with the assembly done, it was time to sand! now, the problem with all these different filament colors is that it becomes really hard to see where i've sanded and spots that i've missed. so, to start, i hit it with a thin layer of normal primer that'll make it easier to see what needs to be smoothed down, then after that i'll bondo the seams and other little holes/mistakes, sand some more, then a layer of automobile filler primer should have it ready for the actual paintjob.
IMG_20170331_152846752_HDR.jpg
IMG_20170331_154019876_HDR.jpg

First round of sanding:
IMG_20170331_164017675_HDR.jpg
IMG_20170402_162657936_HDR.jpg
IMG_20170402_162715074_HDR.jpg
Then i made the wonderful discovery that primer clogs the HELL out of my sanding pads! so i burned through the last few that i had in a matter of minutes. i'll be buying more this week and taking another crack at the sanding this weekend hopefully. stay tuned!
 

Attachments

  • IMG_20170329_184441143_HDR.jpg
    IMG_20170329_184441143_HDR.jpg
    917.3 KB · Views: 579
I return with more updates! some great, some not so much...

So! we last left off with the first layer of primer that would let me see where i needed to sand down to get rid of all the print lines, but i blew through the last of my sanding pads before really getting anywhere. So! after a quick shopping spree, i stocked up on sanding pads, and also got automobile filler primer (to take care of any visible print lines that my sander couldn't get to, as well as just smoothing everything out) and all the colors i would need!
IMG_20170408_132124291_HDR.jpg

Also, the recon scope i printed as a single piece on the printrbot didn't really come out all that good, so since it was small enough i cut it up and printed it again on the ultimaker at ultra-high quality!
IMG_20170407_141610999_HDR.jpg
IMG_20170407_144952491_HDR.jpg
IMG_20170407_144958549_HDR.jpg
And attached it the same way i did the previous one:
IMG_20170407_145437276_HDR.jpg
IMG_20170407_145447832_HDR.jpg

Alright! now back to the main event! with a buttload of sanding pads, i went to TOWN on the assault rifle!
IMG_20170408_140627010_HDR.jpg
With everything as sanded as it was gonna get, i got the bondo ready, since there were QUITE a few gaps, seams, and other mistakes made by the printers:
IMG_20170408_142229637_HDR.jpg
IMG_20170408_142235851_HDR.jpg
IMG_20170408_142252081_HDR.jpg

First pass of bondo:
IMG_20170408_144124257_HDR.jpg
IMG_20170408_150445064_HDR.jpg
The barrel replacement, which had to be sanded down to fit the flash suppressor, and the newly printed Recon scope also needed some work:
IMG_20170408_150504150_HDR.jpg
Then the flash suppressor chomped down on the replacement barrel and wouldn't let go. probably gonna need to reprint...
IMG_20170408_161934970_HDR.jpg
Then we had ANOTHER little oopsie with some detail filing and an area where the shell was a little thinner than expected...
IMG_20170408_164447160_HDR.jpg
IMG_20170408_164522326_HDR.jpg

But after those little hiccups, the first round of bondo was done!
IMG_20170408_170706852_HDR.jpg
IMG_20170408_172718497_HDR.jpg
IMG_20170408_175539806_HDR.jpg
IMG_20170408_182943979_HDR.jpg

That's it for the image limit, END PART 1
 
BEGIN PART 2!

I was a bit in the zone and forgot to document the second round of bondo. once everything was sanded down and looking pretty, it was time for a layer of filler primer! after that, another layer of dark primer (this was to keep the final paintjob darker, since the shade of primer you use tends to REALLY influence the shade of the paint that goes over it) and finally the paintjob itself. not to spoil anything, but this is where things went south in a BAD way.

those with weak stomachs or faint of heart should turn away now...

Anyway! time for the first layer of filler primer!
IMG_20170408_183424419_HDR.jpg
IMG_20170408_184106758_HDR.jpg
IMG_20170408_184455315_HDR.jpg
the light gray REALLY makes the details pop on camera!
IMG_20170408_185923558_HDR.jpg
IMG_20170408_210327129_HDR.jpg

The sanding pad graveyard was starting to build in size...
IMG_20170408_210417324_HDR.jpg

After tons of sanding, both with the mouse sander AND by hand, next was the final layer of primer!
IMG_20170409_094259813_HDR.jpg
IMG_20170409_095336826_HDR.jpg

With the priming done, it was time to lay down the full paintjob! after looking at some reference pictures, it came down to three main colors:
halo-5-guardians-assault-rifle.jpg

The dark, blue-ish brushed steel of the main body (it was actually made up of 5 or 6 different shades, but i'm not THAT much of a stickler for detail, so one color would be enough), the olive drab green of the stock, front grip, and bottom of the magazine, and finally the lighter gray of the barrel hood. (with the white stripe as detail)

So, i went for the main body color first!
IMG_20170409_103746651_HDR.jpg
IMG_20170409_111846340_HDR.jpg

and this is the beginning of the disaster... i had Rustoleum "Dark steel" color, which, i was told by the clerk helping me at the hardware store, would come out smooth and dark, came out a nice sparkly chrome!
IMG_20170409_112212210_HDR.jpg

The other thing that i wasn't told (and stupidly didn't see, since i was busy trying to figure our proper colors for this project) was their line of "furniture paint", which goes on REALLY thick, takes a few DAYS to fully cure (despite feeling dry after a few hours), and does not come off easily.

LET THIS BE A LESSON TO EVERYBODY: ALWAYS HAVE SOMETHING ON HAND TO USE AS A TEST PIECE FOR PAINT YOU HAVE NOT USED BEFORE!

Now to start on damage control. after waiting a few hours, i tried to start sanding it off so i could re-apply primer and start over. remember when i said that, even though you can tough it and handle it after a few hours, it takes a few DAYS to fully cure? yeah, when i went at it with the sanding pad, the paint turned into half dried, sticky GUNK that the sander then deposited all over the rifle as i sanded!

IMG_20170409_125433804_HDR.jpg
IMG_20170409_125443524_HDR.jpg
This is what the sanding pad looked like when i finally realized what was going on:
IMG_20170409_134436989_HDR.jpg

So now not only was the thick paint not coming off, it was actually gunking up even MORE details as i tried to take it off! so it was personal now...

I grabbed an old, worn out file and started manually PEELING the gunked paint off in big curls:
IMG_20170409_130850872_HDR.jpg

after a few hours of switching between peeling and sanding (where i felt safe doing so) i reapplied the black primer:
IMG_20170409_134400820_HDR.jpg
It came out... less than okay. many areas had started to "crackle" because the primer had been laid on still-curing silver paint. but after several rounds of sanding and re-applying primer, it was looking "not-terrible"
IMG_20170409_141658009_HDR.jpg

So at this point, i pretty much just said "screw it". i had some rub-n-buff, which i could scrub onto the black primer to bring out the details in silver, and even though its a total cop-out in terms of personal quality standards, it would allow me to at least finish the rest of the paintjob and not have it look half bad while i try to figure out a way to not only fix the mess i'd gotten myself into, but also find the proper color. END PART 2
 

Attachments

  • IMG_20170409_132135538_HDR.jpg
    IMG_20170409_132135538_HDR.jpg
    920.4 KB · Views: 581
  • IMG_20170409_125501138_HDR.jpg
    IMG_20170409_125501138_HDR.jpg
    969.2 KB · Views: 494
Okay, so after spending an entire afternoon re-learning a very important lesson about testing paint colors before use, i soldiered on with the (semi-temporary) paintjob. like i said in the previous post, i had rub-n-buff as my "cop out" so i could finish painting the rifle.

For those of you who don't know, rub-n-buff is a waxy paint (in silver, gold, and other metallic colors) that you rub onto a rag, and then scrub onto a piece. The effect is similar to drybrushing, but is much more consistent and easier to use (especially over large surfaces). The result is a burnished, weathered metal look. It's a FANTASTIC way to quickly, easily, and very convincingly weather props and armor, and honestly looks fantastic no matter what (you'd have to try REALLY hard to mess up while using it). However, it highlights EVERYTHING. which means it'll make sharp lines and subtle textures super visible, but it will also make mistakes very visible as well.

This was the final pass of primer on the rifle body. for the most part it was back to normal, however the rear, around the magazine, was where i wasn't able to fix it very well:
IMG_20170409_143520474_HDR.jpg
IMG_20170409_143532475_HDR.jpg
IMG_20170409_143538116_HDR.jpg
IMG_20170409_143544062_HDR.jpg

It was especially frustrating because i had been working on a couple fallout 3 props a couple months ago, and spent DAYS trying to get a grimy, flaky paint texture. A texture that i had now emulated perfectly on the assault rifle that DOESN'T HAVE THAT AESTHETIC!

...anyway, time for the rub-n-buff:
IMG_20170409_144837282_HDR.jpg
IMG_20170409_144843247_HDR.jpg

Like i said, it makes things look GREAT on camera! However, holding it in person and being able to really look at the close-up details really shows the mistakes.
IMG_20170409_144852133_HDR.jpg
IMG_20170409_144900115_HDR.jpg

Anyway! onto the other areas! next up was the olive drab green parts.
IMG_20170409_145342186_HDR.jpg
IMG_20170409_152348415_HDR.jpg
IMG_20170409_152557812_HDR.jpg
IMG_20170409_153556865_HDR.jpg
IMG_20170409_153642129_HDR.jpg
IMG_20170409_153652637_HDR.jpg
IMG_20170409_153740362_HDR.jpg
IMG_20170409_153837886_HDR.jpg
IMG_20170409_154155422_HDR.jpg
It certainly brought back some much-needed encouragement to see the green come out identical to the in-game model!

Finally, the gray barrel hood!
IMG_20170409_154537956_HDR.jpg
IMG_20170409_154756319_HDR.jpg
IMG_20170409_161009960_HDR.jpg

Aaaand the image limit. END PART 3
 
Part 4!

Time for the last main part of painting!
IMG_20170409_161103797_HDR.jpg
IMG_20170409_161510051_HDR.jpg
IMG_20170409_161558054_HDR.jpg
IMG_20170409_161826833_HDR.jpg

This is a good lesson in how a paintjob can make or break a project. the main body was a pretty obvious "break" however, i'm SUPER happy with the rest of the paintjob, which "make" the prop!

Anyway, back to the detailing! the gray barrel hood looked a bit too flat once it was dry. so, i grabbed a file and weathered the HELL out of the edges and corners, along with random scuffs and scrapes. it looked great! (all things considered..)
IMG_20170409_162041642_HDR.jpg
IMG_20170409_164127043_HDR.jpg
IMG_20170409_164912019_HDR.jpg

As a final touch, i taped off the white stripe:
IMG_20170409_165833715_HDR.jpg
IMG_20170409_170011146_HDR.jpg
IMG_20170409_171128263_HDR.jpg

And that's that! at least for now.. However! i already have a game plan on what to do to fix the paint!

As soon as i got into class yesterday, i started asking a few professors about my problem (i go to an art school, so most professors have decades of expertise in tons of fields) and got an answer! i didn't think it was something that was done commercially, but apparently there are places that will mix a custom color into an aerosol spraypaint can for you! and the place that i was pointed to apparently sells them for ~$20 a can! so i'll be looking into that next. now, as for getting the paint off. since the other parts of the paintjob came out way better than expected, i'll be taping them up and doing a VERY careful acetone paint stripping. the reason this needs to be delicate is because, well, acetone MELTS PLA! so if i'm not careful, the entire prop will literally just start melting into a goopy mess of plastic. i talked with my manager in the Fab lab (whose a total guru when it comes to any sort of 3D printing) and he recommended watered down acetone instead of the full blown thing. so, i'm going to give nail polish remover a try. on top of all this, just last night the extruder on my home printer jammed for the third (and final) time in a week. i'll be taking apart the entire tool head and seeing if i can unclog the extruder, but if not it may mean ordering an entire new one, which will delay the carbine by a few weeks. so, expect SOME sort of update in the coming weeks!
 
would you mind making a list of all the pretty paints you used? :D
I have a printed AR (of my design) which needs to be painted, could you make a list of the paint colors, brands, and where you got them? Assuming you live in the US anyway.

And....Acetone doesn't melt PLA, Nor is it that destructive on ABS...
 
Last edited:
the olive green does match quite well indeed. cool prop. Looks like it`s ready for action!
yepp, acetone is nasty......
 
would you mind making a list of all the pretty paints you used? :D
I have a printed AR (of my design) which needs to be painted, could you make a list of the paint colors, brands, and where you got them? Assuming you live in the US anyway.

And....Acetone doesn't melt PLA, Nor is it that destructive on ABS...

the paints are sitting on my workbench at home, and i'm in my dorm, so i'll take pictures and do a post this weekend when i get back. and as for the acetone thing, that's what i thought too! but my manager knows his stuff, and he cautioned me against it pretty hard, so i'll be trying it out on a test piece to see how it reacts before cleaning the rifle itself.
 
that is super cool! i really want to make a needler 1 day but i want from halo 4. the crystals actually look like crystals and needles.
 
Alright, time for some good news! i started the stripping process, making sure to be VERY cautious, with a test piece on hand to make sure that whatever stripper i use won't melt the PLA underneath the paint. I haven't been able to go home and get access to my workbench thanks to finals, so i've ventured down into my dorm's basement studio space, so prepare for a lot of pictures that look like they're in a serial killer's underground butcher shop! Anyway, While the stripping was going on, i started reprinting the small detail pieces that got destroyed by the sanding process, along with the barrel replacement replacement:

(BTW, thanks to my job in the fabrication lab, i get to use the Ultimaker 2. lemme tell you guys, that $2500 price tag is well worth it. yu get what you pay for and more)
IMG_20170412_113601253.jpg

Testing out the flash suppressor with the new barrel
IMG_20170412_124609256.jpg

Dry run to see how it fit
IMG_20170412_124629239.jpg
IMG_20170412_124638315.jpg

Alright, now to prepare for stripping. i took some REAL ugly close up shots:
IMG_20170411_120734749.jpg
IMG_20170411_120739996.jpg
IMG_20170412_121902636.jpg

I pilfered the flammables cabinet to look for any leftovers, and found some paint thinner (which is weaker and less "dissolve everything it touches" compared to acetone) and gave it a try!
IMG_20170412_164919330.jpg
Checking it on the test piece, it takes a LOT of elbow grease but the paint does come off (slowly)
IMG_20170412_165058692.jpg
This was after about 20 minutes of scrubbing. obviously not enough oomph
IMG_20170412_165749082.jpg

So, i grabbed some acetone on my way home:
IMG_20170413_181741142.jpg
Que FOUR HOURS of careful scrubbing:
IMG_20170413_181745216.jpg
IMG_20170413_181751829.jpg
grabbed some primer, and laid down the first coat of fresh paint!
IMG_20170414_161736522.jpg
IMG_20170414_162041171.jpg
After that, a little sanding
IMG_20170414_173113057.jpg
IMG_20170414_173124643.jpg
Alright, that's the image limit, END PART 1
 

Attachments

  • IMG_20170412_165515901.jpg
    IMG_20170412_165515901.jpg
    684.1 KB · Views: 426
  • IMG_20170412_165332970.jpg
    IMG_20170412_165332970.jpg
    866.4 KB · Views: 380
Alrighty! so it's time to paint! i went into the scummiest, dirtiest industrial district of Oakland to go to a custom powdercoat paint shop to get a can of custom touch-up paint! now, normal powdercoating would have destroyed my piece just in the preparation process alone (for reference, powdercoating is the type of paint that goes on car exteriors. real thick stuff) HOWEVER they do custom-mixed cans of spraypaint to touch up a powdercoat paintjob that might have gotten scratched. either way, this meant that i could custom order a full can of spraypaint! i picked from a catalogue so i could get it there, and i'll try to track down the color for those of you asking for the colors i used.

Anyway, TIME TO PAINT!
IMG_20170417_151851584.jpg
I made sure to go slow and use thin coats, just in case (even though i already did a test piece) the previous disaster has left me SUPER paranoid!
IMG_20170417_152340090.jpg
IMG_20170417_153914820.jpg

It looks so. damn. good!

Time to pull off the tape!
IMG_20170417_180502870.jpg
IMG_20170417_180817324.jpg
you have no idea how good it feels to see this with a good paintjob!
IMG_20170417_181000173.jpg

Not done yet though! next up was a few dials and little detail bits that were black

IMG_20170417_181915474.jpg
IMG_20170417_181919727.jpg
IMG_20170417_183822601.jpg
IMG_20170417_183829945.jpg
IMG_20170417_184007014.jpg
IMG_20170417_192616489.jpg
IMG_20170417_193513474.jpg
IMG_20170417_193836582.jpg

Finally, the barrel!
IMG_20170417_195159234.jpg
IMG_20170417_195441945.jpg

And one more, exhausted glamor shot!
IMG_20170417_223033903.jpg

That's it for this update. there's still work to do to get it perfect though! one of the things i need is the ammo counter screen. if any of the 3D modelers happen to have it laying around in a texture folder, I NEED IT!
stay tuned!
 

Attachments

  • IMG_20170417_193538187.jpg
    IMG_20170417_193538187.jpg
    674 KB · Views: 392
Alright! time to finish of this Assault rifle paintjob!

First of all, for mblackwell and everyone else that was asking for a paint list, here ya go!
IMG_20170422_135417805.jpg


However, i really don't want to reccomend the custom color i ended up getting, even though its a great color. as it turns out, it's a lead based paint. and not only that, but it was rubbing off VERY easily! i don't know about you guys, but i don't really want legionnaires disease! my fix was to do a couple layers of clear satin protective enamel.

Anyway! onto the detailing! first up, i cranked up the detail on the ultimaker to print the little bits that had to be removed thanks to sanding:
IMG_20170418_120803054.jpg
IMG_20170418_121346685.jpg

And time for paint:
IMG_20170421_114807664.jpg

while that was drying, i taped up the rifle to touch up parts that had been sanded down too much, and were showing filament. some of this was from detailing, while other parts (like the handle around the trigger) was simply rubbing off, like i mentioned earlier (which is NOT GOOD when its lead-based paint!)
IMG_20170421_115135127.jpg
IMG_20170421_115142782.jpg

After that, the tape came off and the final details got glued in:
IMG_20170421_122723250.jpg
IMG_20170421_124243308.jpg
IMG_20170421_125157944.jpg
IMG_20170421_125228247.jpg

Finally, the stripe is the last thing to be painted:
IMG_20170421_125935569.jpg
IMG_20170421_131420952.jpg
IMG_20170421_131639139.jpg
IMG_20170421_145148183.jpg
Start of the weathering, while its half-dried, so it comes off a little more clean:
IMG_20170421_151250865.jpg

After that, since i'm so anal about detail, i went in with an airbrush to make the scratches and stuff more visible:
IMG_20170422_124440559.jpg
...and turned myself into a leopard in the process...
IMG_20170422_124507270.jpg

That's it! all painting is done! the only thing left is the protective varnish!
IMG_20170422_130336153.jpg
IMG_20170422_135445271.jpg
 
PART 2!

i keep saying its done and adding more details, don't I? well, either way, before the protective coat went on, i did some light detailing with the rub-n-buff:
IMG_20170422_140408824_HDR.jpg
IMG_20170422_140418176.jpg
IMG_20170422_140422882.jpg
IMG_20170422_140431931.jpg
IMG_20170422_140448406.jpg
And JUST before i took it out to seal i remembered the little green details on the back!
IMG_20170422_143011986.jpg

Finally, the last step:
IMG_20170422_143244018.jpg
IMG_20170422_183444733.jpg

IT'S DONE! so, i took it to my college to use their cameras/light tables to take some (semi) professional glamor shots!
003A5278-min.JPG
003A5279-min.JPG
003A5283-min.JPG
003A5284-min.JPG
003A5285-min.JPG
003A5290-min.JPG
003A5298-min.JPG
003A5305-min.JPG
003A5309-min.JPG
003A5311-min.JPG


Next up: a big update on the carbine, and my 3D printing woes! stay tuned.
 
Status
Not open for further replies.
Back
Top