You are using an out of date browser. It may not display this or other websites correctly.
You should upgrade or use an alternative browser.
You should upgrade or use an alternative browser.
Sub's ODST foam build thread
- Thread starter SubXzeroXhero
- Start date
- Status
- Not open for further replies.
Rock Lobbster
Sr Member
- Member DIN
- S098
That is some crazy clean foamwork there. Looking forward to yet another Helljumper joining the crew!
- Member DIN
- S068
Mechace13 this thread is nearly two years old and you would have had to hit the confirmation checkbox.where did you get the template and what was the program above
Please remember the previous warnings that Division Staff have issued on this and other topics.
- Member DIN
- S024
Ok so I know it has been a HOT minute since I posted anything but I have not given up! I also have a ton to update on the build. I realized the other day I had posted updates mostly on facebook and instagram but I forgot to update here! My apologies!
So what has happened since then. A lot of life and such getting in the way and a bunch of commissions and such but now I am determined to get this done.
Also Between then and now 343 released the rookie cosplay guide and well..... I had to remake a few things to better match the scale.
what has been worked on:
Chest pieces have been rescaled and remade.
Back plate has been made
gloves are done
fanny pack done
hip canisters done this week
helmet sanded and primed
forearms are done
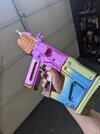
magnum has been painted and weathered
Ditched the silenced sub due to some issues i was having with the model.
printed off the Commando rifle from TurboCharizard and started glue up
Vacuum former built, and started testing for a visor pull.
thighs have been built
stencils for the shins are cut, getting ready to start cutting foam this week.
Getting really close to finishing! My goal is to finish in time for Summercon here in washington.
My apologies again to the moderators for my lack of posting. I will get back to regularly updating this build.
Some photos of the progression so far.
Increased the scale on the chest pieces after comparing to the photos in the rookie cosplay guide.


Made glove covers to match what was seen in game. Eva foam and foam clay worked well after making a stencil.Back plate and butt plate.


Bracers with Eva foam.( Also COVID beard)

Thighs done minus possibly adding the drop pouches. Combination of 10 mm 5mm and 2mm foam


Details of the fully painted magnum. I also printed the socom pistol but the magnum is by far more comfortable to hold so might just hold onto this one for now.


Helmet fully sanded and primed just waiting for final paint.


So what has happened since then. A lot of life and such getting in the way and a bunch of commissions and such but now I am determined to get this done.
Also Between then and now 343 released the rookie cosplay guide and well..... I had to remake a few things to better match the scale.
what has been worked on:
Chest pieces have been rescaled and remade.
Back plate has been made
gloves are done
fanny pack done
hip canisters done this week
helmet sanded and primed
forearms are done
magnum has been painted and weathered
Ditched the silenced sub due to some issues i was having with the model.
printed off the Commando rifle from TurboCharizard and started glue up
Vacuum former built, and started testing for a visor pull.
thighs have been built
stencils for the shins are cut, getting ready to start cutting foam this week.
Getting really close to finishing! My goal is to finish in time for Summercon here in washington.
My apologies again to the moderators for my lack of posting. I will get back to regularly updating this build.
Some photos of the progression so far.
Increased the scale on the chest pieces after comparing to the photos in the rookie cosplay guide.
Made glove covers to match what was seen in game. Eva foam and foam clay worked well after making a stencil.Back plate and butt plate.
Bracers with Eva foam.( Also COVID beard)
Thighs done minus possibly adding the drop pouches. Combination of 10 mm 5mm and 2mm foam
Details of the fully painted magnum. I also printed the socom pistol but the magnum is by far more comfortable to hold so might just hold onto this one for now.
Helmet fully sanded and primed just waiting for final paint.
Last edited:
- Member DIN
- S024
- Member DIN
- S024
more photos of the commando rifle build and the hip canisters.
Starting the assembly for the rifle to start sanding in between other parts.
3d printed, sanded, and primed the caps for the hip canisters and then wrapped 100 mm sections of PVC pipe in craft foam sheets to get the correct outer diameter


Starting the assembly for the rifle to start sanding in between other parts.
3d printed, sanded, and primed the caps for the hip canisters and then wrapped 100 mm sections of PVC pipe in craft foam sheets to get the correct outer diameter
Last edited:
- Member DIN
- S018
Oh dang, the details in that - looking sweet! When's the con you're aiming for?
- Member DIN
- S024
June 17-19. Steve Downes and Jen Taylor will be guests there along with the local 405th so I'm using this as "motivation" to try and finish!
- Member DIN
- S024
For the vacuum former. I built a heating box to fit over a cheap patio heater that I got off of Amazon with an opening at the top to fit a piece of PETG at 11x14. I then covered the interior of the box with aluminum tape to reflect the heat back inwards and protect the surface from scalding or absorbing too much heat.
So far it "works" having some issues with bubbles in the plastic ( likely due to sitting in my garage too long in the PNW) and getting a smooth pull from the puck.
Hoping to get something that I am happy with but first I need more PETG.


So far it "works" having some issues with bubbles in the plastic ( likely due to sitting in my garage too long in the PNW) and getting a smooth pull from the puck.
Hoping to get something that I am happy with but first I need more PETG.
- Member DIN
- S068
So you're saying that I get to meet this costume at Summer Con? Awesome!June 17-19. Steve Downes and Jen Taylor will be guests there along with the local 405th so I'm using this as "motivation" to try and finish!
- Member DIN
- S024
That's the plan! Nothing like a little con crunch to make things happen!So you're saying that I get to meet this costume at Summer Con? Awesome!
- Member DIN
- S024
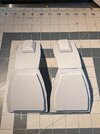
Not a huge update since I've only had one day off this week but working on the knee plates and rough assembly of the commando. Had to reprint a piece of the receiver but good to go now. I'll work on hitting it with a thin layer of XTC3D soon.
Knee plates are coming along. Went back this morning to fix the detail at the top after logging into MCC to look at the model instead of a flat image. My hope it to have shins done by this weekend and then maybe start priming foam with sealant.


Knee plates are coming along. Went back this morning to fix the detail at the top after logging into MCC to look at the model instead of a flat image. My hope it to have shins done by this weekend and then maybe start priming foam with sealant.
Attachments

- Member DIN
- S024
Back with another update after a longish weekend in the garage.
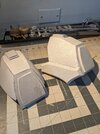
Finished cutting the knee guards. I am very pleased with the repair I had to do with the first one. I accidentally added an extra chamfer to the back side edge of the guard. Using some foam clay i rebuilt the edge and let it dry overnight and came back with a dremel and knocked it back down. The transition is almost seamless!
Highly recommend for anyone looking to do a foam build to get a bucket of the foam clay. Its great for filling in gaps and will hide a little better than quick seal when its all said and done.


Hit all the 3d parts with a thin layer of XTC-3D. It was a bit old at this point so I added a little heat to the drying parts to make sure it cured properly. Now all the parts have been coated and will be ready for sanding.


Finally started to cut out the dreaded Shins. This was the part that i was least looking forward to. The geometry is pretty crazy, also the files from the armory have some variations that with things like the rookie cosplay guide and the ability to go into MCC and take higher resolution photos kind of stand out. (at least in my eyes). Constantly pausing my work to go back into theatre and look at the in game model to take a closer look.
So far so good. I will be going back with some of the foam clay to make the detail on the back of the shin more of a smooth cut away like seen in the game.
Essentially at the point where i just have to make the front of the shin, you know.... once i figure out how i am going to do it. The detail at the top of the shin I am still wrapping my head around how i plan on cutting it out. Hopefully I will have it done before the weekend hits (or at least by this weekend) and then I will start with filling and prime coating the parts while also adding any small details like rivets and such to the pieces I have made so far
.


I would like to also try to prep for adding the hard case backpack but with the deadline I have I don't want to hamstring myself with something I can always add on at a later point.
Here is what i have completed so far for this build. I'm very exited to putting it all together!

Finished cutting the knee guards. I am very pleased with the repair I had to do with the first one. I accidentally added an extra chamfer to the back side edge of the guard. Using some foam clay i rebuilt the edge and let it dry overnight and came back with a dremel and knocked it back down. The transition is almost seamless!
Highly recommend for anyone looking to do a foam build to get a bucket of the foam clay. Its great for filling in gaps and will hide a little better than quick seal when its all said and done.
Hit all the 3d parts with a thin layer of XTC-3D. It was a bit old at this point so I added a little heat to the drying parts to make sure it cured properly. Now all the parts have been coated and will be ready for sanding.
Finally started to cut out the dreaded Shins. This was the part that i was least looking forward to. The geometry is pretty crazy, also the files from the armory have some variations that with things like the rookie cosplay guide and the ability to go into MCC and take higher resolution photos kind of stand out. (at least in my eyes). Constantly pausing my work to go back into theatre and look at the in game model to take a closer look.
So far so good. I will be going back with some of the foam clay to make the detail on the back of the shin more of a smooth cut away like seen in the game.
Essentially at the point where i just have to make the front of the shin, you know.... once i figure out how i am going to do it. The detail at the top of the shin I am still wrapping my head around how i plan on cutting it out. Hopefully I will have it done before the weekend hits (or at least by this weekend) and then I will start with filling and prime coating the parts while also adding any small details like rivets and such to the pieces I have made so far
.
I would like to also try to prep for adding the hard case backpack but with the deadline I have I don't want to hamstring myself with something I can always add on at a later point.
Here is what i have completed so far for this build. I'm very exited to putting it all together!
- Member DIN
- S024
here are some of the detail shots I took in game of the shin. You can see easier the detail at the back of the calf and shin along with the side profile.
The front of the shin is where the armory pep files differ a bit from the in game assets. Its doable but there will be a bit of deciphering on how to cut it and then figure out how im going to get the thing on and off.


The front of the shin is where the armory pep files differ a bit from the in game assets. Its doable but there will be a bit of deciphering on how to cut it and then figure out how im going to get the thing on and off.
- Member DIN
- S024
Finally after slaving over them in any spare time I could find the shins are assembled! I really tried to make them as accurate to the game as possible so it took a lot of going back and forth with the reference photos I took.
The particularly difficult part was the detail at the top of the shin. Had to spend a ton of time looking at it in game from the front then the side and figuring how to transfer it to foam. Ended up cutting it too short and had to carefully remove the front shin details, add a shim, and then reattach it higher and flush with the other pieces
.


After that I had to attach the details that are on the top of the shin once i got all the angles cut.


Did a quick sizing test to see how it all comes together, I think the knee plate could stand to have a size increase but I think i will go with it for now and i could always upgrade down the road but for now its trying to finish in time for summercon.


Having some issues with vacuum forming the visor. I noticed some small bubbles on the last pull but only where it was touching the buck, figured something on the surface could be off gassing. Trying to print a new one with ABS instead of PLA but its also my first time printing with ABS. Using my paint booth as an enclosure while its printing but I had some warping.
Consensus to try next: Print it in two sections, add a heater to the paint booth, remove the filament guide that prevents the door from closing all the way, and increase the bed temp.


Speaking of the helmet, bought some padding to put inside and did the quick install. So nice to finally "wear" it!


Alright its Time to start working on some of the details and getting parts primed for coating and painting then to get to the strapping!
The particularly difficult part was the detail at the top of the shin. Had to spend a ton of time looking at it in game from the front then the side and figuring how to transfer it to foam. Ended up cutting it too short and had to carefully remove the front shin details, add a shim, and then reattach it higher and flush with the other pieces
.
After that I had to attach the details that are on the top of the shin once i got all the angles cut.
Did a quick sizing test to see how it all comes together, I think the knee plate could stand to have a size increase but I think i will go with it for now and i could always upgrade down the road but for now its trying to finish in time for summercon.
Having some issues with vacuum forming the visor. I noticed some small bubbles on the last pull but only where it was touching the buck, figured something on the surface could be off gassing. Trying to print a new one with ABS instead of PLA but its also my first time printing with ABS. Using my paint booth as an enclosure while its printing but I had some warping.
Consensus to try next: Print it in two sections, add a heater to the paint booth, remove the filament guide that prevents the door from closing all the way, and increase the bed temp.
Speaking of the helmet, bought some padding to put inside and did the quick install. So nice to finally "wear" it!
Alright its Time to start working on some of the details and getting parts primed for coating and painting then to get to the strapping!
- Member DIN
- S024
Alright slowly but surely it is coming along.
printed off a new buck with my enclosure with a small desk heater to help keep the enclosure warm. Printed it in two sections and welded it together with abs paste and a little bondo.


With a little help from PerniciousDuke with vacuum forming we successfully got some good pulls from the form. There is the most subtle seem line in the visor which bugs me but i will accept it for now.


Also did some tests for coloring and adding chrome to the visor so not to waste any good ones. The color came out not quite as intended but I actually really like it! hoping to get something close to it when I go to color the actual visor.

As for the foam! I have been priming everything piece by piece with a wash of kwik seal and water along with some gap filler of just kwik seal. Once its dry I usually give it a nice light sanding. This i find helps fill in some of the porousness of the foam and makes it easier to have a clean and even surface when I go to coat the pieces in rubber. I grabbed some more leak seal for the project and I may experiment with some other coatings on some of the smaller pieces as well. I prefer leak seal over plasti dip since i find that the coating goes on thicker and more even and is less prone to cracking or tearing.
I have also taken the time to mod the shins and the forearms with scoops to allow for better range of movement but tried to cut them in a fashion that made sense and maintained a similar design to halo armor. This was also the time I experimented with methods of putting on the shins so that i can still secure my boots when I go to wear the armor.
Added some details to the chest UA plate and should finish that this week. The back side of it is hollow so I am considering making a cut out in the base armor that goes to a compartment in there to add a speaker for when I wear the helmet.
Also received a molle belt for attaching all the hip pieces( pictured below from the cosplay guide)


printed off a new buck with my enclosure with a small desk heater to help keep the enclosure warm. Printed it in two sections and welded it together with abs paste and a little bondo.
With a little help from PerniciousDuke with vacuum forming we successfully got some good pulls from the form. There is the most subtle seem line in the visor which bugs me but i will accept it for now.
Also did some tests for coloring and adding chrome to the visor so not to waste any good ones. The color came out not quite as intended but I actually really like it! hoping to get something close to it when I go to color the actual visor.
As for the foam! I have been priming everything piece by piece with a wash of kwik seal and water along with some gap filler of just kwik seal. Once its dry I usually give it a nice light sanding. This i find helps fill in some of the porousness of the foam and makes it easier to have a clean and even surface when I go to coat the pieces in rubber. I grabbed some more leak seal for the project and I may experiment with some other coatings on some of the smaller pieces as well. I prefer leak seal over plasti dip since i find that the coating goes on thicker and more even and is less prone to cracking or tearing.
I have also taken the time to mod the shins and the forearms with scoops to allow for better range of movement but tried to cut them in a fashion that made sense and maintained a similar design to halo armor. This was also the time I experimented with methods of putting on the shins so that i can still secure my boots when I go to wear the armor.
Added some details to the chest UA plate and should finish that this week. The back side of it is hollow so I am considering making a cut out in the base armor that goes to a compartment in there to add a speaker for when I wear the helmet.
Also received a molle belt for attaching all the hip pieces( pictured below from the cosplay guide)
Attachments
- Member DIN
- S128
We did a thing!
Your armor is coming along great!
- Member DIN
- S829
Wait PerniciousDuke - you have a vacuum forming setup in your living room?
- Member DIN
- S128
I live in a 600sft 1BR Apartment so all I really have is a living room. Lol. I do have a similar, but smaller former I can set up, but the one pictured is SubXzeroXhero 's that he brought over.Wait PerniciousDuke - you have a vacuum forming setup in your living room?
- Status
- Not open for further replies.