Xcoser ODST Helmet Repaint & Potential Full Build

Status
Not open for further replies.

Deviss65

New Member
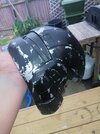
I guess this is the start of my ODST journey, I've got the skillset now that I think I can create some cosplay work that would be up to my own standard and sorting a helmet is the first part of that journey. I've got a few ideas on how to build the full armour but for now I think well keep this focused on the helmet. I was pleasantly surprised at the quality and customer service I got purchasing an ODST helmet from Xcoser, the model isnt perfect but I think that actually makes it better as a prop piece. I can't quite put it into words but the hard-edged 3d printed ODST helmets don't quite hit the mark for me.

Anyway saying the Xcoser helmets are worth the money kind of depends on your own financial situation but I'm more than happy with the one that arrived to me, minus the paint job of course but that was never really an issue.

00.jpg
01.jpg
 
First step was getting the paint and priming the thing, I don't have access to my airbrush at the moment so went for the 100ml Tamiya Spray Cans, from my experience these things are amazing and have a surprising amount of coverage, easily enough for multiple coats per can and they completely dry in like an hour. They often touch dry while you're still spraying in hot climates.

Anyway here's the helmet primed, doesn't look like much at this point but the surface quality wasn't too bad at all. I forgot to mention I also sanded off the Xcoser logo before this.

02.jpg
03.jpg
 
The weathering effect that I went for was more of a chipping effect and less scratching like a lot of people seem to do, I just find it super fun and easy to use the liquid mask which creates some great high-quality chipping if you're accustomed to it. I believe the WETA ODST uses a very similar method too.

Anyway here's the black layer on and some pics of after I've peeled some mask off. I can already tell I've overdone it a bit but it's easily fixable when I get to the greys.

07.jpg
08.jpg
09.jpg
 

Attachments

  • 08.jpg
    08.jpg
    142.7 KB · Views: 163
I basically repeated the last step but with the Tamiya 'German Grey' over the black which worked a charm, I didn't want the grey of the helmet to be too light compared to the rest of the helmet. I toned down some of the chipping by not masking all of it so it could be recovered but I definitely need another layer to get rid of some more of the excess chipping.

I gotta be a bit careful here as I can always take away chips but cant add them without restarting or hand painting which just doesn't look as nice.

10.jpg
 
As of posting all of these, this is where I've reached so far, much happier with how it looks at the moment but I've still got to do the colour strips, decals, weathering wash, and then finally the visor. I plan to get some fine wire mesh to paint black and inlay into the vent areas too.

Heres the helmet and my curious cat.

12.jpg
11.jpg

13.jpg
14.jpg
 
Added a plastic/rubber trim around the edge which also looks quite good and hides some of the rough trimming from the helmet cast. Just cut a line through the length of this tubing but if it isn't straight it'll want to twist and turn and it makes it a pain to put on the helmet. The best way I found to make sure it was slit straight was to leave it flat and coiled like it wants to be as you cut around the edge.

147103372_2936758393273260_3263878742544936162_n (1).jpg
148610020_229173832174409_8742344070489014816_n.jpg
147648322_414240953139528_7518003245612003552_n.jpg
 
that tubing is genius. i was thinking of a way to neaten up the edge inside the bucket. what kind of tubing is that?
 
Awesome paint job and great idea with the tubing! I'm planning on doing a gasket out of EVA foam but now I have to consider that tubing too! A+!
 
Digging this all around dude!!! Excellent weathering and the ONI logo is really original. Also like the idea with the trim. Will likely add that this mine as well. The edge seems to be most brittle with these helmets, I recommend reinforcing with epoxy on the inside. Mine had already cracked in a couple places down there!
 
Status
Not open for further replies.
Back
Top